New Piwik PRO Templates In Server-side Google Tag Manager
Piwik PRO has two new server-side Google Tag Manager templates, and this article explains what they are and how they work.
The first template, Piwik PRO Client, is designed to work in unison with the Piwik PRO HTTP API. Most often these requests are generated by the Piwik PRO JavaScript tracker, but theoretically any HTTP source that uses the same schema can send requests for the Client to claim. Once the Client claims the request, it generates an event data object that can be consumed by tags in the server-side Google Tag Manager container.
The second template, Piwik PRO, is a tag template that takes the event data object, compiles it into the format required by the Piwik PRO HTTP API, and then dispatches it to the Piwik PRO instance.
These two templates enable (at least) these two approaches:
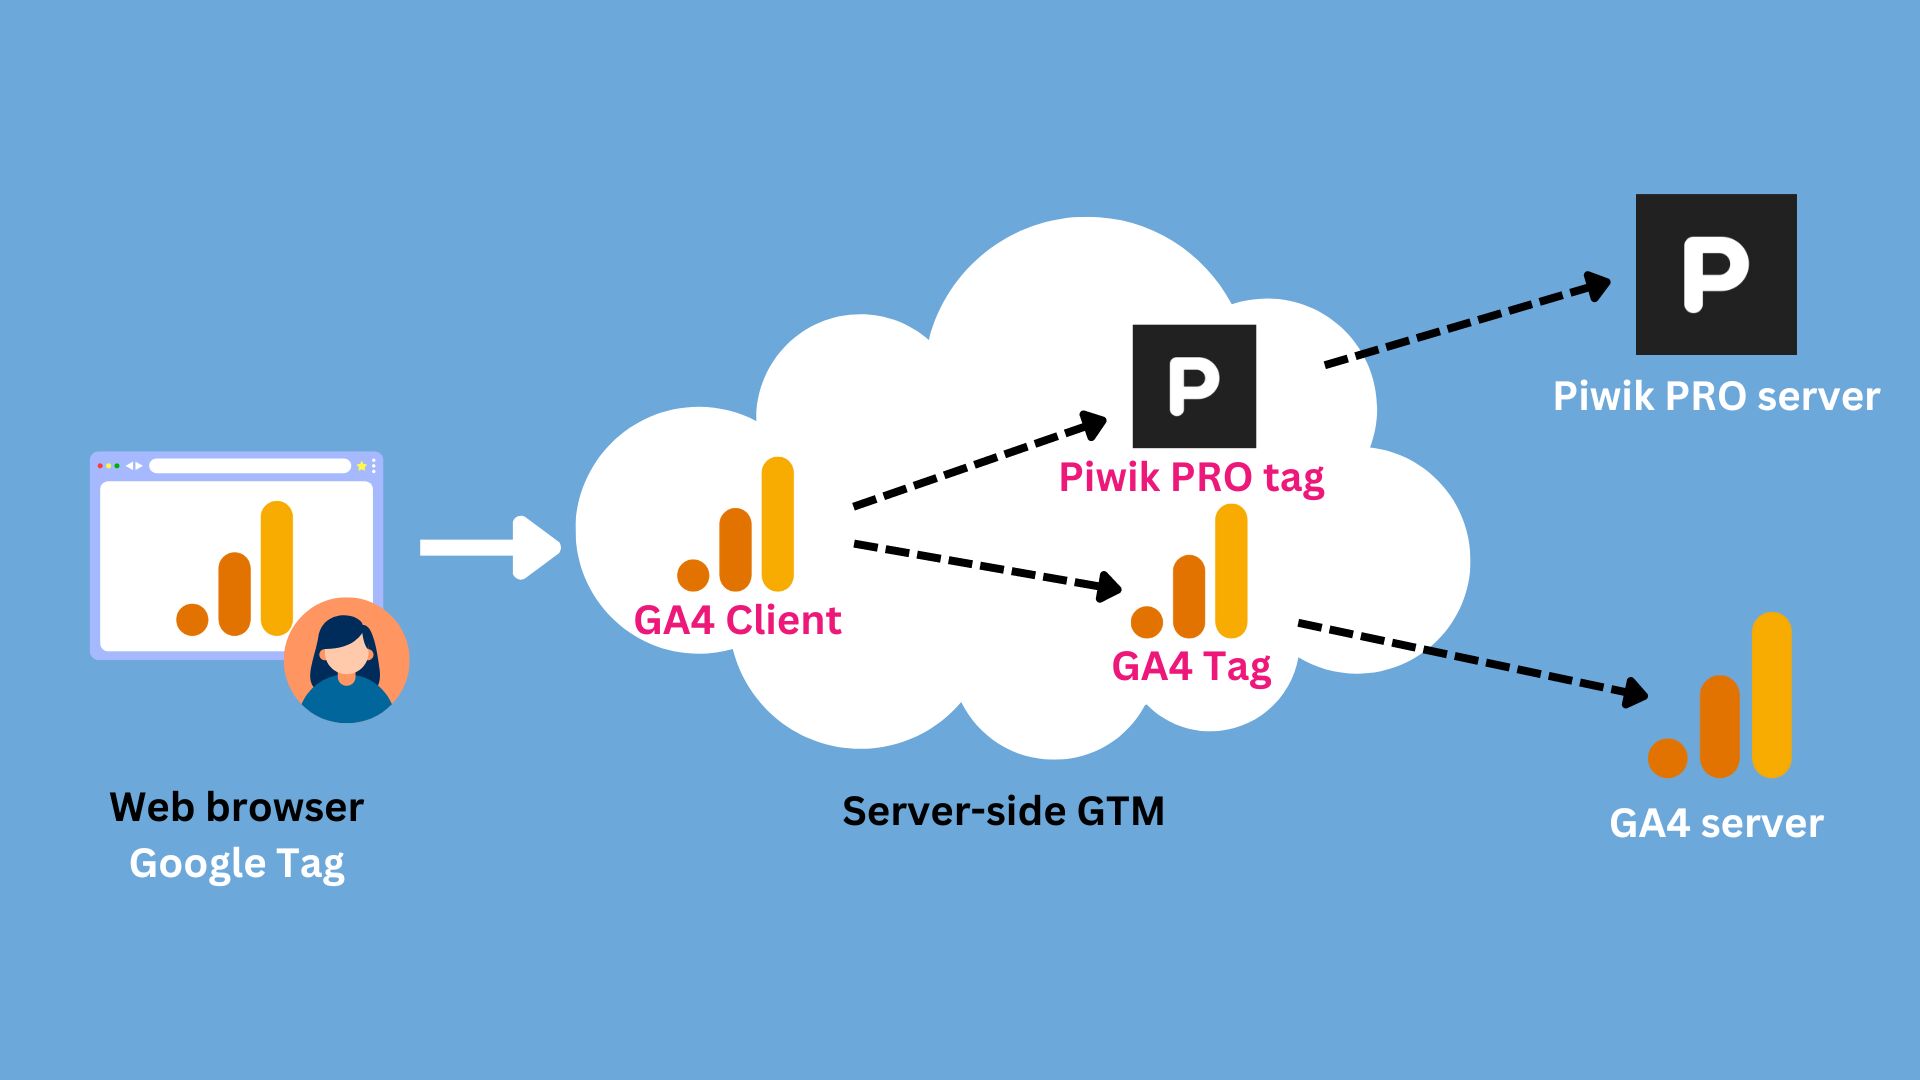
- Use some other vendor’s tracker, such as Google Tag in the browser. Forward the hits to server-side Google Tag Manager. Claim the requests with the vendor’s own Client (such as the GA4 Client), and use this data to fire the vendor’s own tag as well as the Piwik PRO tag.
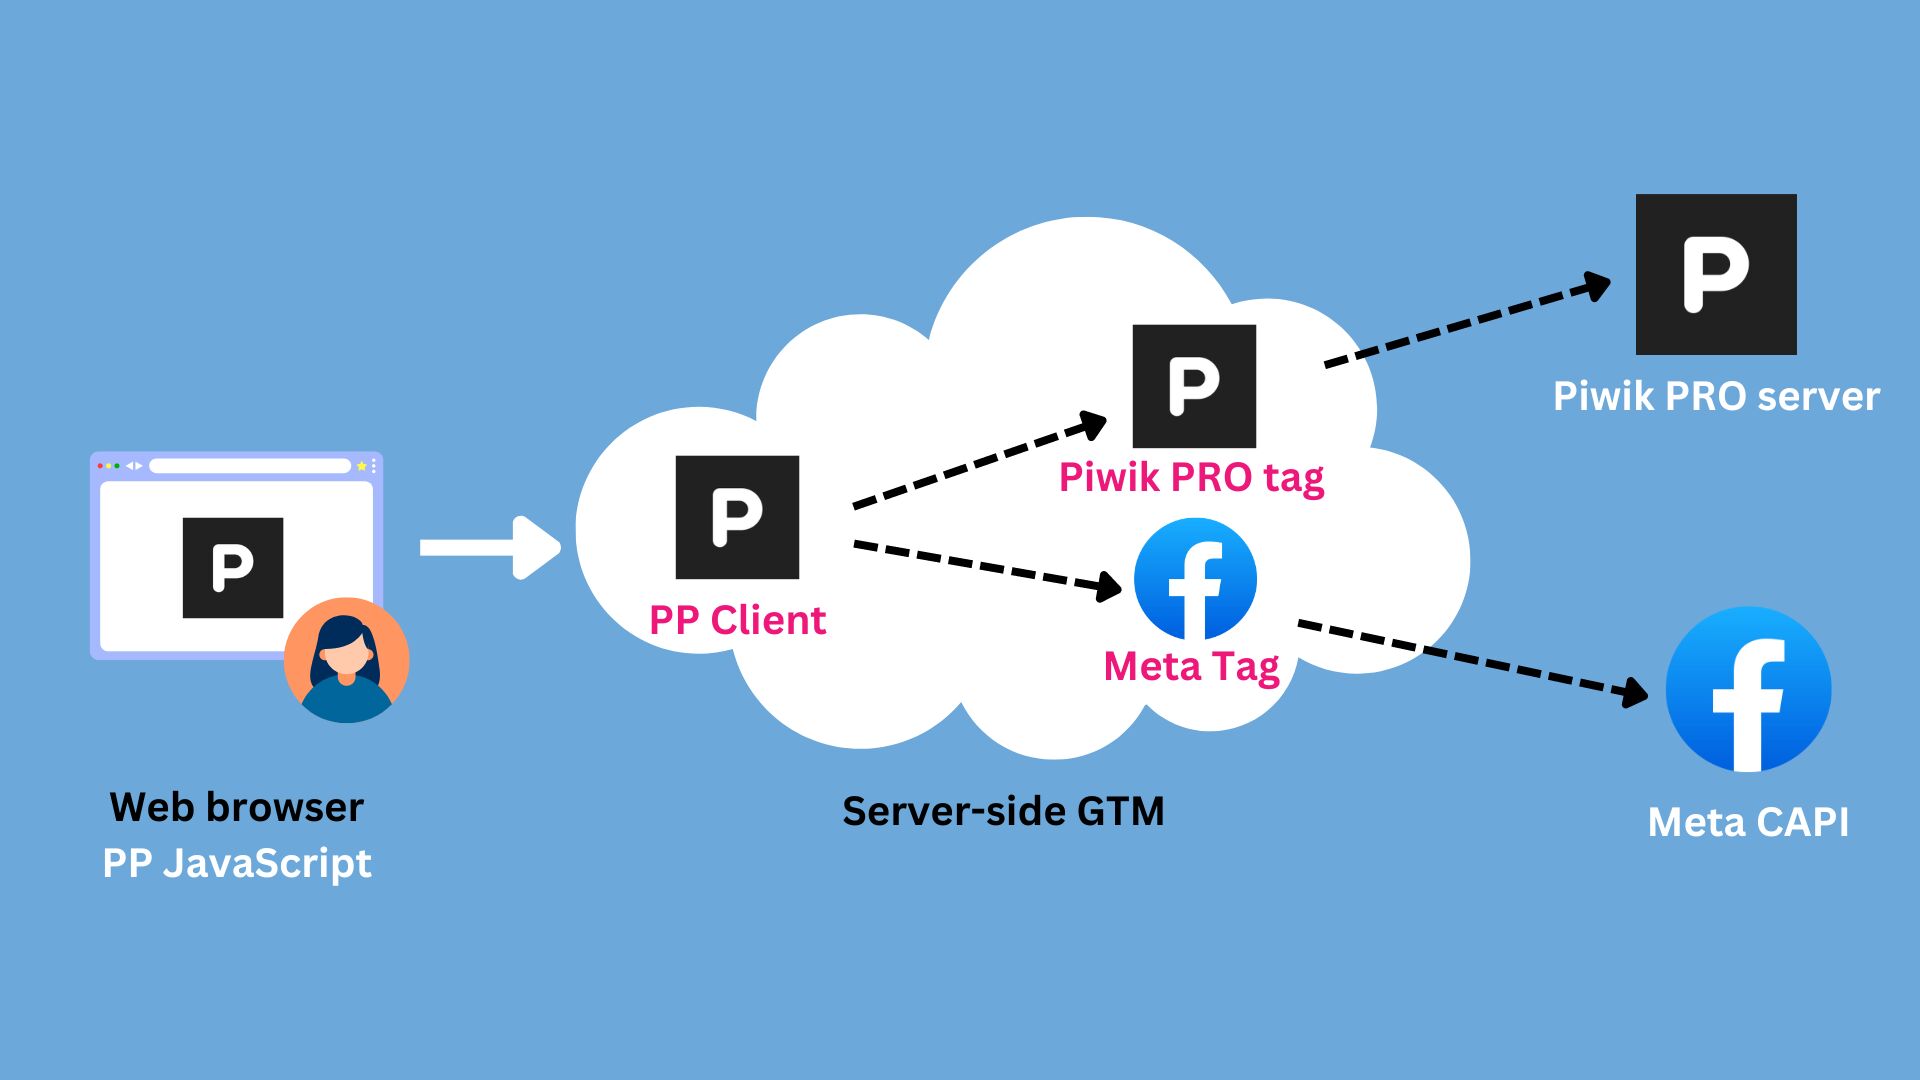
- Use the Piwik PRO JavaScript tracker in the browser. Forward the hits to server-side Google Tag Manager. Claim the requests with the Piwik PRO Client, and use this data to fire the Piwik PRO tag and other vendors’ tags, too, such as those designed for Google Ads and Meta Conversions API.
If you’re curious about the first approach, check out this article I’ve written about mapping Google Analytics 4 data to Piwik PRO using the new Piwik PRO tag template.
Table of Contents
The Simmer Newsletter
Subscribe to the Simmer newsletter to get the latest news and content from Simo Ahava into your email inbox!
The Client template
The Piwik PRO Client template has been designed to capture requests that originate in Piwik PRO’s client-side libraries.
For example, with the JavaScript API, you can use a command like this to route all subsequent events by the tracker to your server-side Google Tag Manager endpoint:
_paq.push(["setTrackerUrl", "https://sgtm.my-website.com/ppms.php"]);
If you’re using the Piwik PRO Analytics template for client-side Google Tag Manager, you can use the Use a custom tracker URL setting to achieve the same easily:
When a request comes in for the /ppms.php resource, the Piwik PRO Client (in server-side Google Tag Manager) claims the request and proceeds to generate an event data object with both common event data keys as well as Piwik PRO-specific items.
How to install the template
Because Google Tag Manager’s Community Template Gallery doesn’t support distributing Client templates, you need to install the template manually.
First, navigate to the template.tpl file in the GitHub repo for the Client by following this link. Download the file to your device.
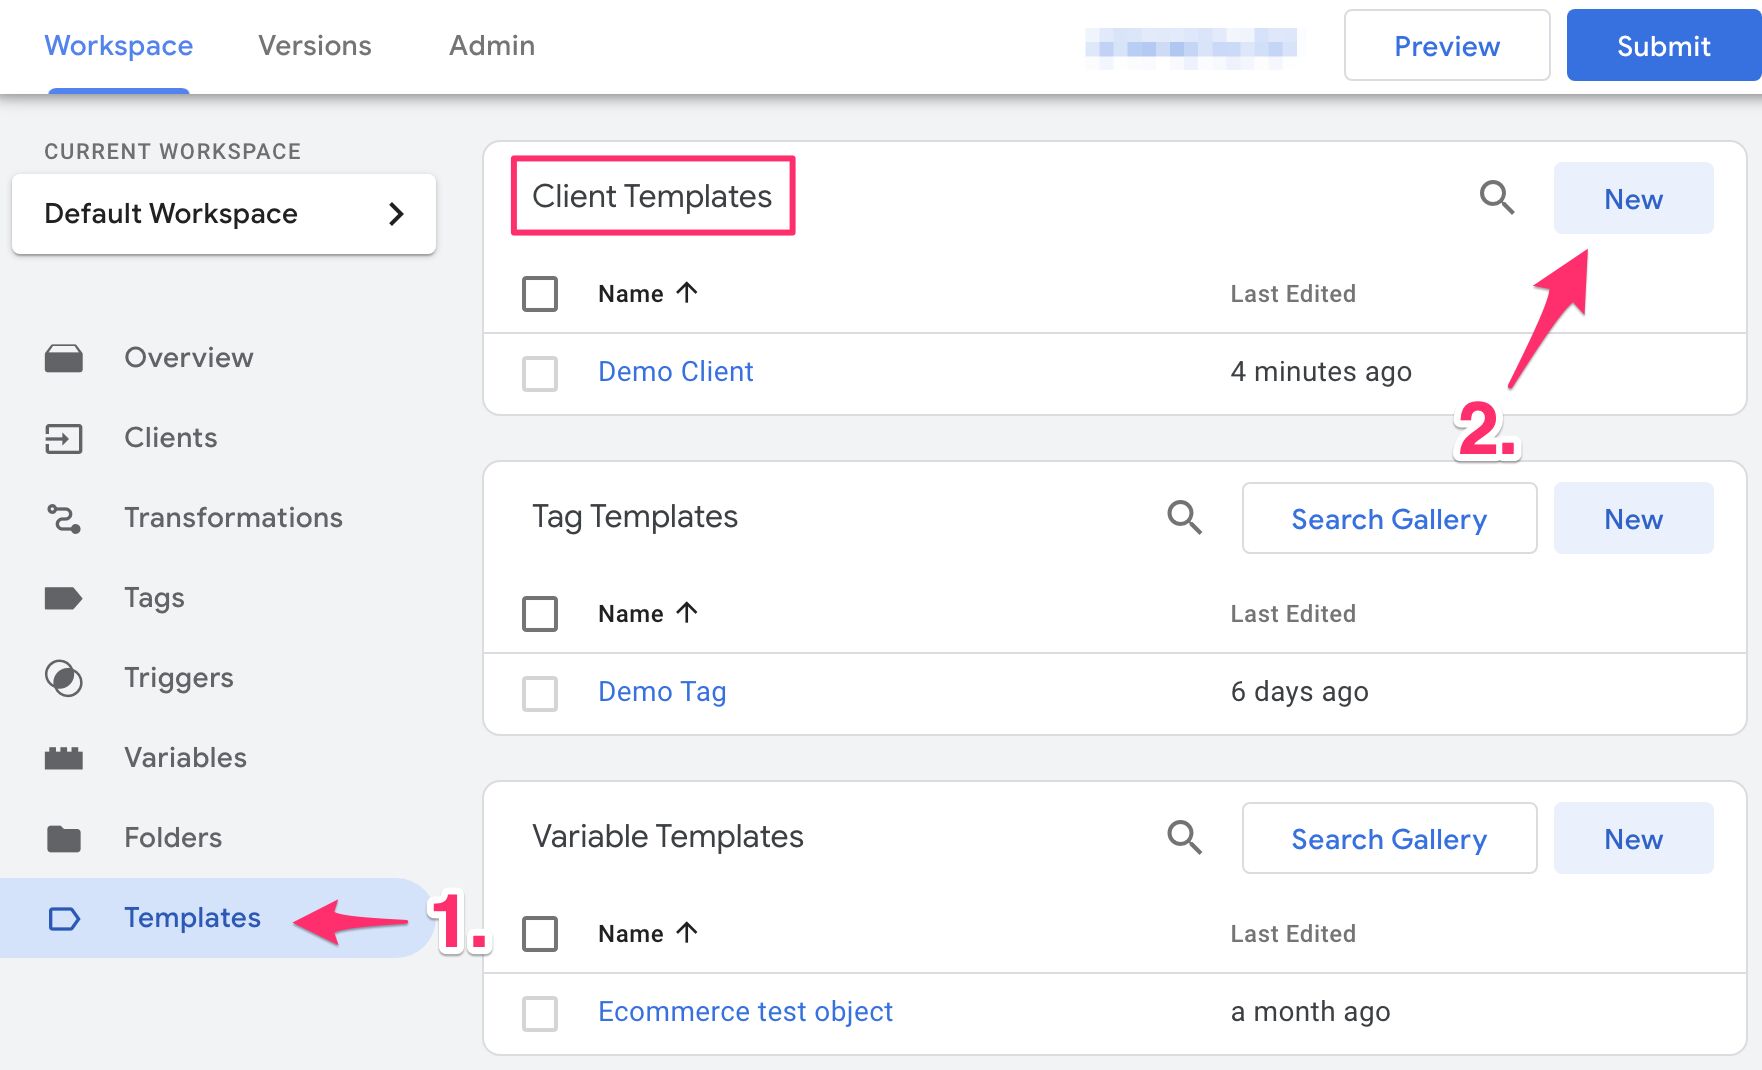
Then, in your server-side Google Tag Manager container, browse to Templates and create a new Client template.
Once the editor opens, click the overflow menu in the top-right corner and choose Import.
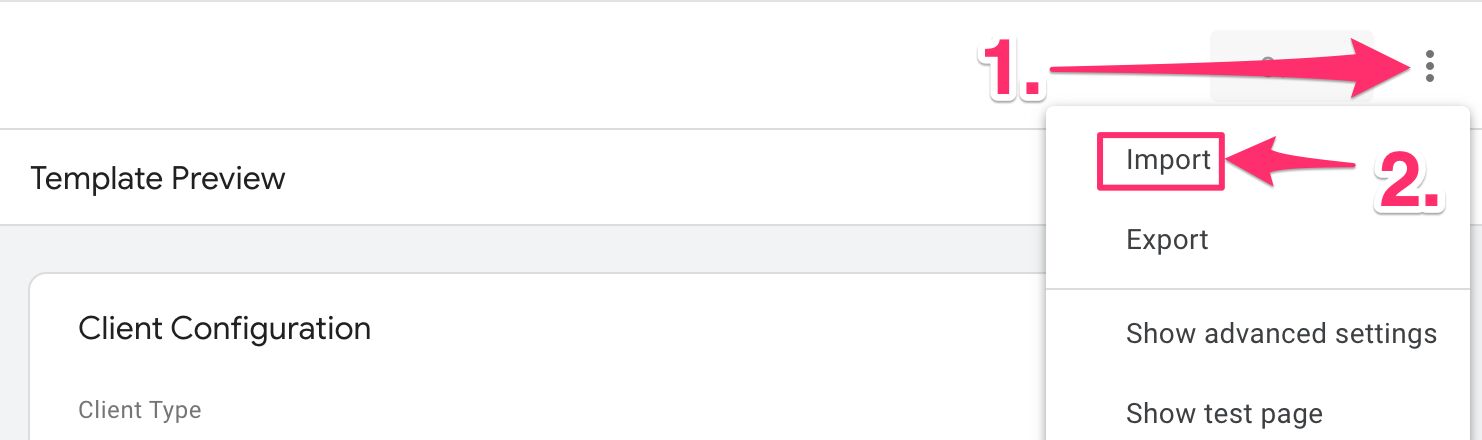
Locate the template.tpl file on your device, and select it to import it.
You should see the template load in the editor. Click Save to save the template.
Once the template is saved, head on over to Clients in the container, and click to create a new Client.
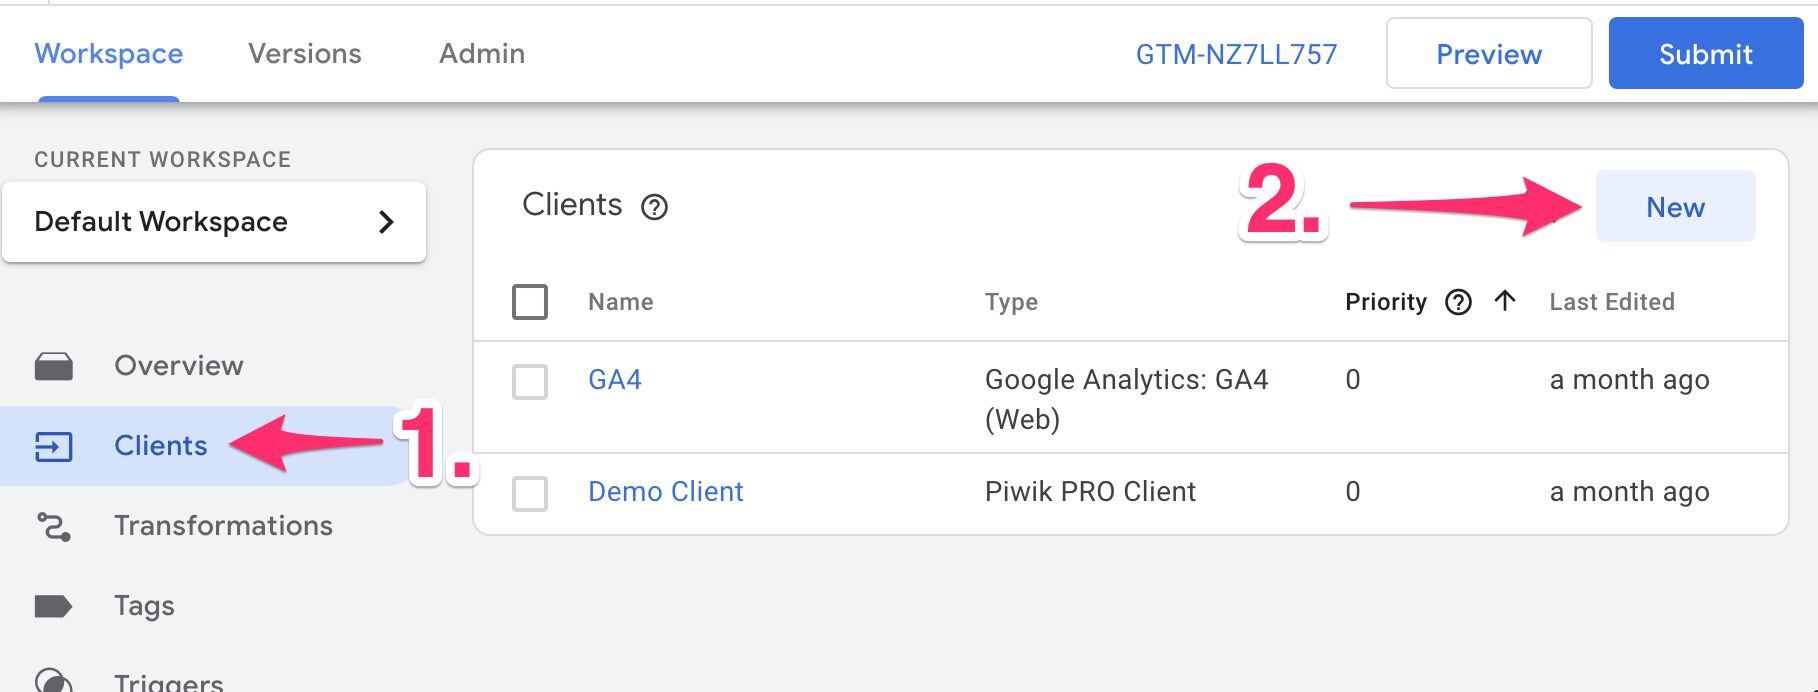
Select the Piwik PRO Client from the list of available templates.
How to configure the Client template
The Client template has only a few configuration options. It’s designed to work automatically whenever Piwik PRO JavaScript requests are dispatched to the server-side Google Tag Manager container.
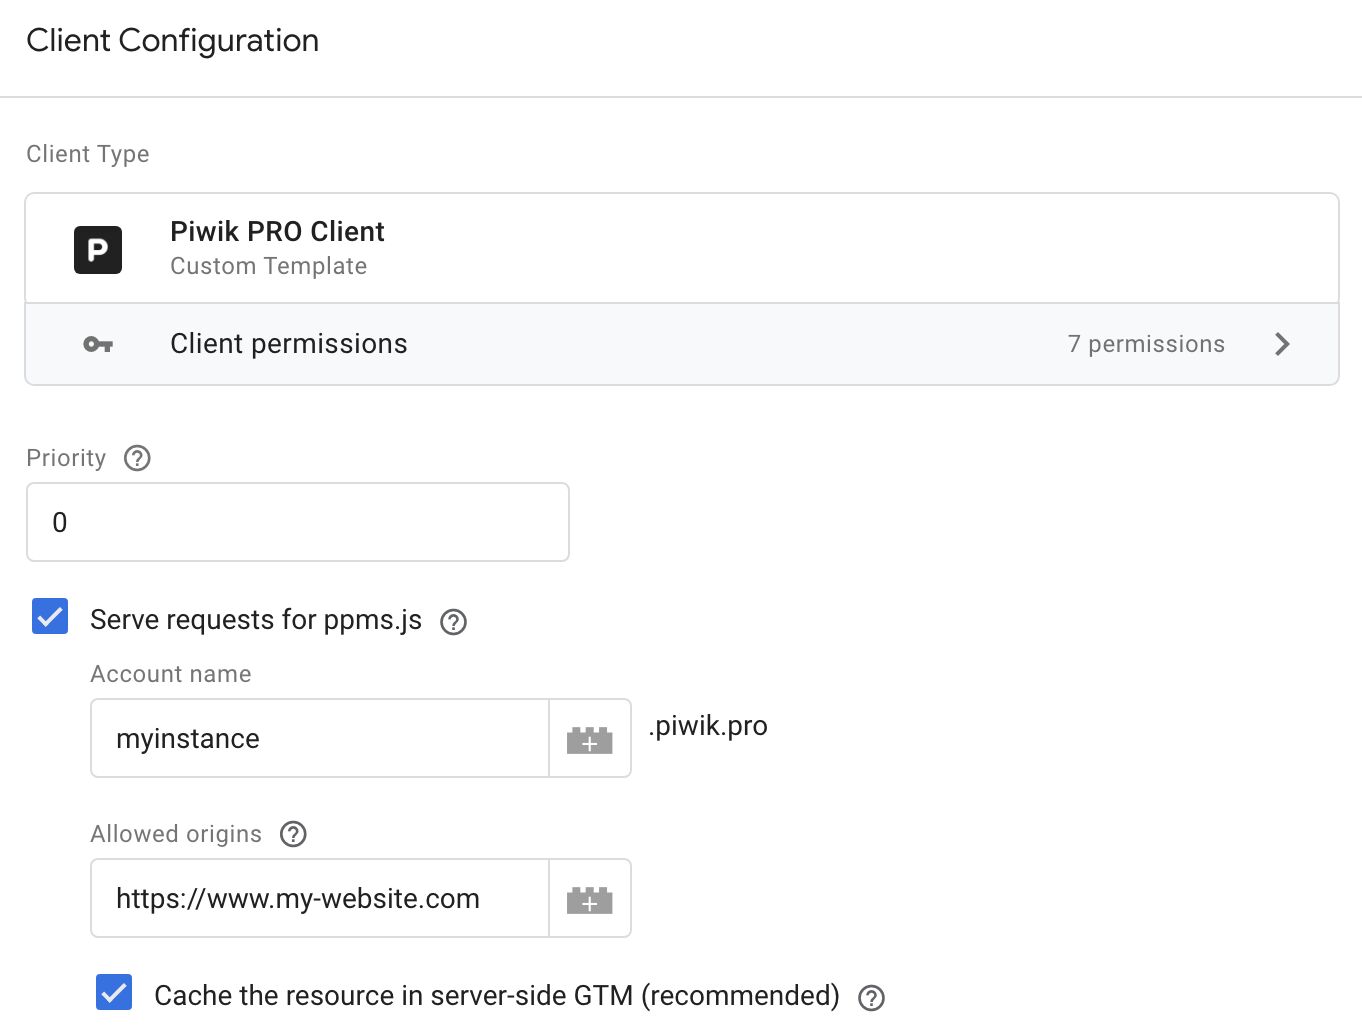
The only manually configurable option is labeled Serve requests for ppms.js.
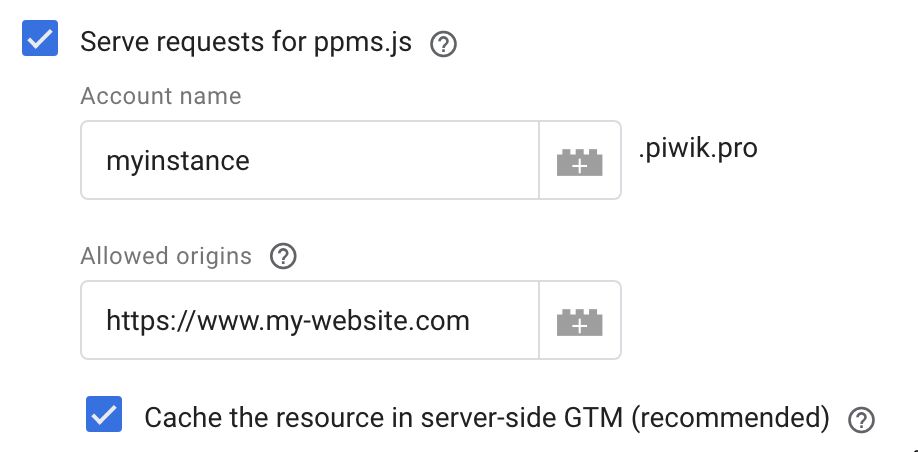
Checking this option enables first-party serving of the Piwik PRO JavaScript library.
This means that instead of loading the JavaScript from Piwik PRO’s own content distribution network, you load the library from the server-side Google Tag Manager domain. You need to configure your client-side Piwik PRO installation to load the
ppms.jsfile from your own domain.
When you enable this option, you need to provide the Account name of your Piwik PRO environment. You also need to list all the allowed URL origins from which requests for the ppms.js file are considered. Add the list of origins as a comma-separated string:
https://www.my-website.com,https://www.my-website.de,https://store.my-other-website.com
Check Cache the resource in server-side GTM to reduce network egress costs by storing the file (temporarily) in the server cache.
Once you save the Client and publish (or preview) the container, the Client is active and ready to intercept incoming requests.
How the Client works
The Client parses the incoming request from the web browser and creates an event data object with it.
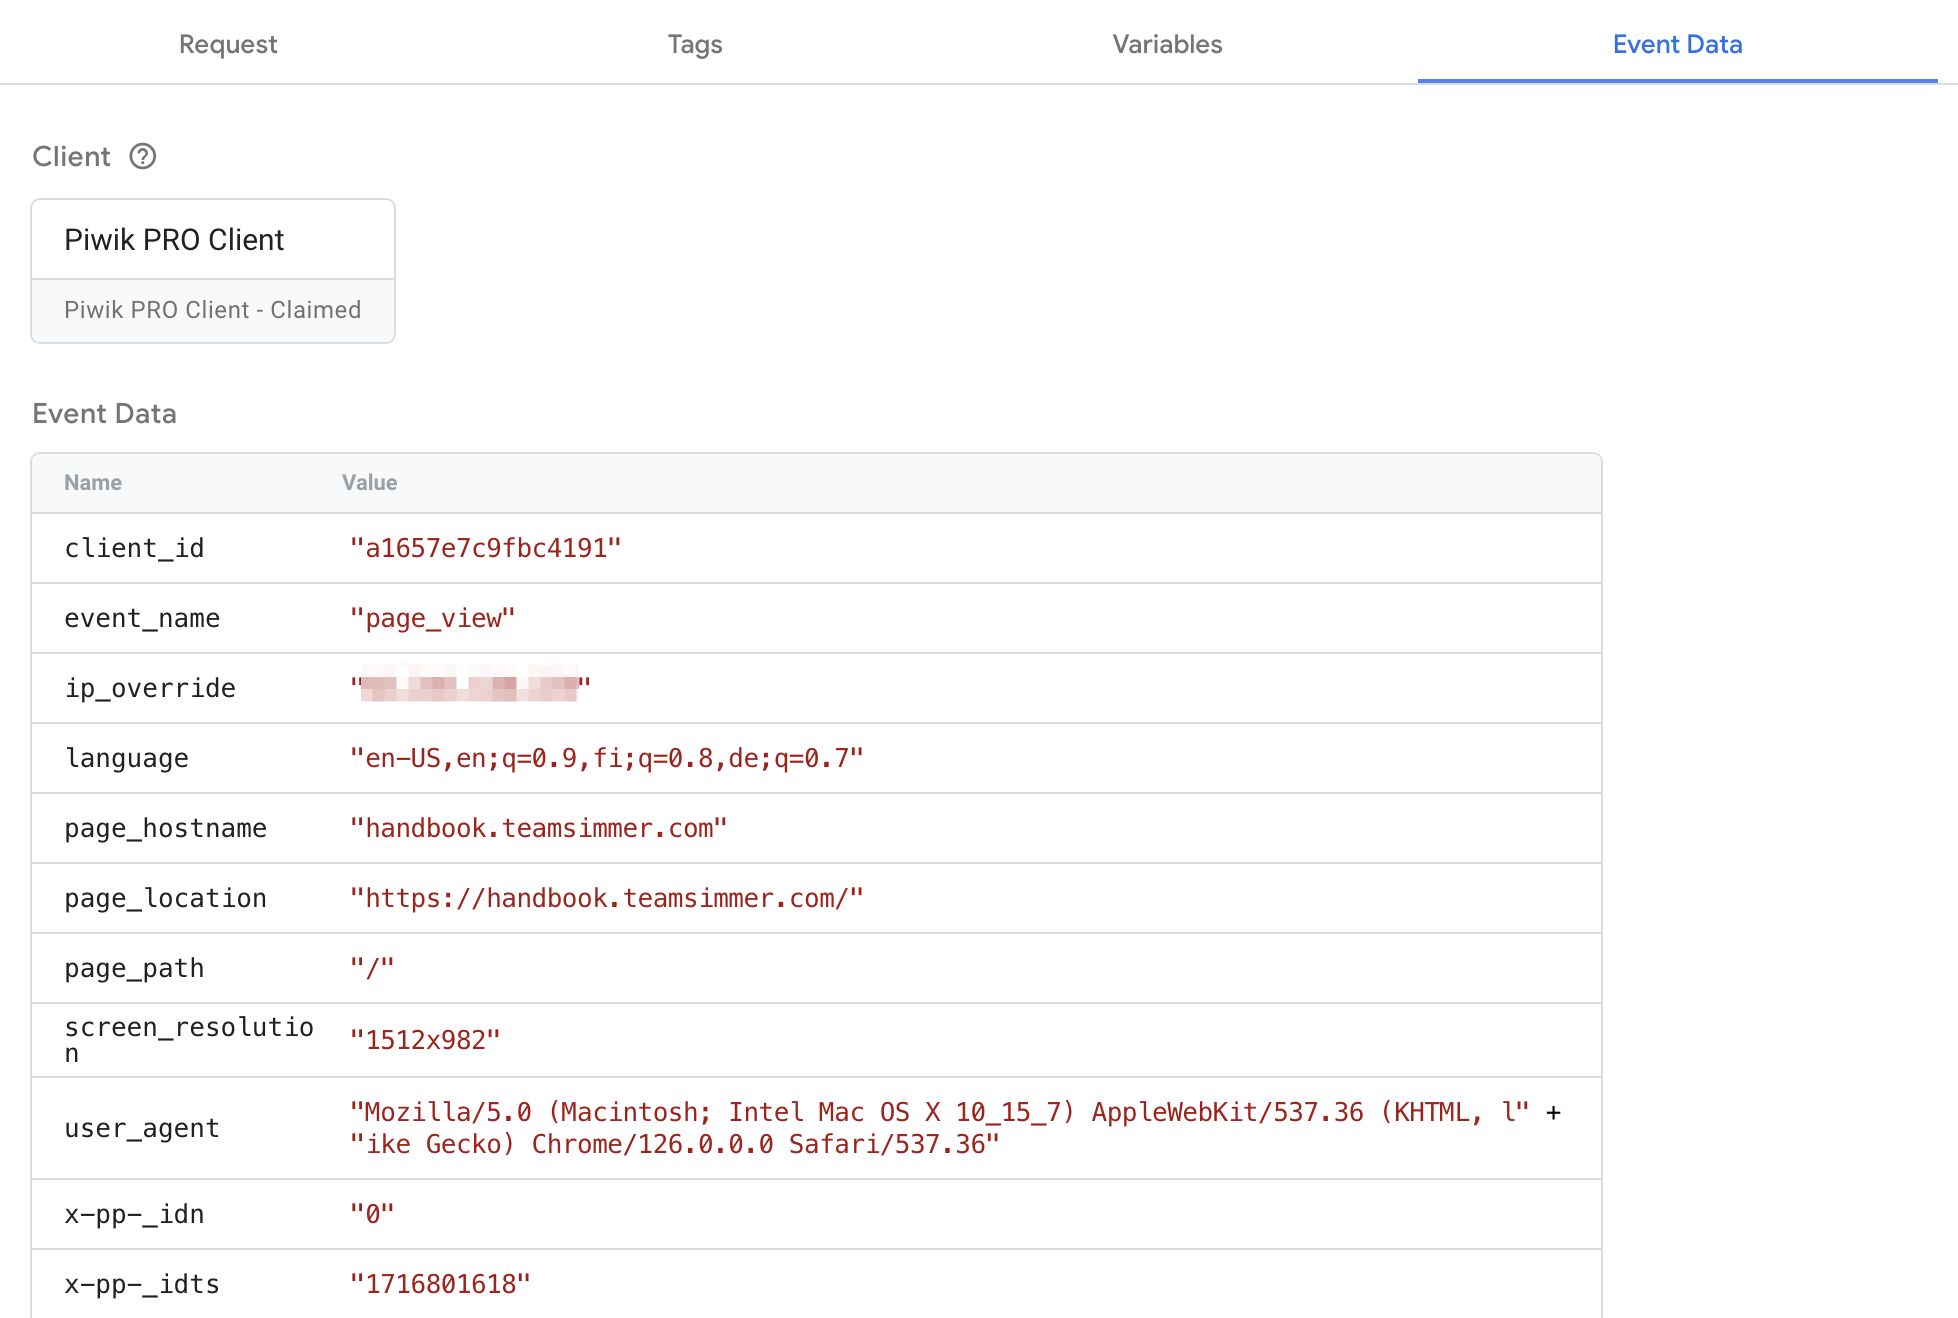
In server-side Google Tag Manager, the only way that tags can fire is if a Client generates an event data object. This object typically contains common event data as well as vendor-specific keys.
The Piwik PRO Client generates these common event data keys:
| Event data key | Piwik PRO request parameter | Description | |
|---|---|---|---|
event_name |
N/A | The request event type. This is not always applicable to Piwik PRO requests. | |
client_id |
_id |
The Visitor ID. | |
ip_override |
cip |
The IP address of the visitor. | |
language |
lang |
The browser language string. | |
page_location |
url |
The URL of the page the request was sent from. | |
page_path |
N/A | The URL path of the page the request was sent from. | |
page_referrer |
urlref |
The referrer URL of the page the request was sent from. | |
screen_resolution |
res |
The screen resolution of the visitor’s device. | |
ua |
ua |
The User-Agent string of the web browser. | |
user_id |
uid |
The login ID of the visitor. | |
value |
revenue |
The revenue of the order. | |
value |
e_v |
The event value. |
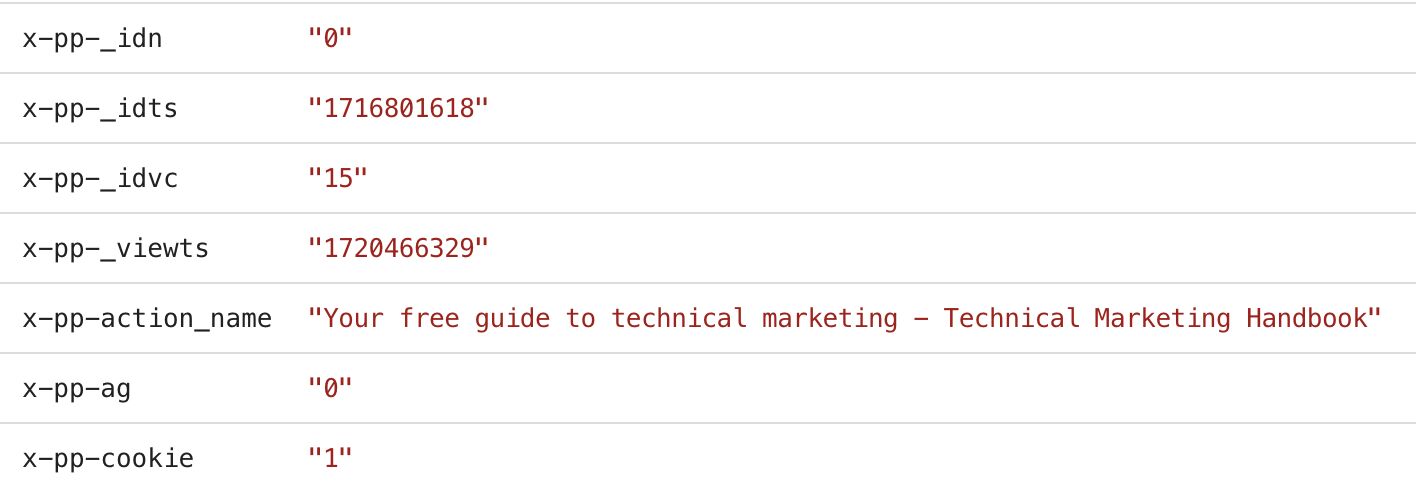
Any parameter that isn’t listed here but is part of the incoming request is added to the event data object using the parameter name with the prefix x-pp-:
For more details about these Piwik PRO-specific parameters, consult the HTTP API documentation.
This event data can then be used to trigger supported tags, allowing you to orchestrate a complete data pipeline using the Piwik PRO JavaScript tracker as the starting point.
The tag template
The purpose of a Client in server-side Google Tag Manager is to claim an incoming HTTP request and (ideally) generate an event data object to trigger tags and populate them with data.
Tags, on the other hand, are typically request-agnostic, which means that they should be configurable to work with the event data object generated by any Client.
The Piwik PRO tag template has been designed to be as request-agnostic as possible, but it works best when coupled with a Piwik PRO Client.
How to install the tag template
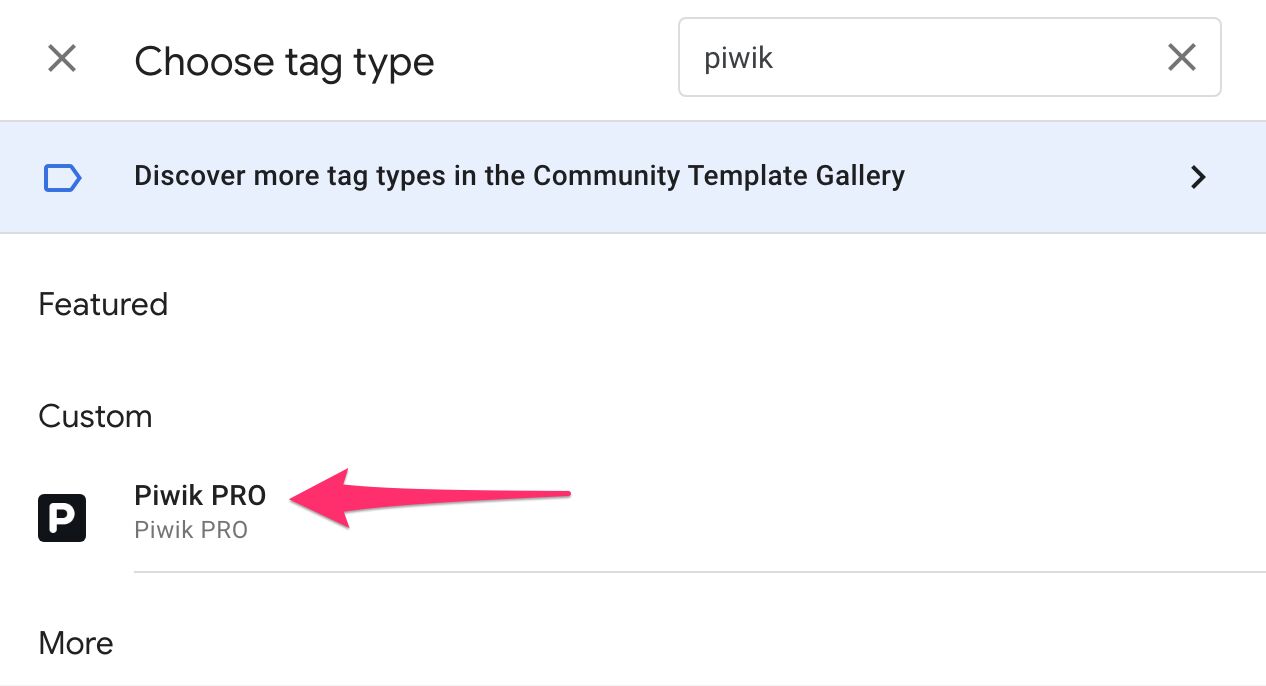
The easiest way to install the tag template is to browse to Templates in the server-side Google Tag Manager container, and then click Search Gallery in the Tag Templates section.
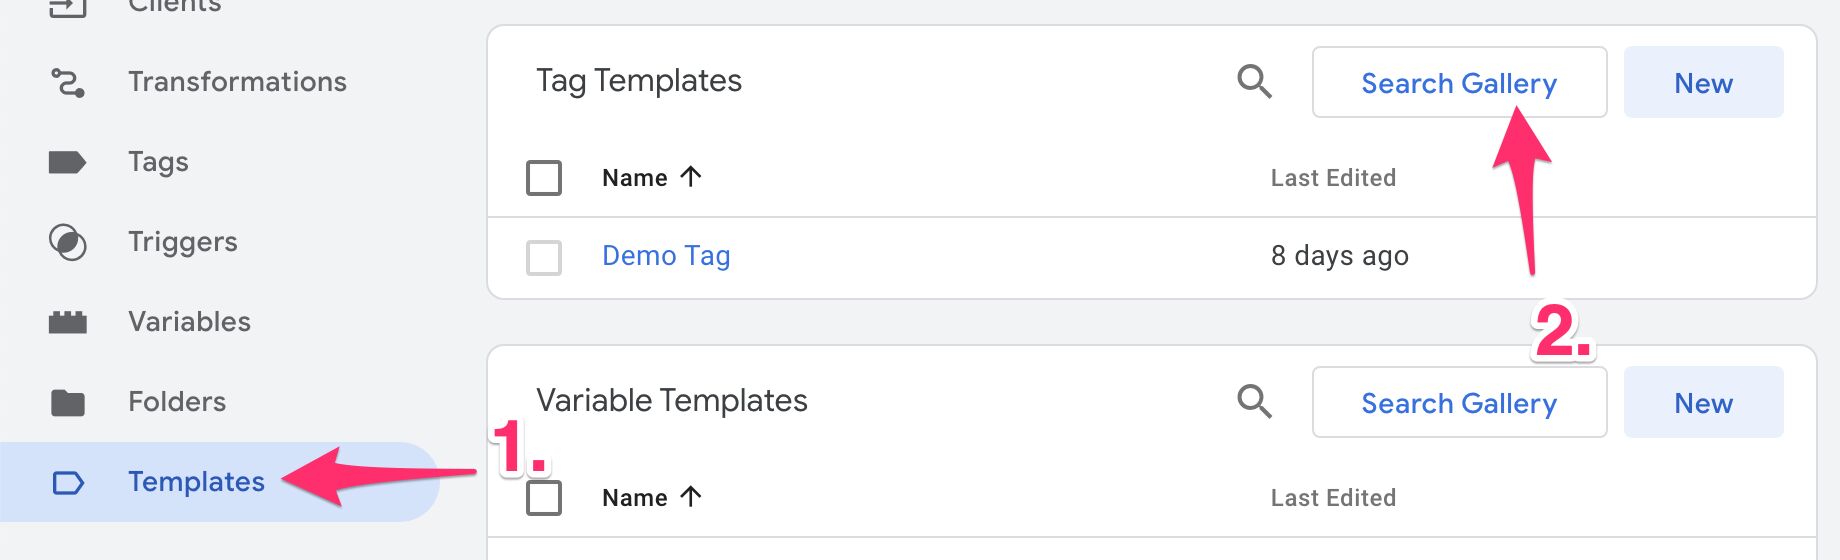
Here, you can search for piwik pro.
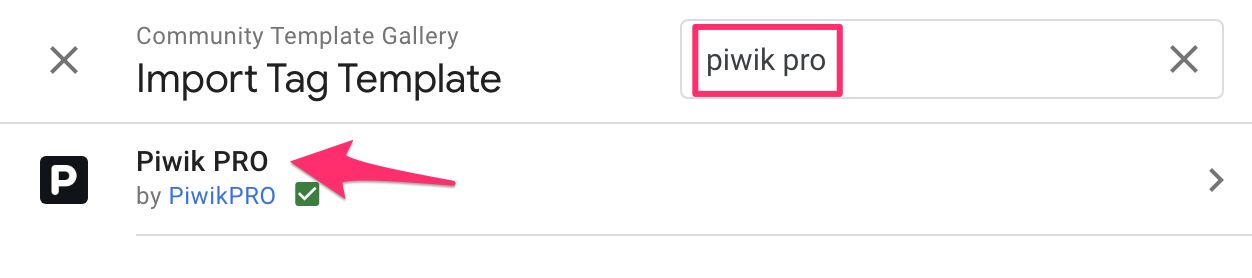
Note! This is the official template by Piwik PRO. You might find other templates, too, but they have not been created by the Piwik PRO team. For most reliable results, I recommend you stick with the official templates.
Once you locate the template, install it after reading and approving any prompts it throws your way.
You can also install the tag template manually by first downloading the template.tpl file from Piwik PRO’s GitHub repo, and then following the same steps as for the Client template.
Once you’ve installed it, browse to Tags in the server-side Google Tag Manager container, and click New to create a new tag. Choose the Piwik PRO template.
Before we explore the template, let’s walk through how the tag actually works.
How the tag template works
The purpose of the tag template is to compile an HTTP request to your Piwik PRO instance using the Piwik PRO HTTP API.
Minimally, you need to enter your Account name (myinstance.piwik.pro) and your Site or App ID.
You’ll also need to add a trigger to the tag.
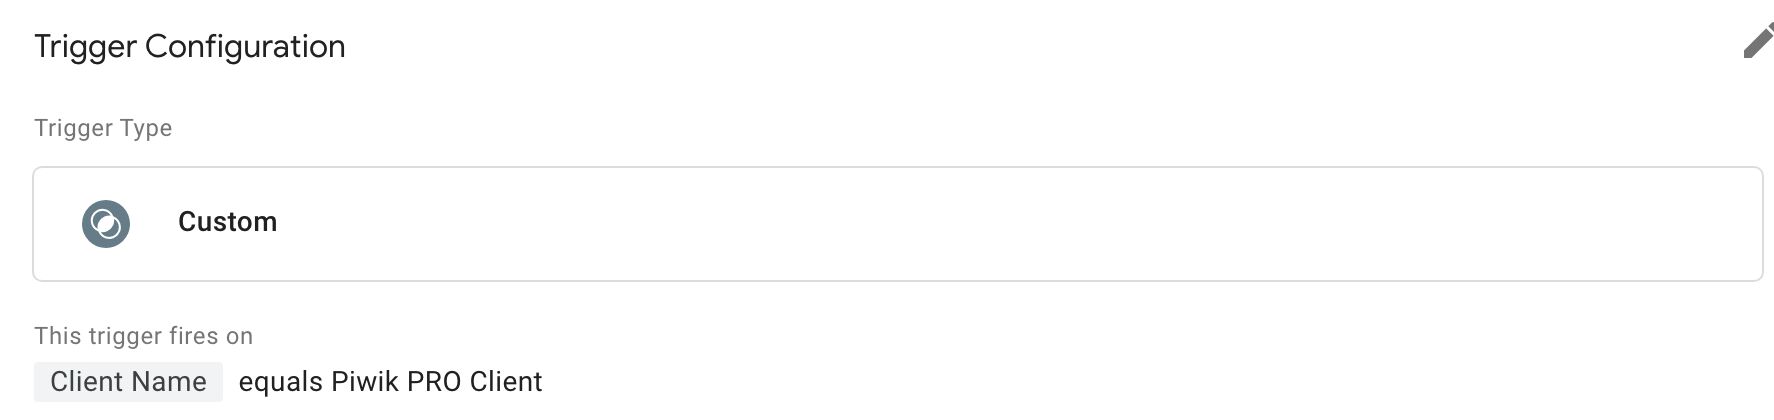
If the tag is orchestrated to work with a specific Client, such as the Piwik PRO Client or the GA4 Client, it’s a good practice to modify the trigger so that it only fires the tag when this Client has claimed the request, like this:
As for populating the necessary parameters for the outgoing request, you have three options with the tag template:
- Select Inherit from Client means that the field tries to grab the value directly from the event data object generated by the Client (more on this below).
- Add or select a value by editing the tag field (you can use variables).
- Add any supported HTTP API parameter name and value to the Additional Parameters table in the tag (more on this below, too).
Once the tag fires, it parses all the available fields and the values within to generate the outgoing request to your Piwik PRO instance.
It will transparently forward the data generated by the Piwik PRO Client to your Piwik PRO instance.
Integration with the Piwik PRO Client
If you are using the Piwik PRO JavaScript tracker or the Piwik PRO HTTP API to collect hits to server-side Google Tag Manager, you can get by with a minimal setup in server-side Google Tag Manager.
This is because the Piwik PRO Client transparently forwards everything in the incoming request stream to the event data object, where the Piwik PRO tag then picks it up and sends to Piwik PRO servers.
In this case, the Piwik PRO tag could look as simple as this:
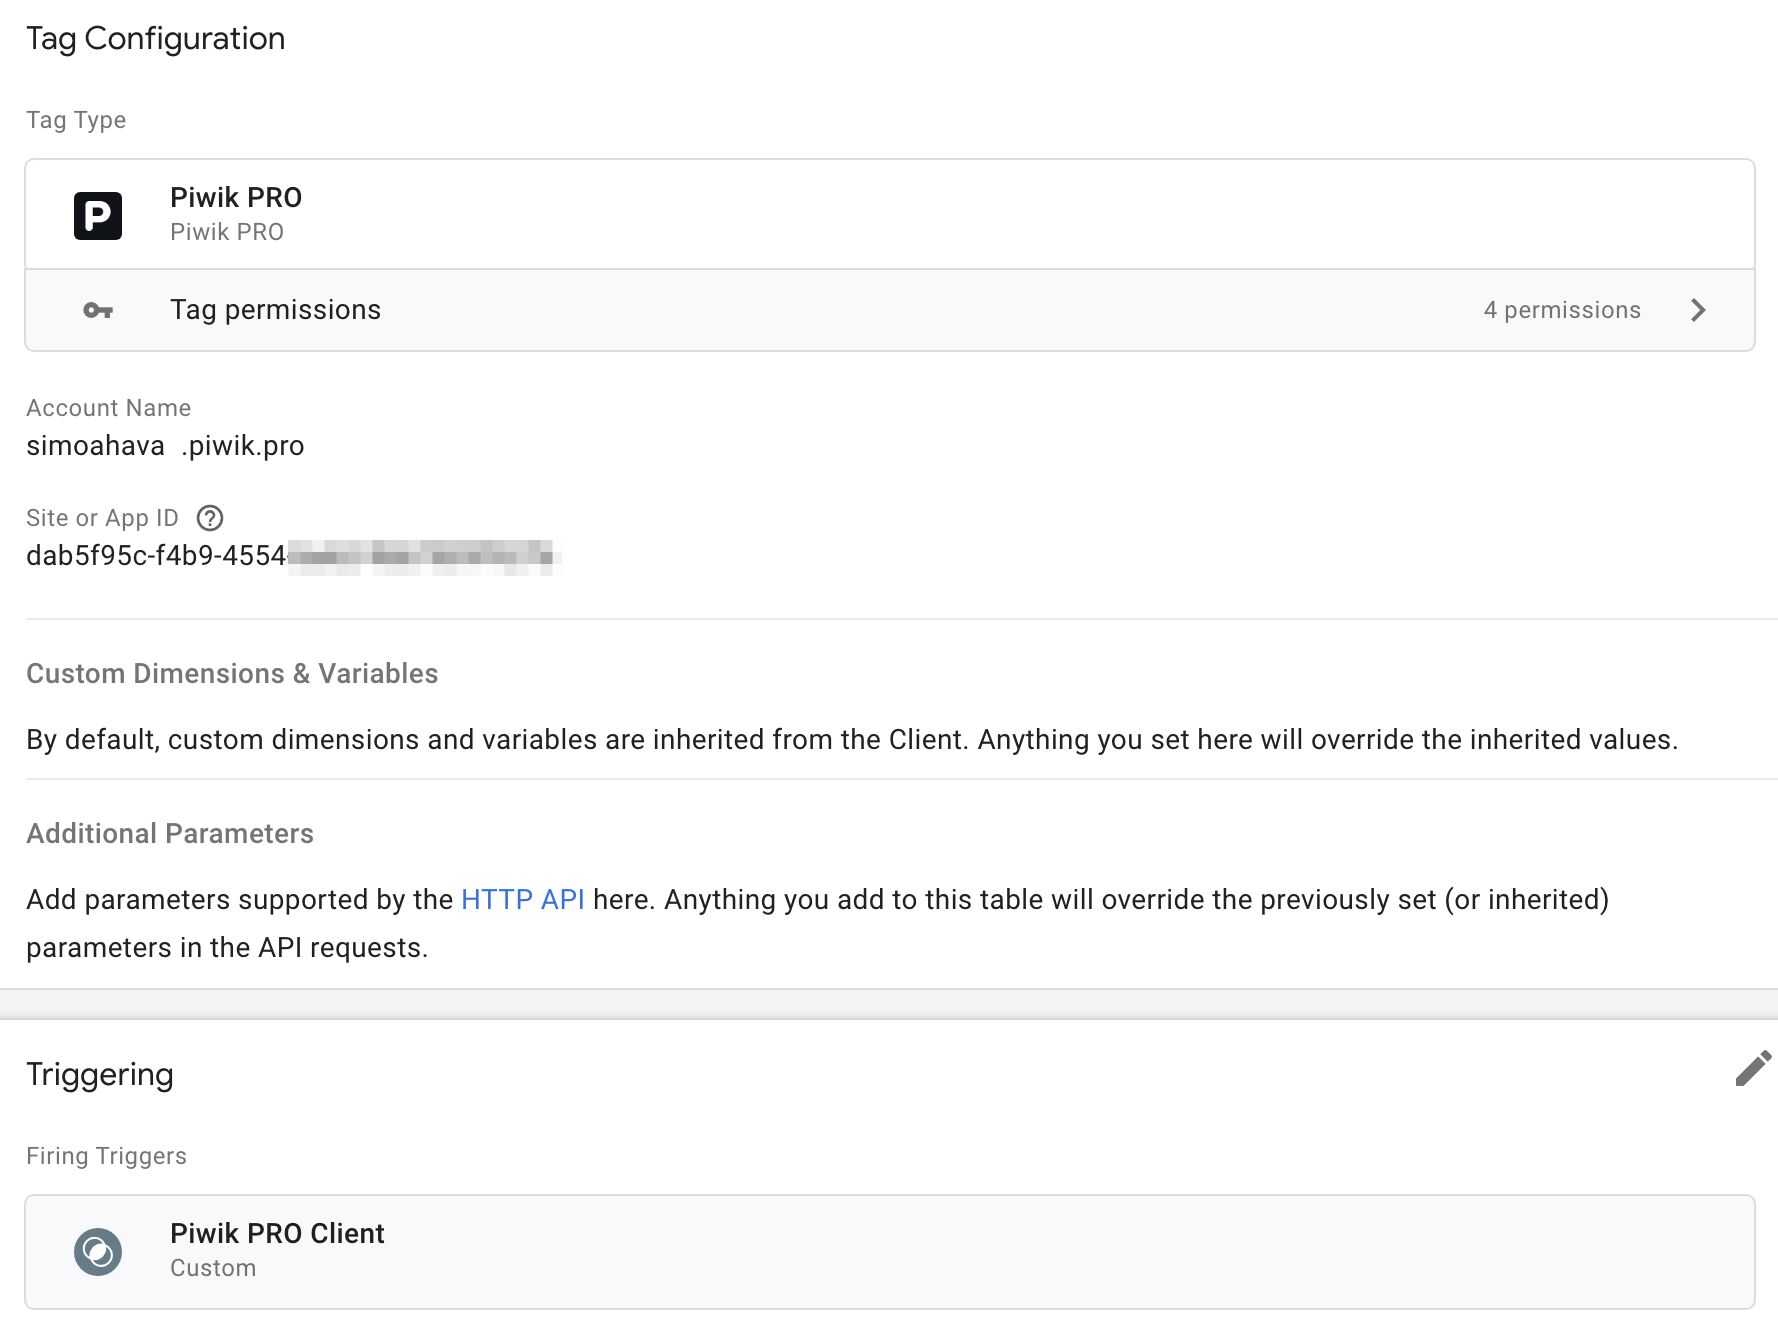
The tag only has Account Name and Site or App ID populated, and it fires on a trigger for all events generated when {{Client Name}} equals Piwik PRO Client.
“Inherit from Client”
When you select Inherit from Client as the value of a tag field, the tag template looks at the event data object for the value relevant to that particular field.
Note that the fields in the tag are the most frequently used configurations. They don’t cover every single possible aspect of a Piwik PRO data stream. The template sources other parameters too, when necessary, and you can always use Transformations and Additional Parameters to further configure the tracking.
Here are the tag fields with the associated event data logic included.
Remember that Piwik PRO-specific keys are prefixed with
x-pp-, and the rest of the key name comes from the HTTP API parameter name.
| Field name in the tag UI | Event data key |
|---|---|
| Anonymous Tracking | x-pp-uia and x-pp-rmip |
| Event URL | page_location |
| Referrer URL | page_referrer |
| Event (Action) Name | x-pp-action_name or page_title |
| Search Query | x-pp-search |
| Search Categories | x-pp-search_cats |
| Search Results Count | x-pp-search_count |
| External Link URL | x-pp-link |
| File Download URL | x-pp-download |
| Custom Event Category | x-pp-e_c |
| Custom Event Action | x-pp-e_a |
| Custom Event Name | x-pp-e_n |
| Custom Event Value | x-pp-e_v |
| Ecommerce Event Type | x-pp-e_t |
| Order ID | x-pp-ec_id or transaction_id |
| Revenue | value |
| Sub-total | x-pp-ec_st |
| Shipping | x-pp-ec_sh |
| Tax | x-pp-ec_tx |
| Discount | x-pp-ec_dt |
| Products | x-pp-ec_products or items |
| Visitor ID | client_id |
| User ID | user_id |
| Override User IP | ip_override |
If there is an
itemskey in the event data object that is in the GA4 format, then it is automatically transformed to the format that Piwik PRO requiresec_productsto be in.
Additionally, the Tag automatically inherits these fields from the event data object:
user_agentis used to populate theuaparameter.languageis used to populate thelangparameter.screen_resolutionis used to populate theresparameter.
So, if you want Inherit from Client to work, you need to make sure that the event data keys for the tag fields you are concerned about can be found in the event data object (see below for tips on using Transformations).
Custom dimensions and custom variables
Any custom dimensions (x-pp-dimensionN) in the event data object are automatically inherited by the tag, unless you override them with the Custom Dimensions table in the tag (or with Additional Parameters).
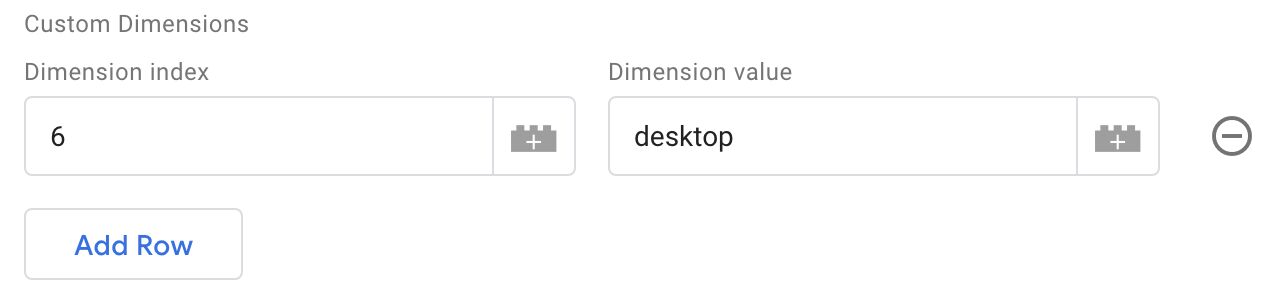
In the example above, custom dimension with index number 6 has been overridden by the tag field. Any other custom dimensions present in the event data object are included automatically.
Custom variables work a bit differently. If you add even a single custom variable to the tag, then nothing else is inherited from the event data object. In that case, only the variables added to the tag are considered.
If you do not edit the custom variables in the tag, then the event data key x-pp-cvar is used for event-scoped custom variables, and x-pp-_cvar is used for session-scoped custom variables.
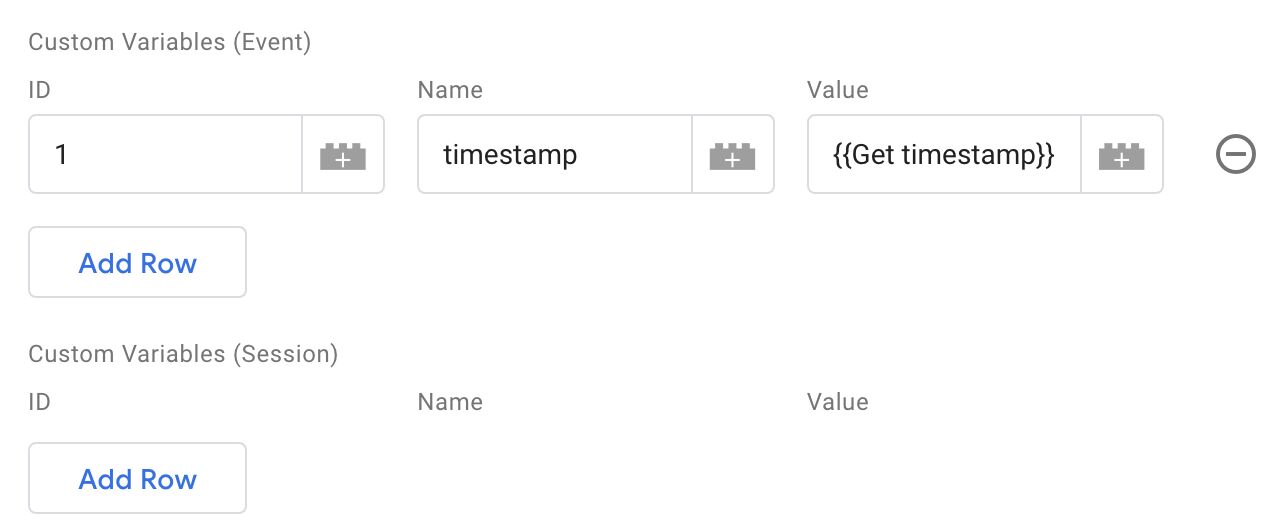
In the example above, the only event-scoped custom variable that is sent is the one with index 1, even if there are additional event-scoped custom variables in the event data object. All session-scoped custom variables in the event data object are sent with the request to Piwik PRO.
Transformations
In case the event data object is not in the correct format or it’s missing certain keys that you need your tag fields to inherit, you can apply a Transformation to add or augment the Piwik PRO key in the event data object.
It’s a good practice to make sure the Transformation only applies to Piwik PRO tags.
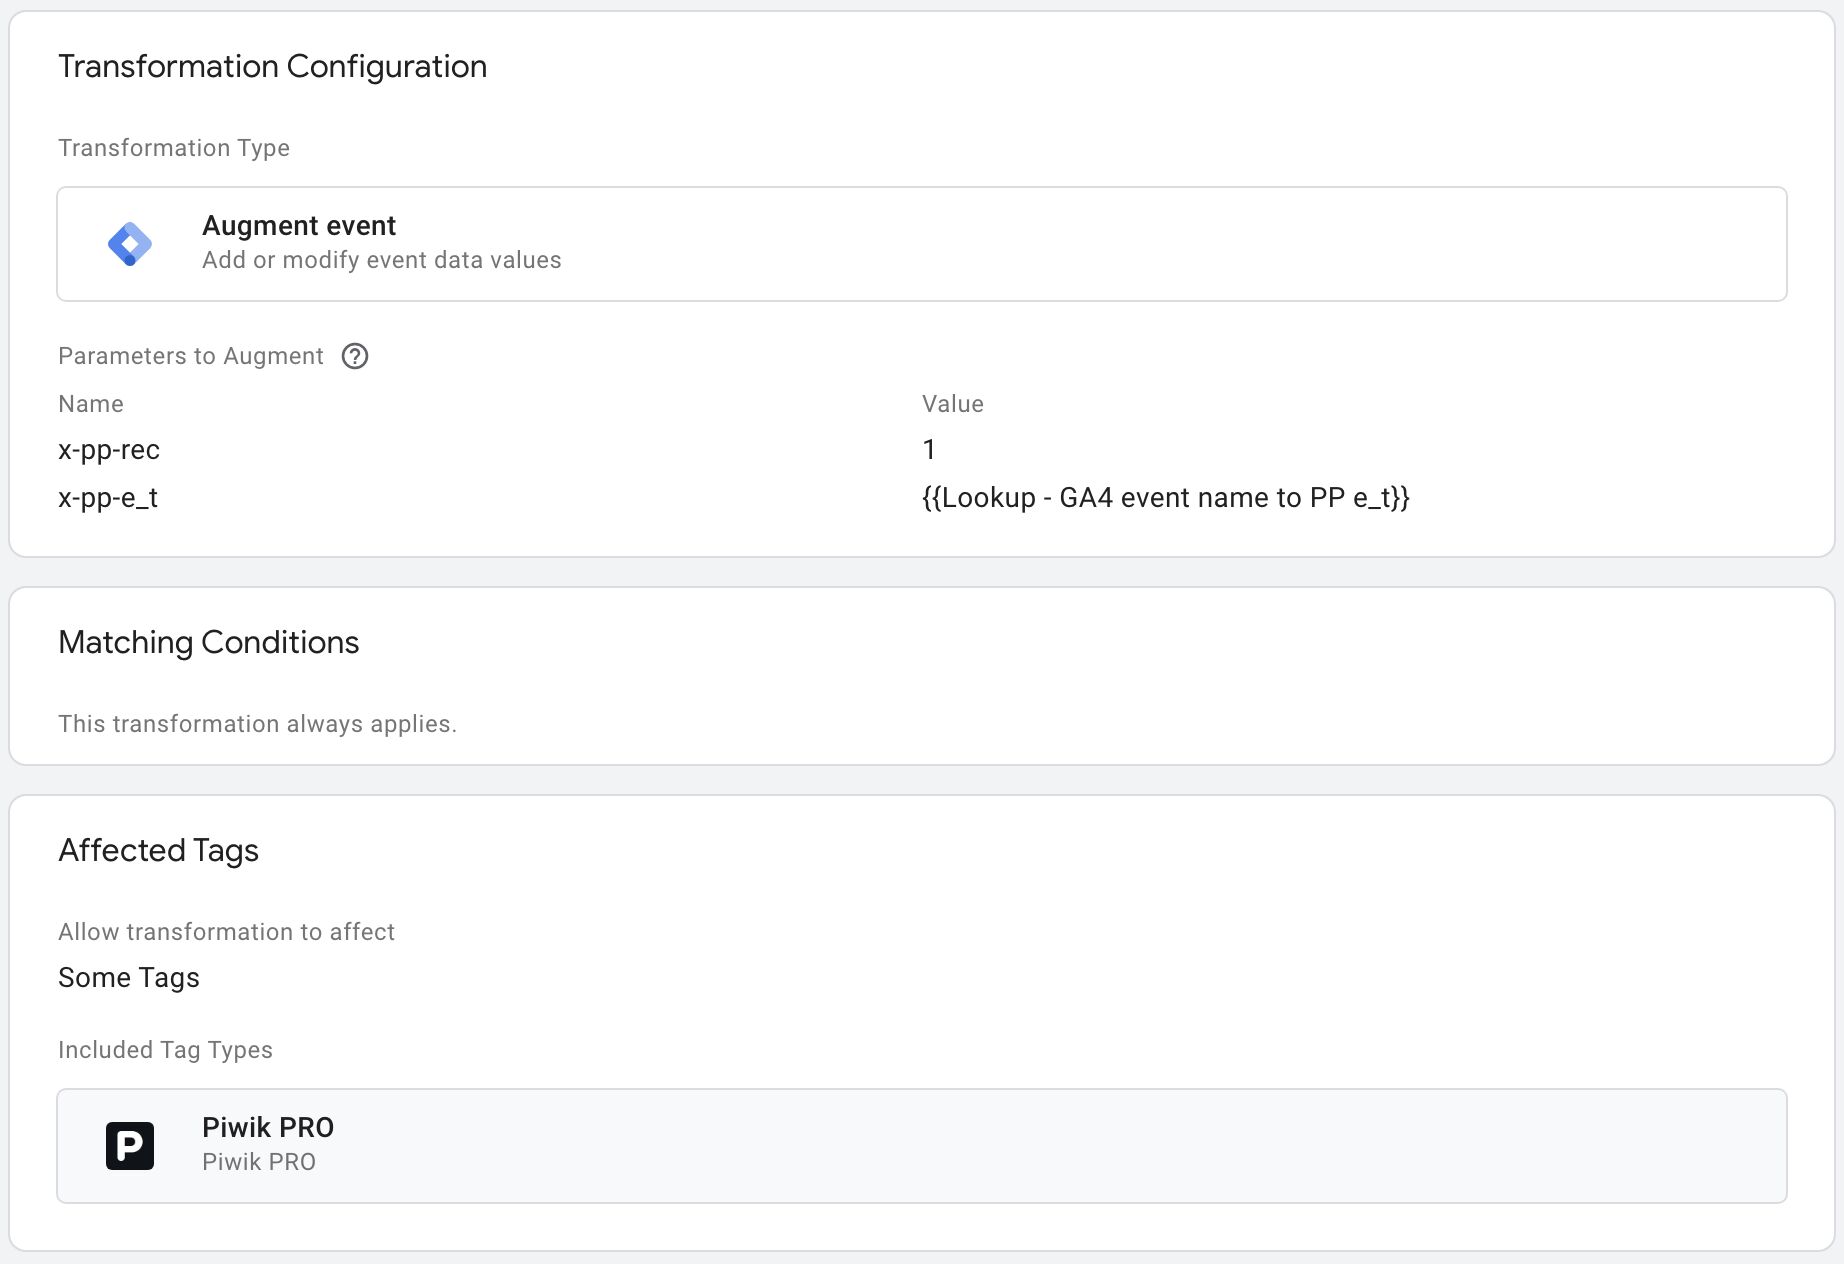
For example, the Transformation above adds the x-pp-rec key with the value 1 to the event data object, and it automatically populates the x-pp-e_t (Event Type) key based on the GA4 event name.
Read this article for a more elaborate example of how to use a Transformation like this to support a real-world use case.
Additional Parameters
In the Additional Parameters section of the tag, you can add any supported HTTP API parameters to the tag.
Remember to use the HTTP API parameter name directly, and don’t add the
x-pp-prefix.
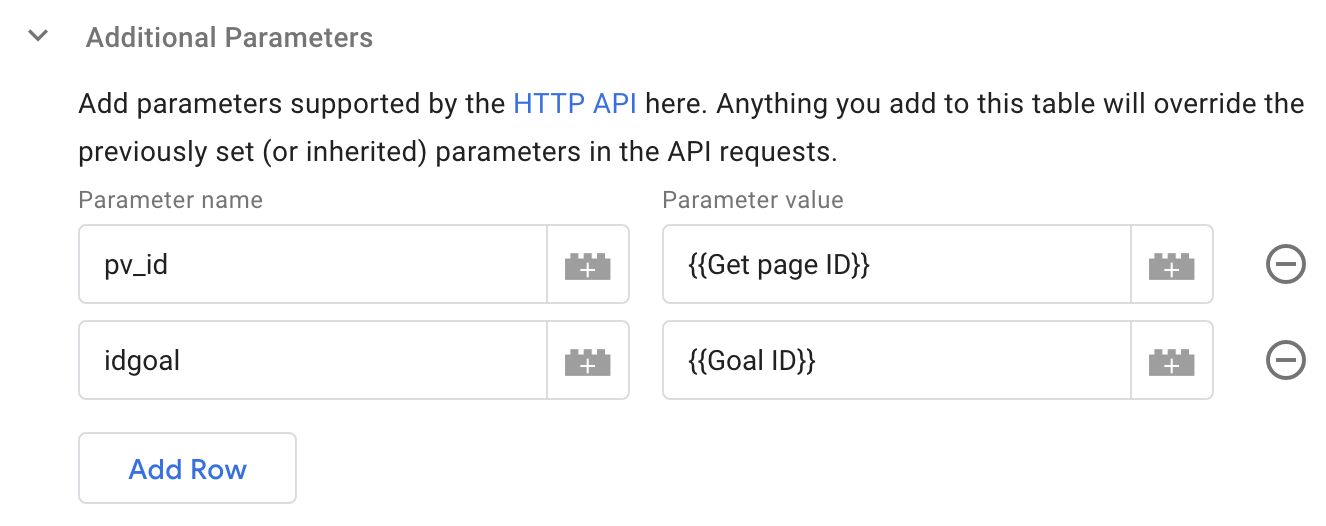
Anything you add to Additional Parameters will override any other considerations done by the tag. So even if the tag inherits from the Client, or even if you’ve added a value directly to a tag field, the keys in Additional Parameters will take precedence.
Priority for value resolution
The priority order of how parameters are populated into the Piwik PRO request is:
- If the parameter has been defined in Additional Parameters, use it.
- Else if the parameter has been added into a tag field (and has a truthy value), use it.
- Else if the parameter is available in the event data object, use it.
Thus if you want to unset a value that’s present in a tag field or in the event data object, the easiest way is to use Additional Parameters and make sure the value is set to undefined or null, such as with the Undefined Value variable type available in server-side GTM.
Preview the tag
When you enable Preview mode in server-side Google Tag Manager, the Piwik PRO tag writes two log entries into the Console tab for any given event.

The first is the Compiled request body, which is the JSON data including all the parameters configured for the outgoing request. If you don’t see some parameter here, it’s not sent to Piwik PRO.
The second is the Encoded POST body, which is the URL-encoded request body that is shipped to your Piwik PRO instance. This is what Piwik PRO servers ultimately receive. If it looks good here, it will most likely look good in Piwik PRO.
However, always remember to use the Tracker Debugger to verify the data stream – that is the ultimate truth.
Use Preview mode to ascertain that the SGTM pipeline works.
The logging is only available in Preview mode. In a Live container, nothing is logged to
stdout.
Summary
This article is a technical overview of how the Client and tag templates work.
For a more practical approach, don’t forget to read my other article on how to utilize the GA4 data stream to mutate a request flow to Piwik PRO.
Custom templates in Google Tag Manager are open-source projects. I encourage you to participate in the Client and tag template development work by submitting Issues.
- The GitHub repo for the Client template. Direct link to Issues.
- The GitHub repo for the tag template. Direct link to Issues.
There are lots of further development ideas going through my mind, ranging from a better integration with Google Analytics 4 to more granular control over custom variable overrides.
The success of template development for GTM is directly correlated with the strength of the community around the vendor’s services. In this, I believe, Piwik PRO is very well positioned. With the help of Piwik PRO’s amazing community, these templates will surely become benchmarks for all other vendors’ template development work.
Please let me know in the comments if you have questions about these templates!
