Measure Cart Value In Enhanced Ecommerce
One of the glaring omissions in the Enhanced Ecommerce reports of Universal Analytics is the ability to calculate cart value for products. Cart value, here, is the value that has been added to the cart.
This value can be used to query for products that have the highest discrepancy between cart value and generated revenue. These are missed opportunities of the highest caliber.
With some Custom Metrics magic, we can, however, get cart value into our reports, and we can find our most and least “effective” products with just a glance:
As you can see, my most revenue-generating product, The Ahava Machine 2.0, also has the most value left in the shopping cart. This is more interesting to me than comparing the buy-to-detail and cart-to-detail ratios, as now I actually have a currency attached to the gap between purchases and cart interactions.
It’s very easy to setup. We will, of course, be using Google Tag Manager, here, but with a little tinkering you should be able to set it up with the on-page tracking code as well, if you are archaic enough to still use that. I’m assuming here that you already have Enhanced Ecommerce setup through Google Tag Manager, and you have a valid ecommerce.add (and ecommerce.remove) object in dataLayer or returned with a Custom JavaScript Variable.
To get things rolling, you need to create the Custom Metric itself. A product-scoped Custom Metric will be scoped to a single product in a single Enhanced Ecommerce interaction. So, if you send a product-scoped Custom Metric with a product object in the ecommerce.add.products Array, the metric can only be queried against that particular product. The metric itself will only apply to the Add To Cart interaction, but you can of course combine valid metrics for the same product as I have done in the screenshot above.
The Simmer Newsletter
Subscribe to the Simmer newsletter to get the latest news and content from Simo Ahava into your email inbox!
Create the Custom Metric
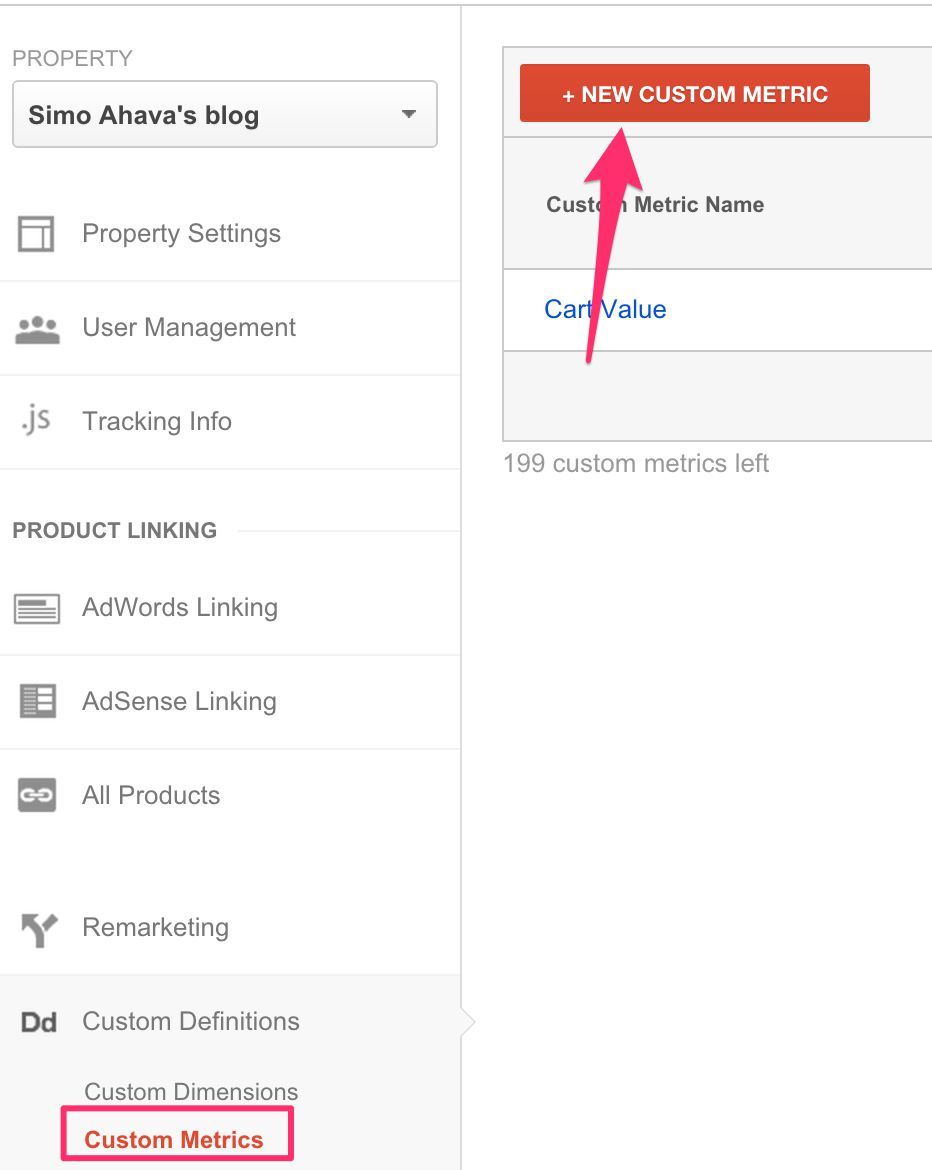
In the Property settings in your Google Analytics Admin, open Custom Definitions > Custom Metrics, and click + New Custom Metric.
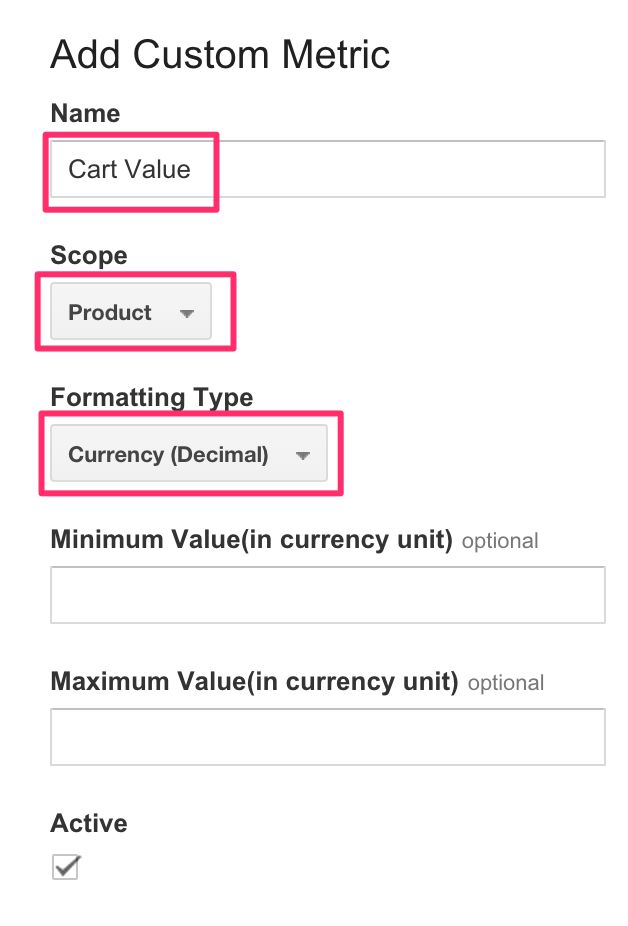
In the screen that opens, give the Custom Metric a name (I chose Cart Value), select Product as the scope and Currency (Decimal) as the type.
Remember to make sure the Metric has Active checked, and then click Save.
You should be back in the Custom Metrics screen. Make note of the Index the Custom Metric receives. You’ll need this in a short while.
Next we’ll head on over to Google Tag Manager, where we’ll modify the ecommerce.add object to include the new Custom Metric with the value that was added to cart.
Send the Custom Metric with the product object
Let’s assume that your ecommerce.add object looks like this in dataLayer:
dataLayer.push({
  'event' : 'addToCart',
  'ecommerce' : {
    'add' : {
      'products' : [{
        'id' : '42',
        'name' : 'The Ahava Machine 2.0',
        'brand' : 'AHAVA',
        'price' : '3999.90',
        'quantity' : '2',
        'variant' : 'Awesome|Kick-ass'
      }]
    }
  }
});
So it’s a fairly basic affair. With an object like this, you’ll be able to track adds-to-cart no problem through Enhanced Ecommerce.
But if we want to have the product-scoped Custom Metric there, we’ll need to add metricX into the product object in the products Array like this:
...
'products' : [{
  'id' : '42',
  'name' : 'The Ahava Machine 2.0',
  'brand' : 'Ahava',
  'price' : '3999.90',
  'quantity' : '2',
  'variant' : 'Awesome|Kick-ass',
  'metric1' : '7999.80'
}]
...
That would solve it. You’d push the total value of the cart addition for that particular product into the Custom Metric at index 1 (which we got from previous chapter), after which you’ll accumulate cart value for that particular product.
On top of that, you’d need to push a negative value for cart removals, right? So the ecommerce.remove object for when you want to remove one of the Ahava Machines (why would you, seriously?) looks like this:
dataLayer.push({
  'event' : 'removeFromCart',
  'ecommerce' : {
    'remove' : {
      'products' : [{
        'id' : '42',
        'name' : 'The Ahava Machine 2.0',
        'price' : '3999.90',
        'quantity' : '1',
        'metric1' : '-3999.90'
      }]
    }
  }
});
That way you’ll have the correct balance in your Cart Value metric at all times.
But this sucks! It sucks because metric1 is purely for Google Analytics. It’s not generic! dataLayer should be as generic as possible.
So let’s do what I did in my previous article about modifying the ecommerce object using a Custom JavaScript Variable. We’ll add the Custom Metric dynamically using a Custom JavaScript Variable.
How cool is that? I know, very cool.
Modify the ‘ecommerce’ object in the Data Layer
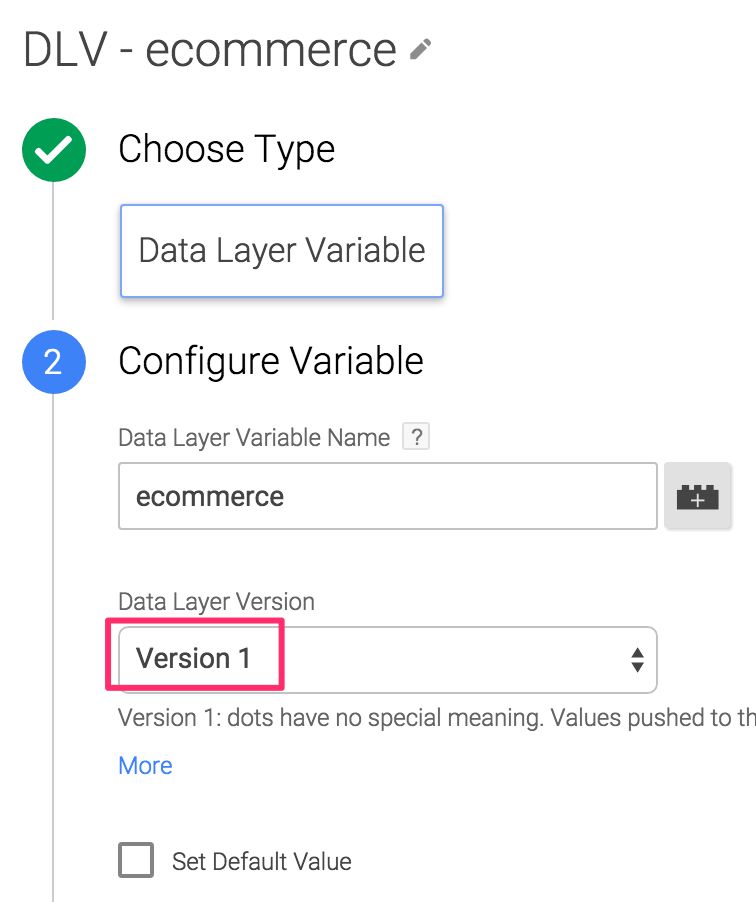
First, you’ll need to create a Data Layer Variable for the ecommerce object, just as I did in the article linked to a paragraph or two ago. It looks like this:
This will return the most recent ecommerce object stored in the Data Layer. Since we’re working with the Add To Cart or Remove From Cart events, it will return the ecommerce.add or ecommerce.remove object, respectively. This makes sense, right?
Next, we’ll need a Custom JavaScript Variable, which adds the Custom Metric into the payload, and returns the modified ecommerce object to your Tag. You can name it whatever you want, e.g. {{JS - Modified EEC Cart Object}}. The Custom JavaScript would look like this:
function() {
  try {
    var index = '1'; // Change to reflect the Custom Metric Index
    var ecom = {{DLV - ecommerce}};
    var i, len, prefix, obj;
    if ('add' in ecom) {
      prefix = '';
      obj = 'add';
    } else if ('remove' in ecom) {
      prefix = '-';
      obj = 'remove';
    }
    if (typeof prefix != 'undefined') {
      for (i = 0, len = ecom[obj]['products'].length; i < len; i += 1) {
        ecom[obj]['products'][i]['metric' + index] =
          prefix + (ecom[obj]['products'][i]['price'] *
          ecom[obj]['products'][i]['quantity']);
      }
    }
    return {'ecommerce' : ecom};
  } catch(e) {
    return {'ecommerce' : {{DLV - ecommerce}}};
  }
}
This piece of JavaScript takes the existing ecommerce.add or ecommerce.remove object, and cycles through all the products stored within. For each product, it calculates the product’s price multiplied by its quantity. This gives the total value for that product in the cart interaction. This value is then stored in the metricX, and X is defined in the beginning using the index variable. The value is positive if it was an Add To Cart action, and negative if it was a Remove From Cart action.
The Variable finally returns the modified ecommerce object, which is then used by your Tag as instructed in this article. If you can’t bother to read through the linked article, you will need to change your Tags’ Enhanced Ecommerce settings to not use the Data Layer, but rather retrieve the data from the Custom JavaScript Variable you just created.
Summary
The core of this article is really simple. Let’s use a Custom Metric to fix a flaw in Enhanced Ecommerce reports of Universal Analytics. The flaw is that Cart Value isn’t automatically calculated, as it would be very simple to do so with the existing dimensions and metrics.
Cart Value lets us see how much value is left into the shopping cart when people are browsing on your site. When someone adds a product to the cart, the value added is automatically saved into the Custom Metric for that particular product in the Add To Cart action. When products are removed from the cart, their value is deducted from the Custom Metric.
Using the product-scoped Custom Metric lets you then query the Custom Metric with the Product SKU or Name, for example, and you can combine total Product Revenue in the custom report as well, as in the screenshot at the very beginning of this article.
The Custom JavaScript Variable method lets you add a lot of platform-specific flexibility to your Enhanced Ecommerce measurement. Let’s just hope this is one of those articles that becomes obsolete soon, as Google Analytics hopefully introduces Cart Value as a default metric in the Enhanced Ecommerce reports!


