GA4 to Piwik PRO Using Server-side Google Tag Manager
There are two new custom templates available in server-side Google Tag Manager. These templates have been designed to facilitate Piwik PRO tracking in a server-side container.
- Piwik PRO Client -> This Client template interacts with the Piwik PRO JavaScript tracker and lets you route Piwik PRO tracking through a server-side GTM container. GitHub repo.
- Piwik PRO -> The tag template works in unison with the Piwik PRO Client, forwarding the hits to the Piwik PRO endpoint. GitHub repo.
Read this article to learn more about how these templates work.
However, both templates have been built with a universal application in mind. The Client template produces event data that can be consumed by other vendors’ tags, too. Similarly, the tag template has been designed so that it can work with other Clients.
In this article, I’ll show you how to quite easily take an incoming Google Analytics 4 stream in server-side Google Tag Manager (claimed by the built-in GA4 Client) and map that to a format that can be utilized by the Piwik PRO tag.
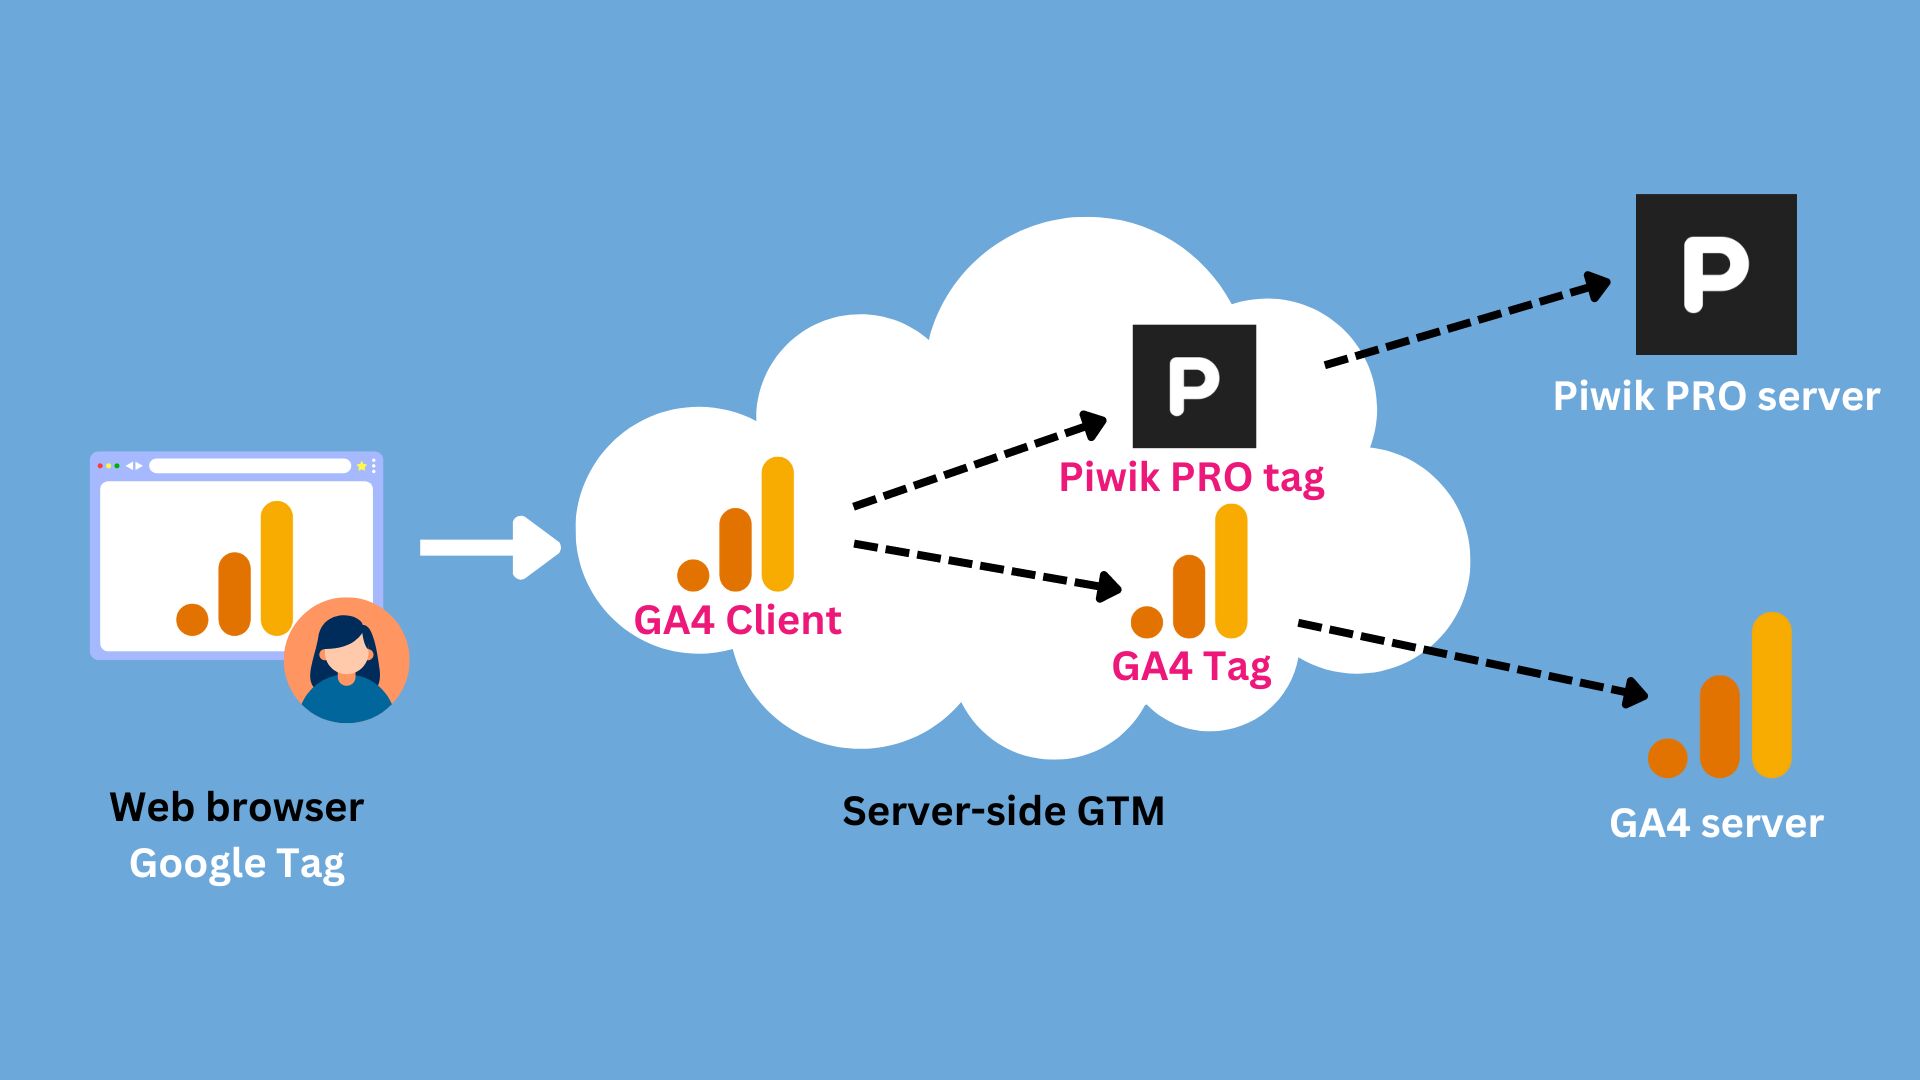
As the lousy illustration above shows, we’ll use the GA4 Client to handle the incoming stream, but we’ll then create a Piwik PRO tag to take the data generated by the GA4 Client and forward it to Piwik PRO servers (in the correct format, of course).
Table of Contents
The Simmer Newsletter
Subscribe to the Simmer newsletter to get the latest news and content from Simo Ahava into your email inbox!
Getting started
To start with, we already have an established data stream for proxying Google Analytics 4 hits through a server-side Google Tag Manager container.
The property collects a variety of Google Analytics 4 data, but we’re going to focus on the following four events in our mapping to Piwik PRO:
- The
page_viewevent is sent whenever a page is loaded in the browser. - The
view_itemevent is sent whenever a product is viewed. - The
add_to_cartevent is sent whenever a product is added to the cart. - The
purchaseevent is sent whenever a purchase is completed.
This is a very typical business-critical event list. To keep things concise in this article, we’ll focus on just these four and ignore the rest when building the mapping to Piwik PRO.
How the tag template works
First of all, remember to read this article for a more in-depth exploration of the new Piwik PRO templates.
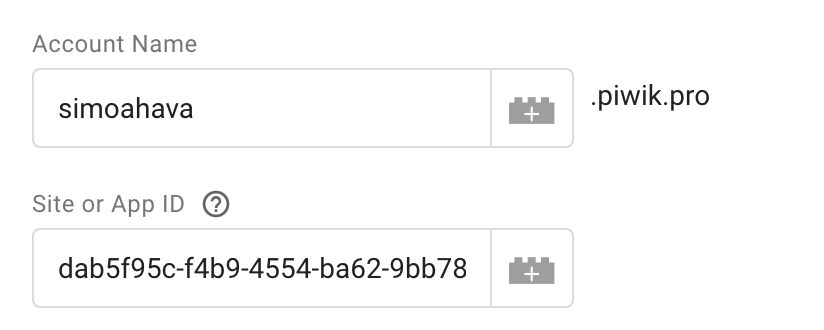
To get started with the tag template, you need to fill in the Account Name and the Site or App ID fields. The values for these fields can be found in your Piwik PRO settings.
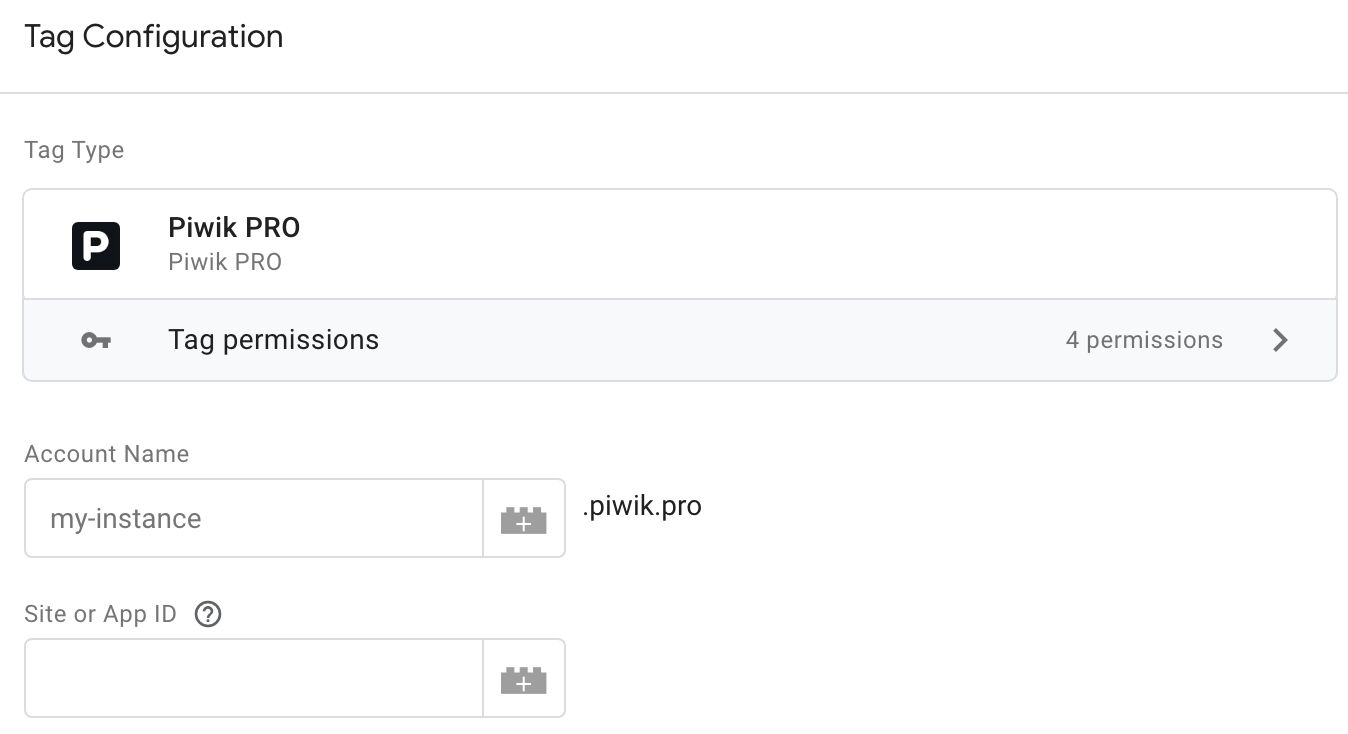
If you then scroll down the tag template, you’ll find that almost all the fields have a default value of Inherit from Client.
This means that the field automatically grabs the value from what the server-side Client produced as long as it’s in the correct format.
The Piwik PRO Client has of course been built so that it generates the values correctly for the tag, but the GA4 Client understandably doesn’t consider Piwik Pro’s idiosyncracies in its output.
GA4 Event Data mapped to Piwik PRO parameters
Here is the list of fields that the Piwik PRO tag template can read automatically from the GA4 Client:
| GA4 Event Data key | Maps to Piwik PRO parameter | Field name in the tag UI | Description |
|---|---|---|---|
page_location |
url |
Event URL | The URL of the page where the event happened. |
page_referrer |
urlref |
Referrer URL | The referrer of the page where the event happened. |
user_id |
uid |
User ID | User ID for logged-in users. |
ip_override |
cip |
Override User IP | IP address of the visitor. |
value |
revenue |
Revenue | Value of the event (for e-commerce). |
user_agent |
ua |
- | User-Agent string of the user’s browser. |
language |
lang |
- | Browser language. |
screen_resolution |
res |
- | Screen resolution of the visitor’s browser. |
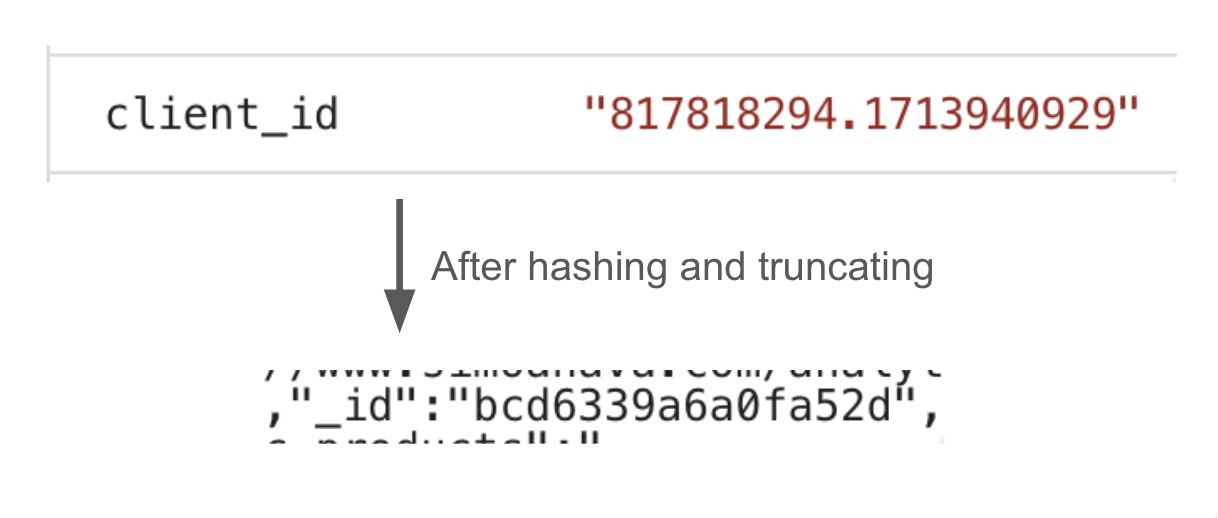
client_id |
_id |
Visitor ID | The tag automatically converts the GA4 Client ID to the correct Piwik PRO format (16-character hexadecimal hash). |
page_title |
action_name |
Event (Action) Name | With page view hits, the page_title is automatically used as action_name. |
transaction_id |
ec_id |
Order ID | The ID of the transaction. |
items |
ec_products |
Products | The GA4 items array is automatically converted to the correct ec_products format. |
These keys are accounted for by the GA4 Client and the Piwik PRO tag template, so you can leave them with the Inherit from Client option enabled.
The rest of the parameters that you need to map or generate depend on the event you are collecting. The full inventory of parameters supported by the Piwik PRO servers can be found in their HTTP API documentation.
You can add the missing parameters by editing the Piwik PRO tag fields or by using a Transformation in SGTM.
The “rec” parameter
The tag template sets the rec parameter to 1 by default. This means that the request is recorded in your Piwik PRO instance.
If, for some reason, you don’t want the hit to be registered in Piwik PRO, you can set rec to 0 using the Additional Parameters field in the tag UI. Any parameters you enter here will override any previous values registered by the tag.

The “_id” parameter
Piwik PRO uses a 16-character-long hexadecimal hash as the value of the Visitor ID. This is collected with the parameter _id.
The tag template automatically uses the client_id value stored in the Event Data object when creating the _id value.
To collect the ID in the correct format, the Client ID is first hashed with the SHA256 algorithm and then the first 16 characters are used for the Visitor ID.
Of course, you can use your own value for the Visitor ID, but remember that it must be in the correct format for Piwik PRO to accept it.
The page_view event
We’ll build the mapping event by event, starting with page_view.
Create a new Piwik PRO tag in server-side Google Tag Manager, and set the Account Name and Site or App ID fields.
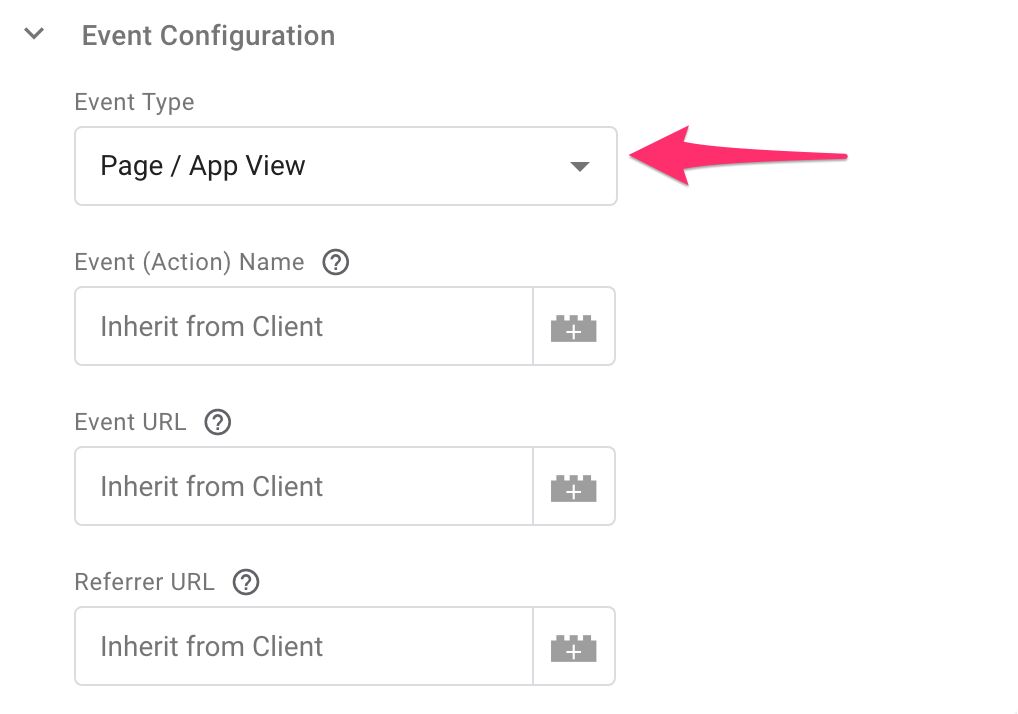
Next, under Event Configuration, choose Page / App View as the Event Type.
This is an optional step, because the tag template sees the
page_viewevent and deduces the event type from that. But sometimes the event name doesn’t match the event type, so it’s good to be explicit.
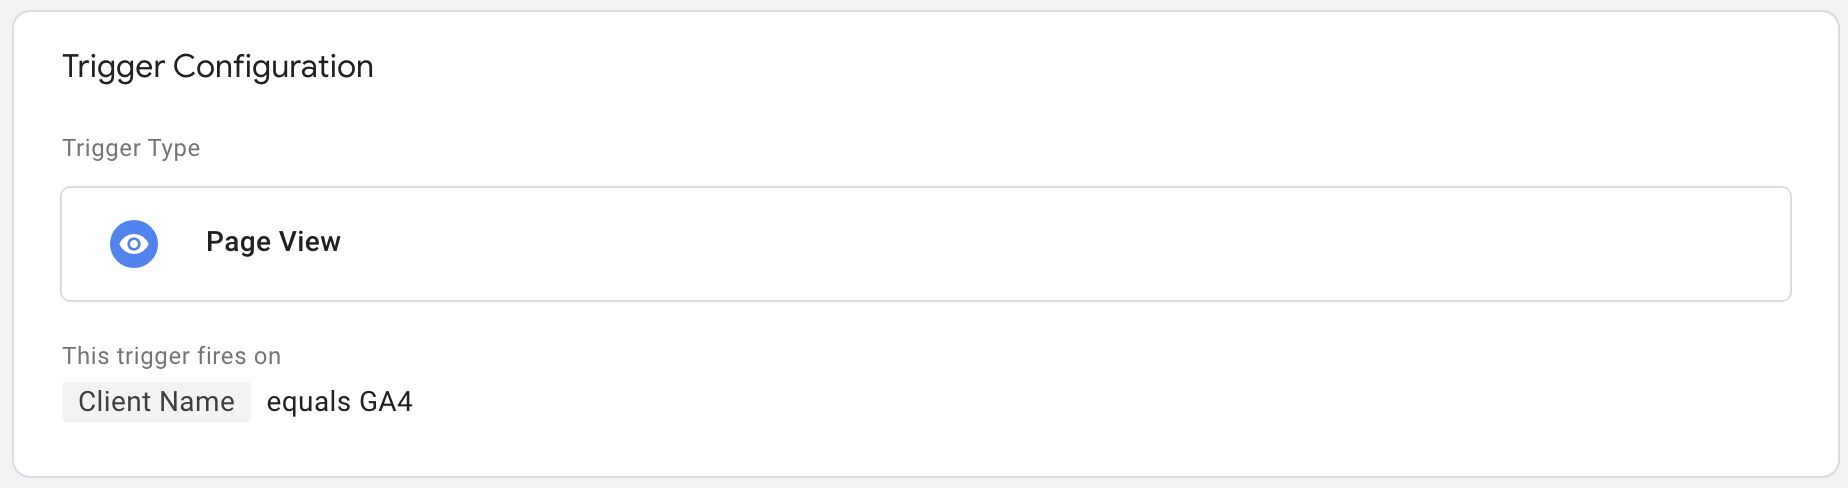
Finally, add a trigger to the tag. Focus on the page_view event, and for good measure only fire the tag if the Client Name built-in variable is GA4.
Finally, save the tag and go to Preview mode in server-side Google Tag Manager.
Preview and test
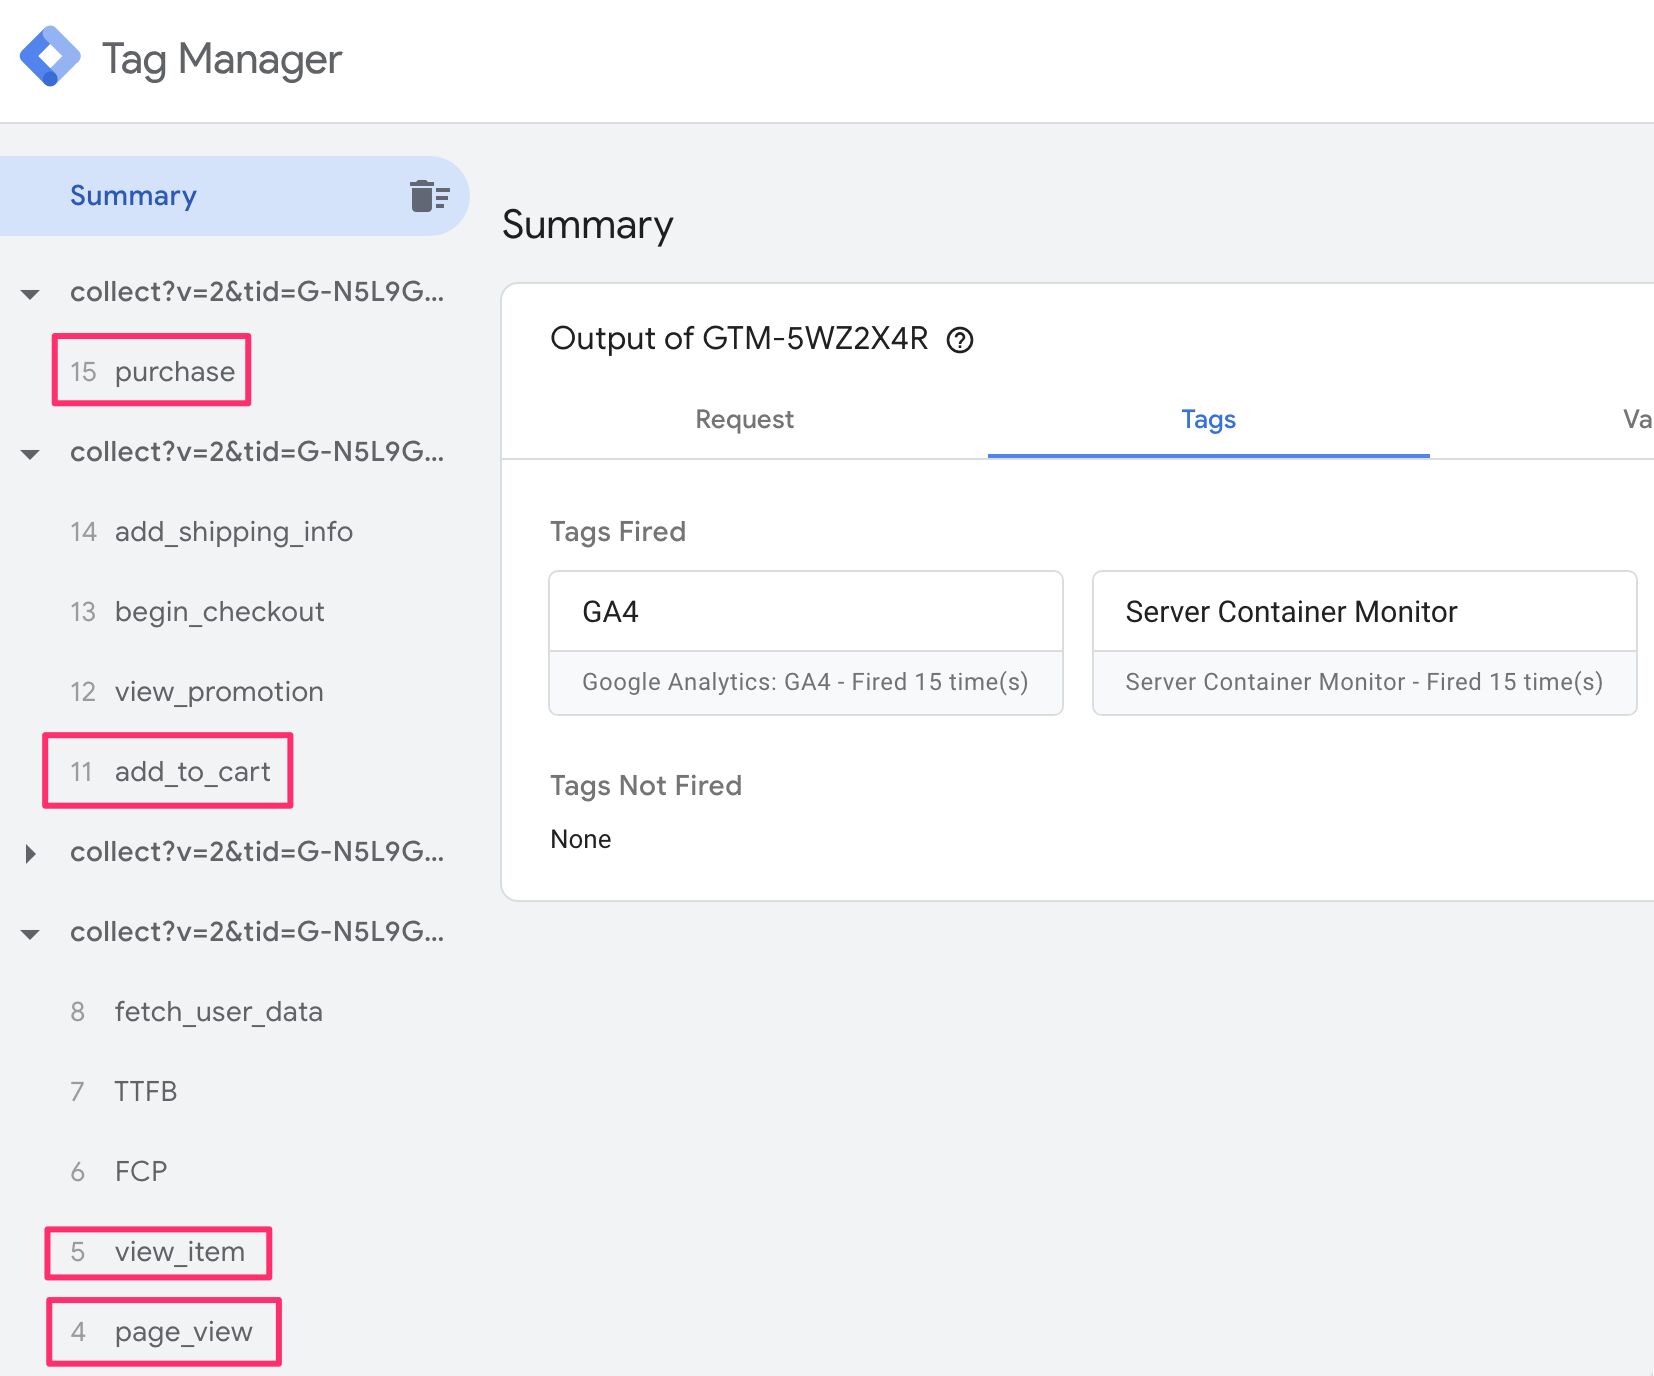
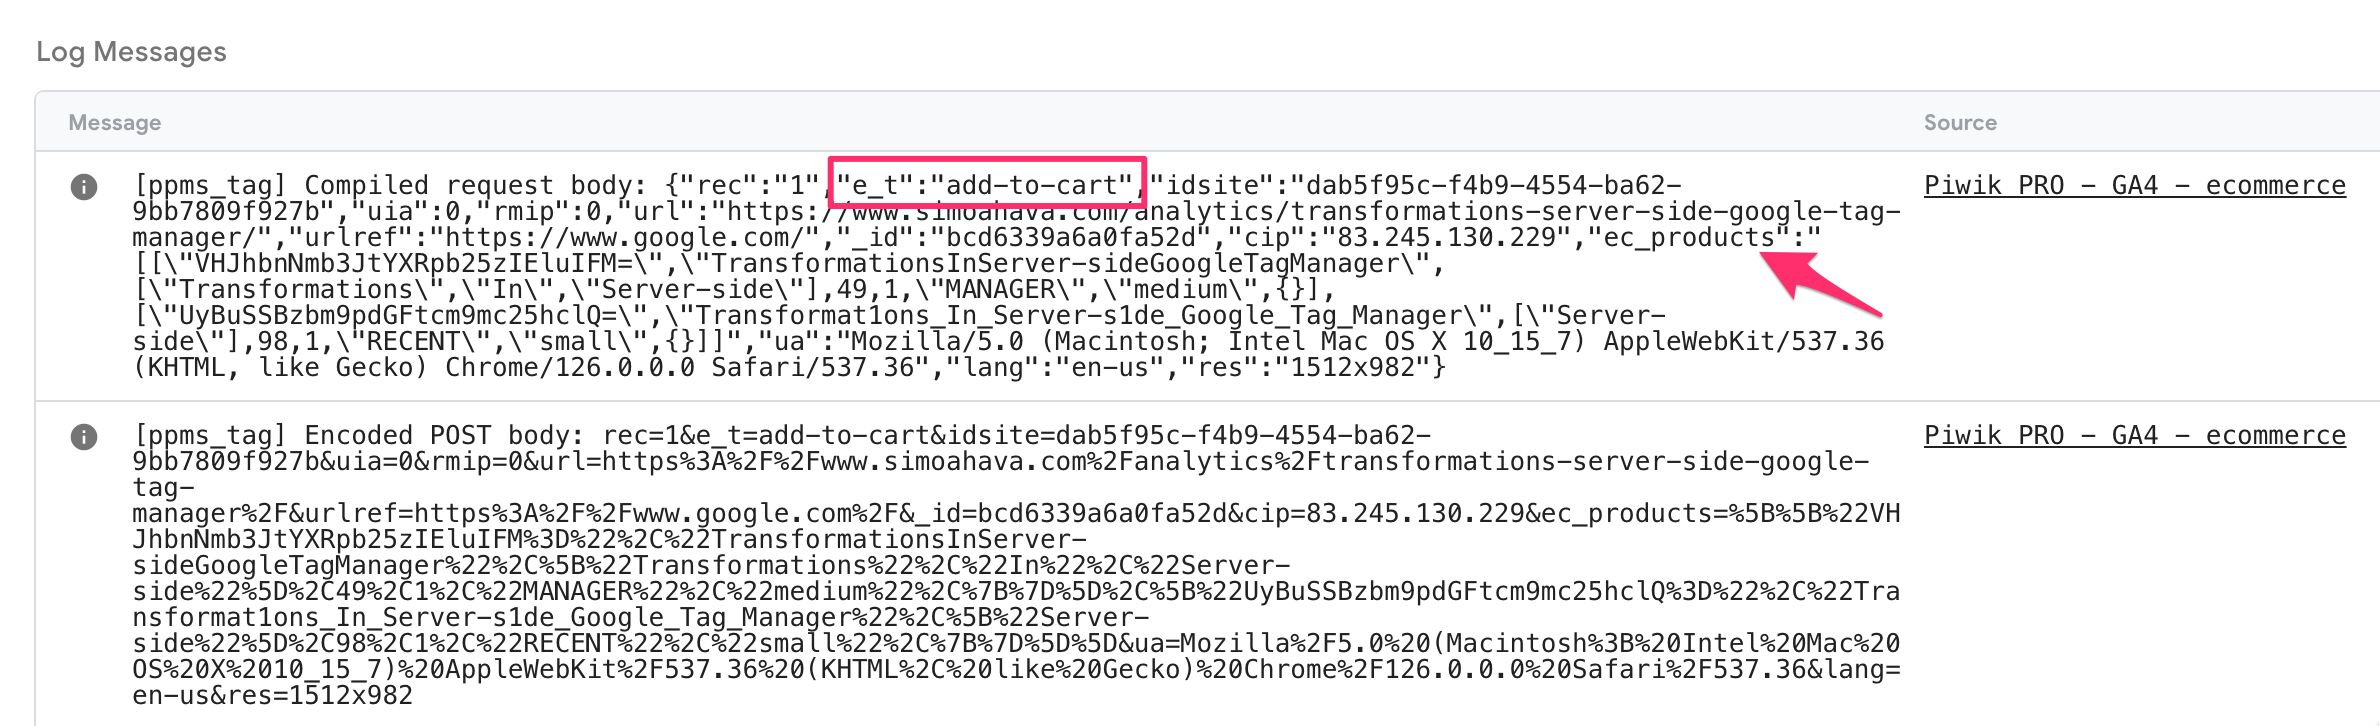
The first thing we’ll do is send a page_view event to server-side Google Tag Manager, select it, and open the Console tab.
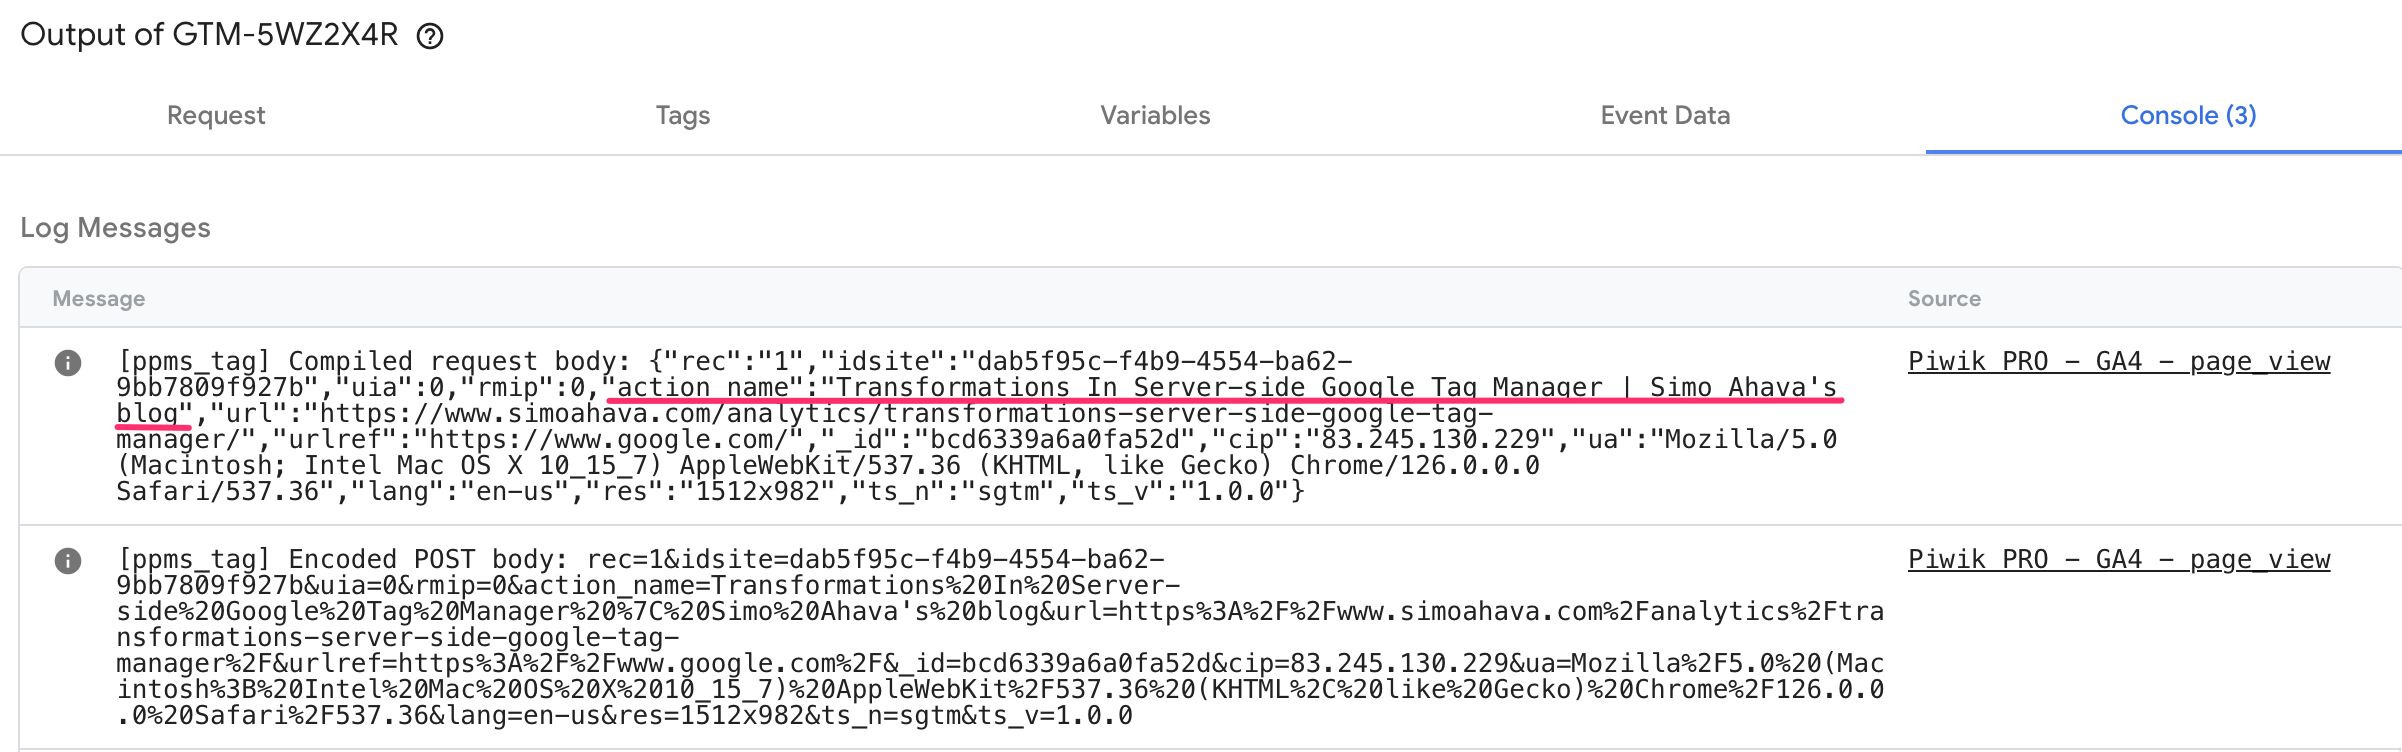
The Piwik PRO tag outputs this information into the console.
In the Compiled request body, you should see the action_name with the page title. This is important, because this distinguishes the hit as a page view request.
Check also that you see the _id parameter in the request. Copy the value of _id to the clipboard.
Next, open the Tracker Debugger in Piwik PRO. Filter the results for the Visitor ID you copied to the clipboard. This is what you should see:
Everything just … works! Your Page View hit has all the necessary data included.
You can click the little </> button next to the Page view event name to view more details about what was collected. The raw data should match what you saw in the Console tab of server-side Google Tag Manager.
And that’s it for the page view event! It works! Here’s a recap of what was done:
- Create a new Piwik PRO tag.
- Fill in the Account Name and Site or App ID fields correctly.
- Trigger the tag on the
page_viewevent collected by the GA4 client.
Next, let’s do the same for the three e-commerce events.
The product-detail-view event
The GA4 analogy to Piwik PRO’s product-detail-view is the view_item event.
Let’s follow the same process as above to map this event correctly.
First, we’ll create a new Piwik PRO tag with the Account Name and Site or App ID populated.
Now, let’s choose Ecommerce as the Event Type.
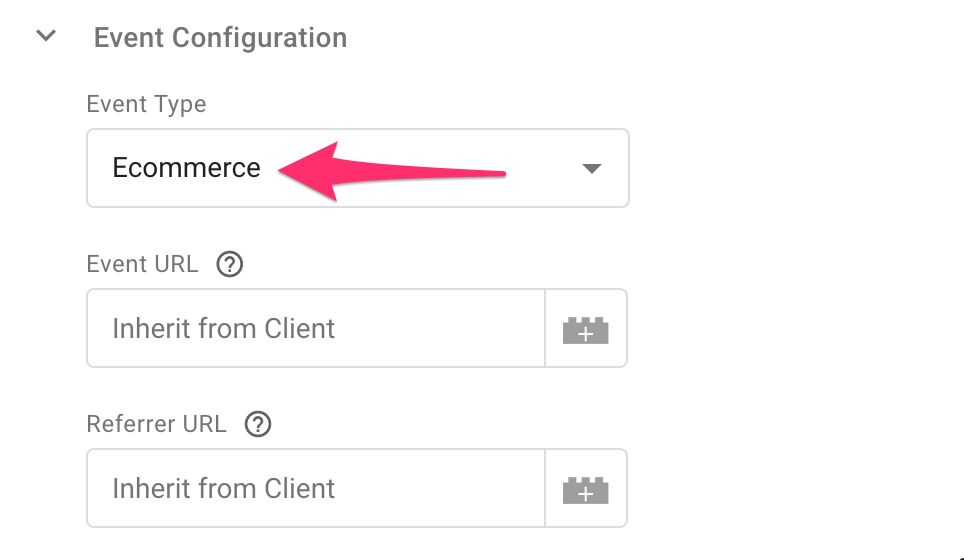
When you choose this, a new section titled Ecommerce appears.
Here, the key field is Ecommerce Event Type. We’ll keep that as Inherit from Client, but it won’t work properly until we add the relevant field into the Event Data object using a Transformation. We’ll get to this in a bit.
Create a Custom Event trigger with ^(view_item)$ as the value of the Event name field, and check Use regex matching. Add a condition to check for the GA4 Client, same as you did with the Page View tag.
Once ready, save the trigger and add it to the tag.
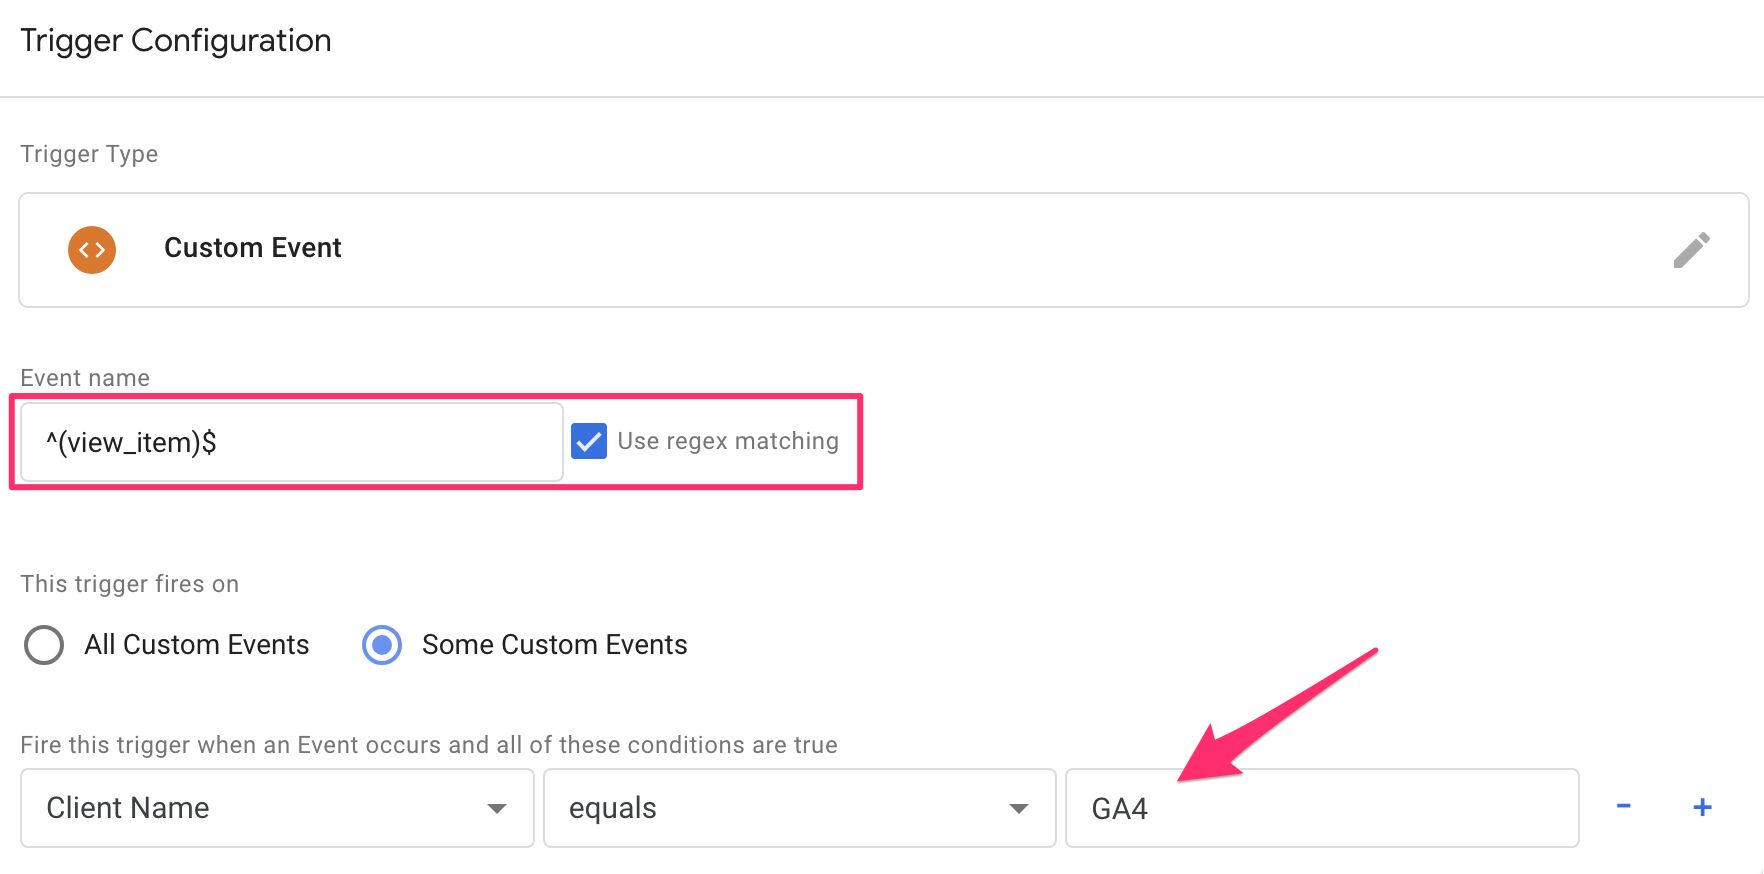
We’re using a regex match for the event name, because we’ll expand this trigger soon with other Ecommerce events.
Finally, save the tag.
The Event Type parameter
The Event Type parameter in the Piwik PRO request is e_t, and so the name of the field we need to add with a Transformation is x-pp-e_t (remember that x-pp- is the prefix for all Piwik PRO-specific parameters).
Piwik PRO accepts one of these as the value: order, product-detail-view, add-to-cart, cart-update, remove-from-cart. In this article, we’ll focus just on the first three.
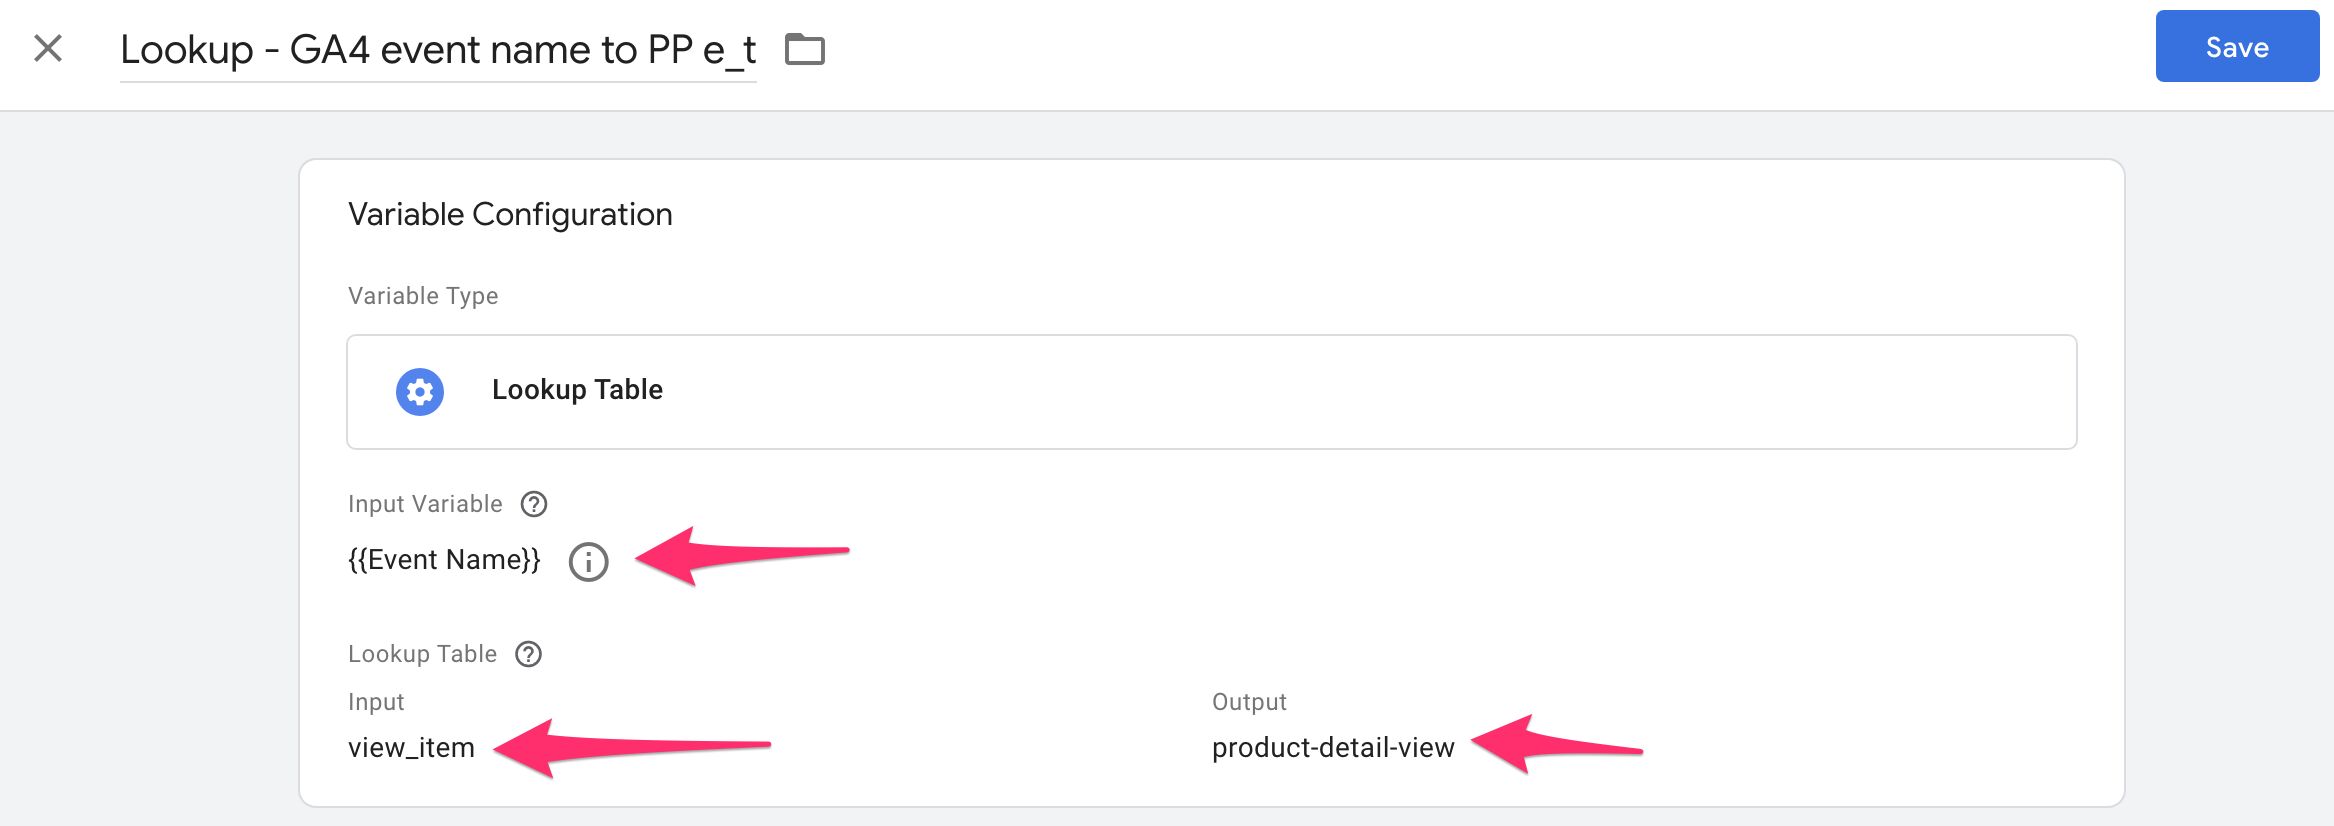
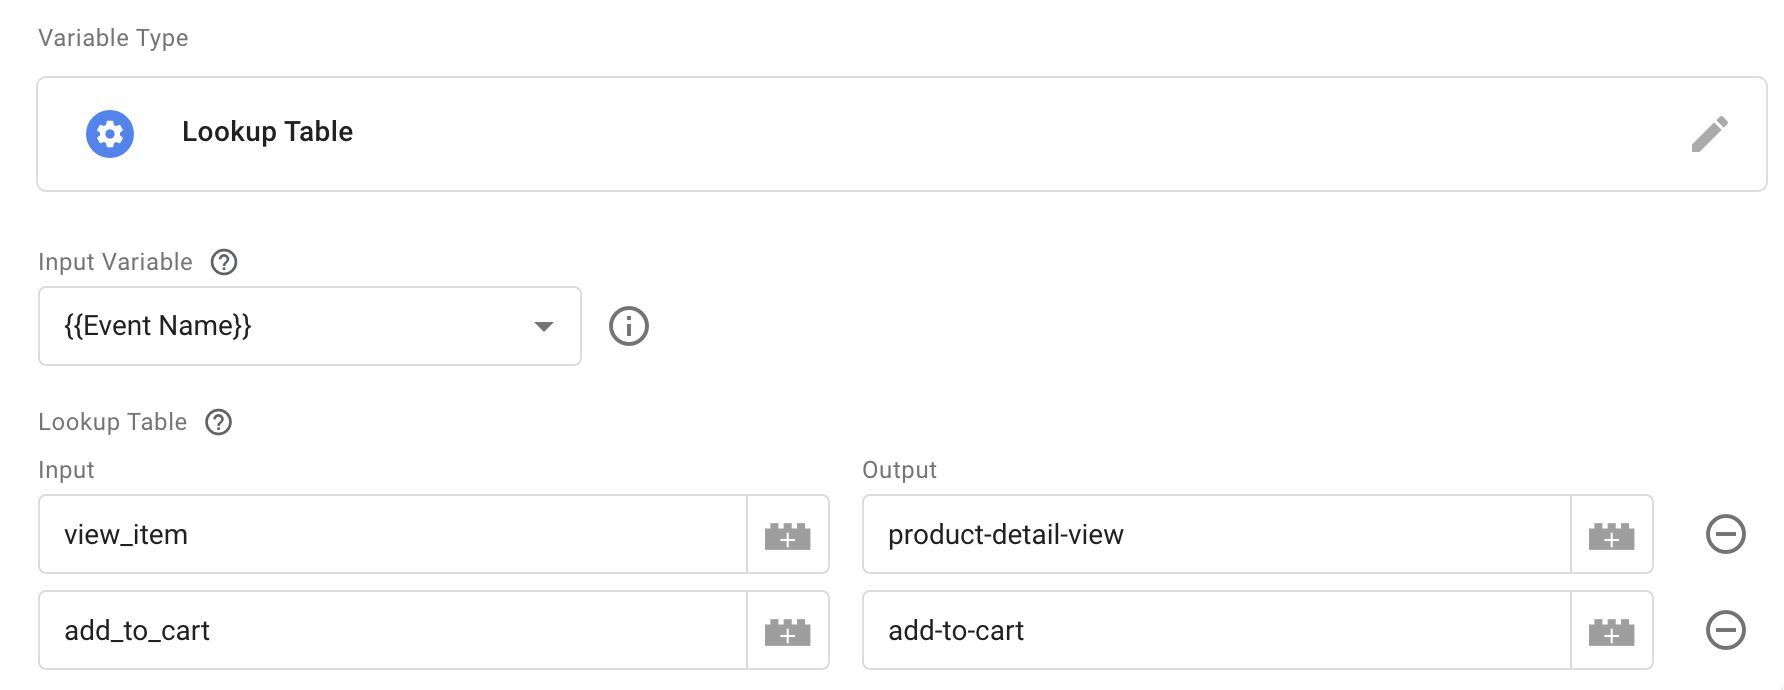
To make things easier to manage, start by creating a new Lookup Table variable, where the Input variable is the built-in {{Event Name}} variable. Add just one row, which maps view_item in the input (the value of {{Event Name}}) to product-detail-view in the output:
Next, create a new Augment Event Transformation for Piwik PRO.
Go to Transformations in the container UI, and click to create a new Augment Event Transformation.
Here, add a new row with x-pp-e_t as the Name. Set the Lookup Table variable you just created as the Value.
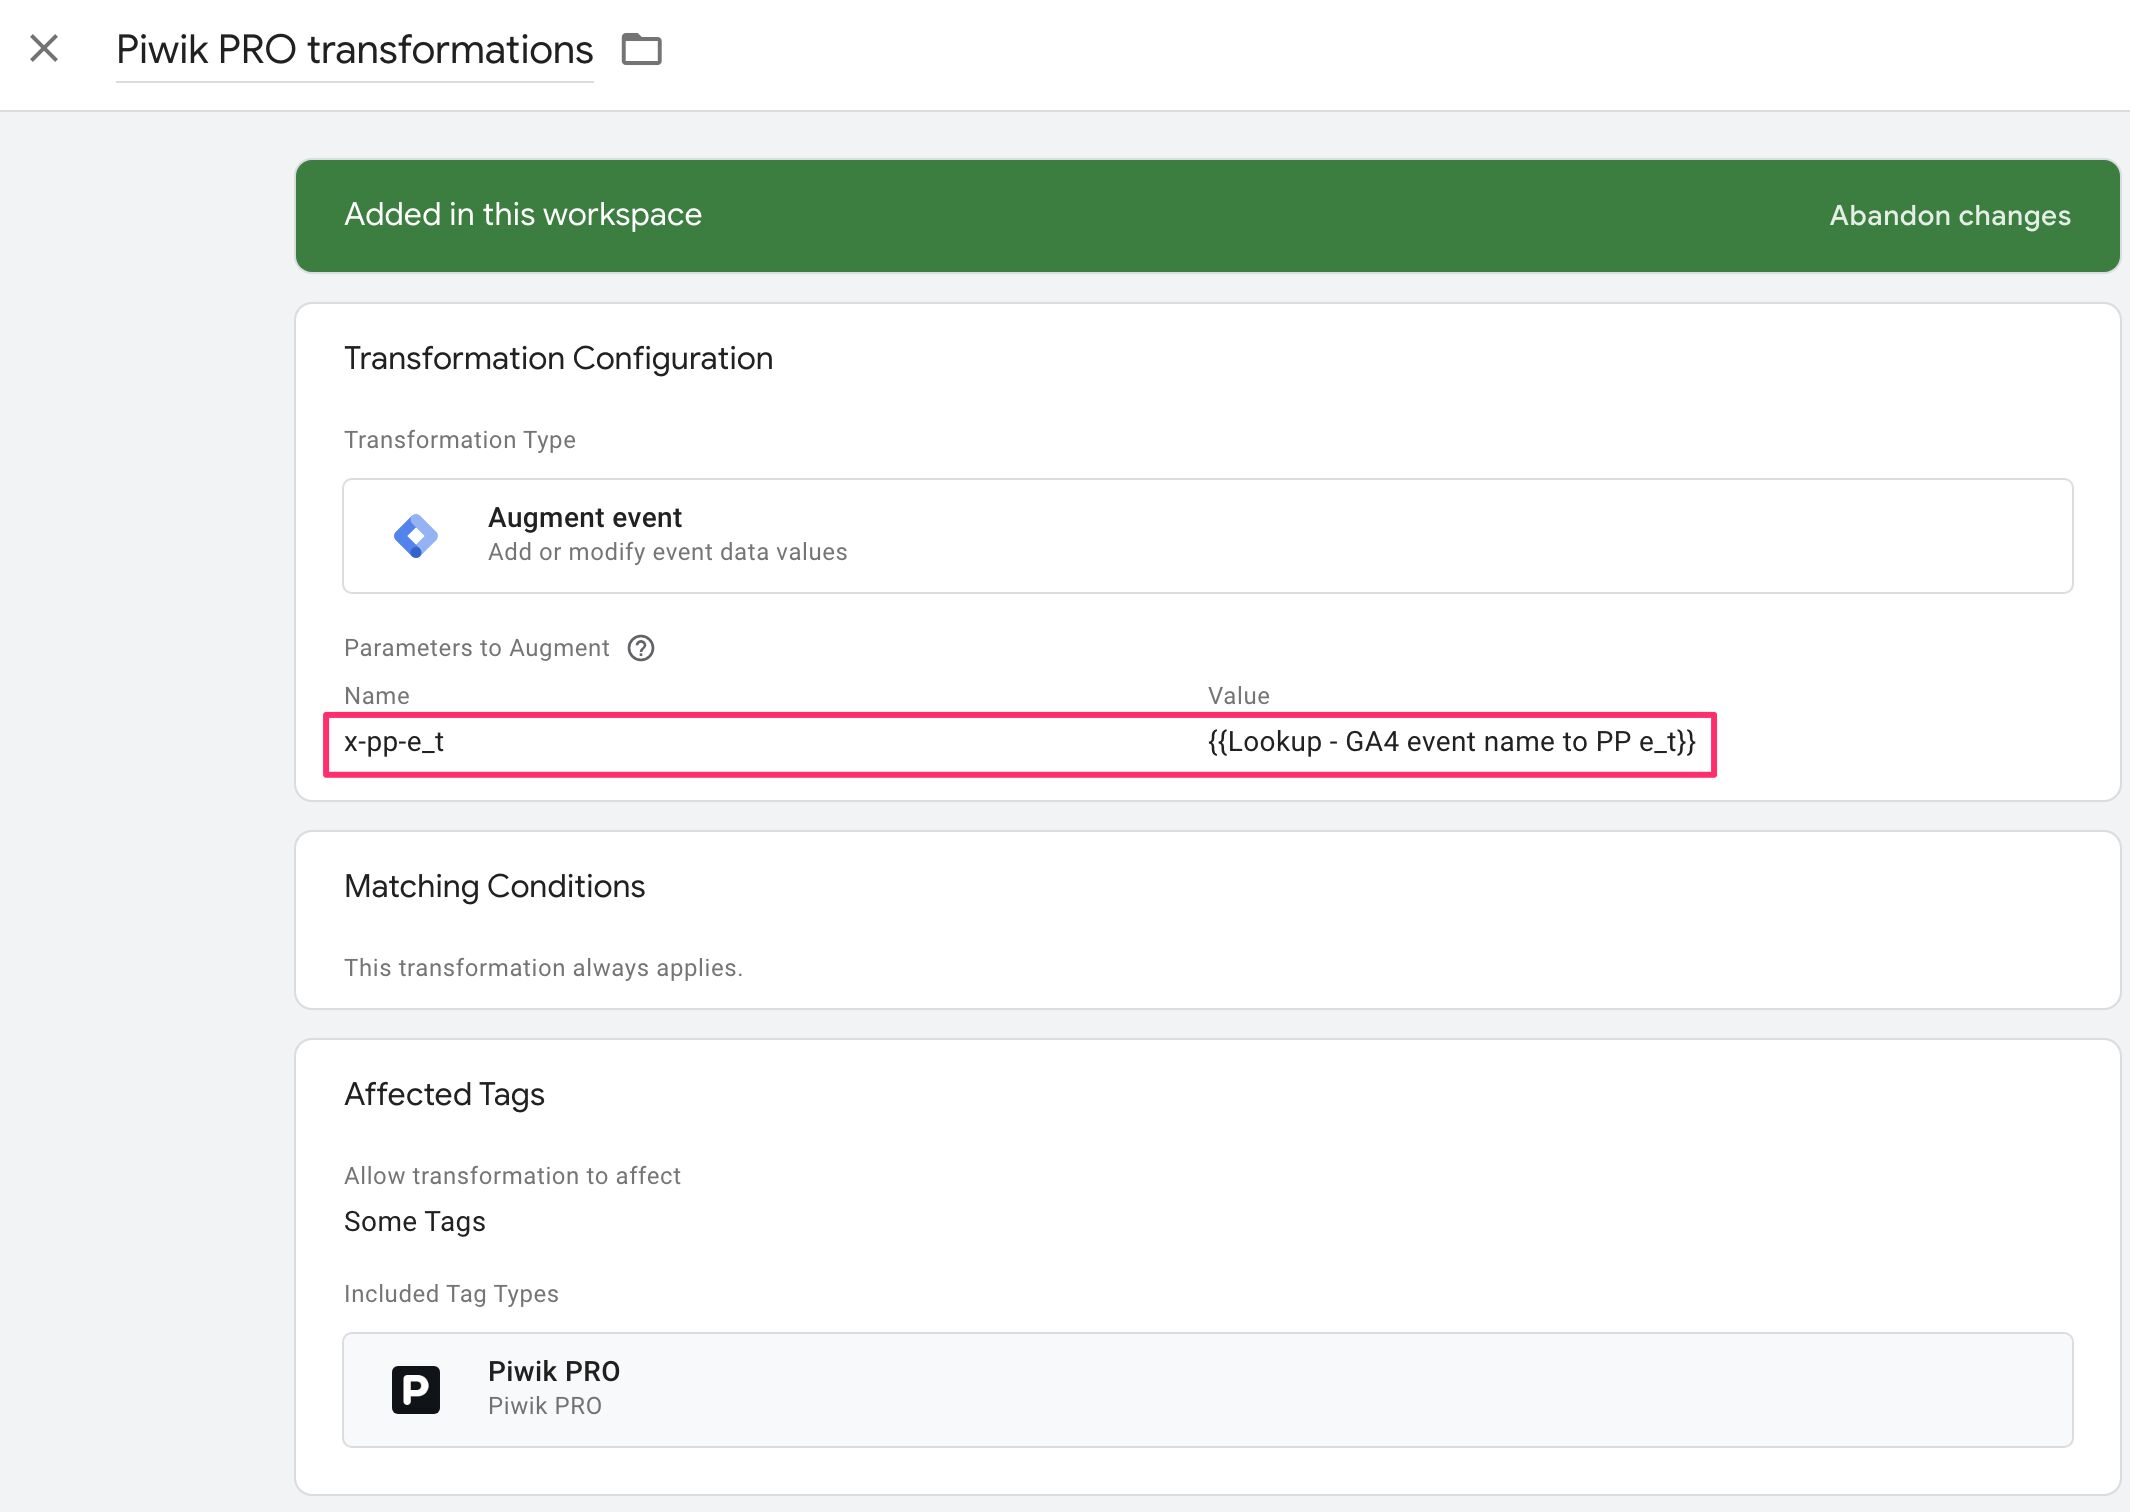
This Transformation populates the x-pp-e_t field with the correct Ecommerce event name if the event name is mapped in the Lookup Table.
Preview and test
Once you’ve created the tag and the trigger and you’ve updated the Transformation, you can go into Preview mode and do whatever it takes to fire a standard view_item event to your GA4 Client.
The Piwik PRO tag should fire with the view_item event, and you should see something like this in the Console tab with the event selected:

When you open Tracker Debugger in Piwik PRO, you should see this:
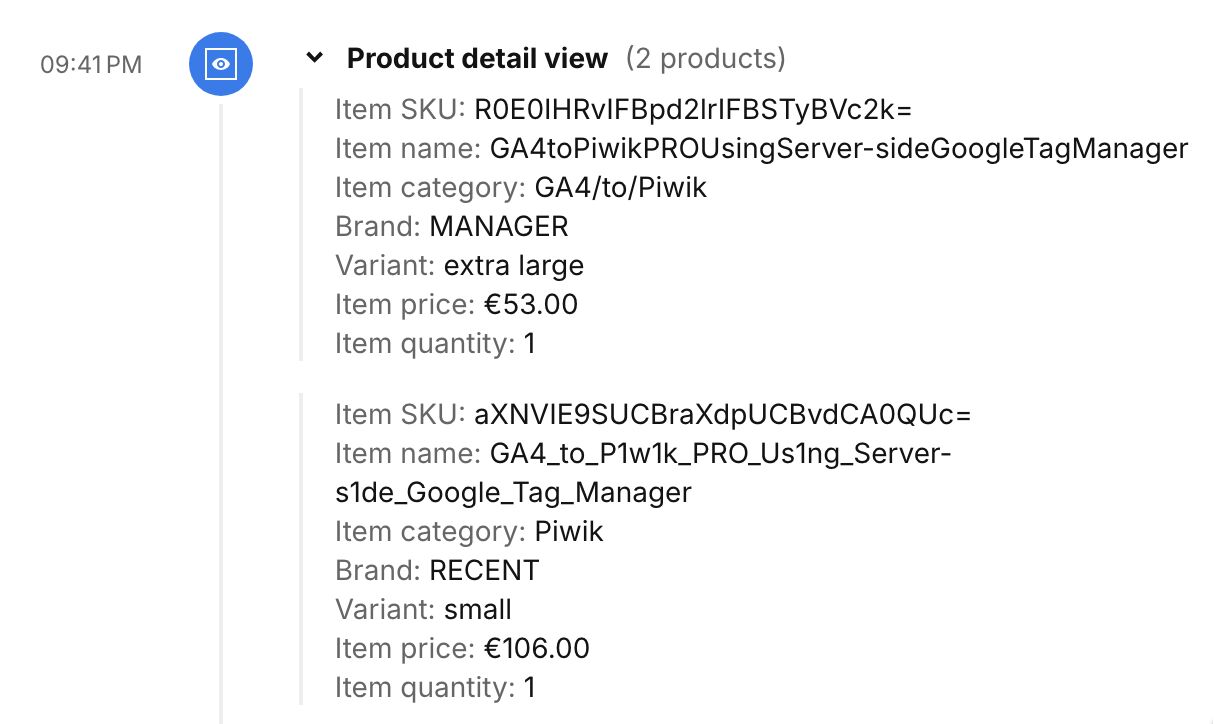
The tag template automatically mapped the items array that the GA4 Client produced into the correct format digested by the Piwik PRO tag (ec_products).
Nice, product-detail-view works now, too. Here’s what we did:
- Create a new Lookup Table that maps GA4 event names to their Piwik PRO counterparts.
- Create a new the Augment Event Transformation with Event Type (
x-pp-e_t), derived from the built-in{{Event Name}}variable using the Lookup Table. - Add a trigger to the tag that only fires it when an Ecommerce event occurs (
view_itemin this case).
This is getting easier by the event!
Next, add-to-cart.
The add-to-cart event
Because we’ve laid all the groundwork, getting the add-to-cart event working is as easy as editing the Lookup Table variable for the x-pp-e_t Transformation and modifying the trigger to also fire on the add_to_cart event.
Here’s what the modified Lookup Table variable looks like:
Please note that the Input has
add_to_cartwith underscores (this is the event name as GA4 uses it) and the Output hasadd-to-cartwith hyphens (this is the Event Type for Piwik PRO).
Here’s what the updated trigger should be – as you can see, the regular expression is now ^(view_item|add_to_cart)$.
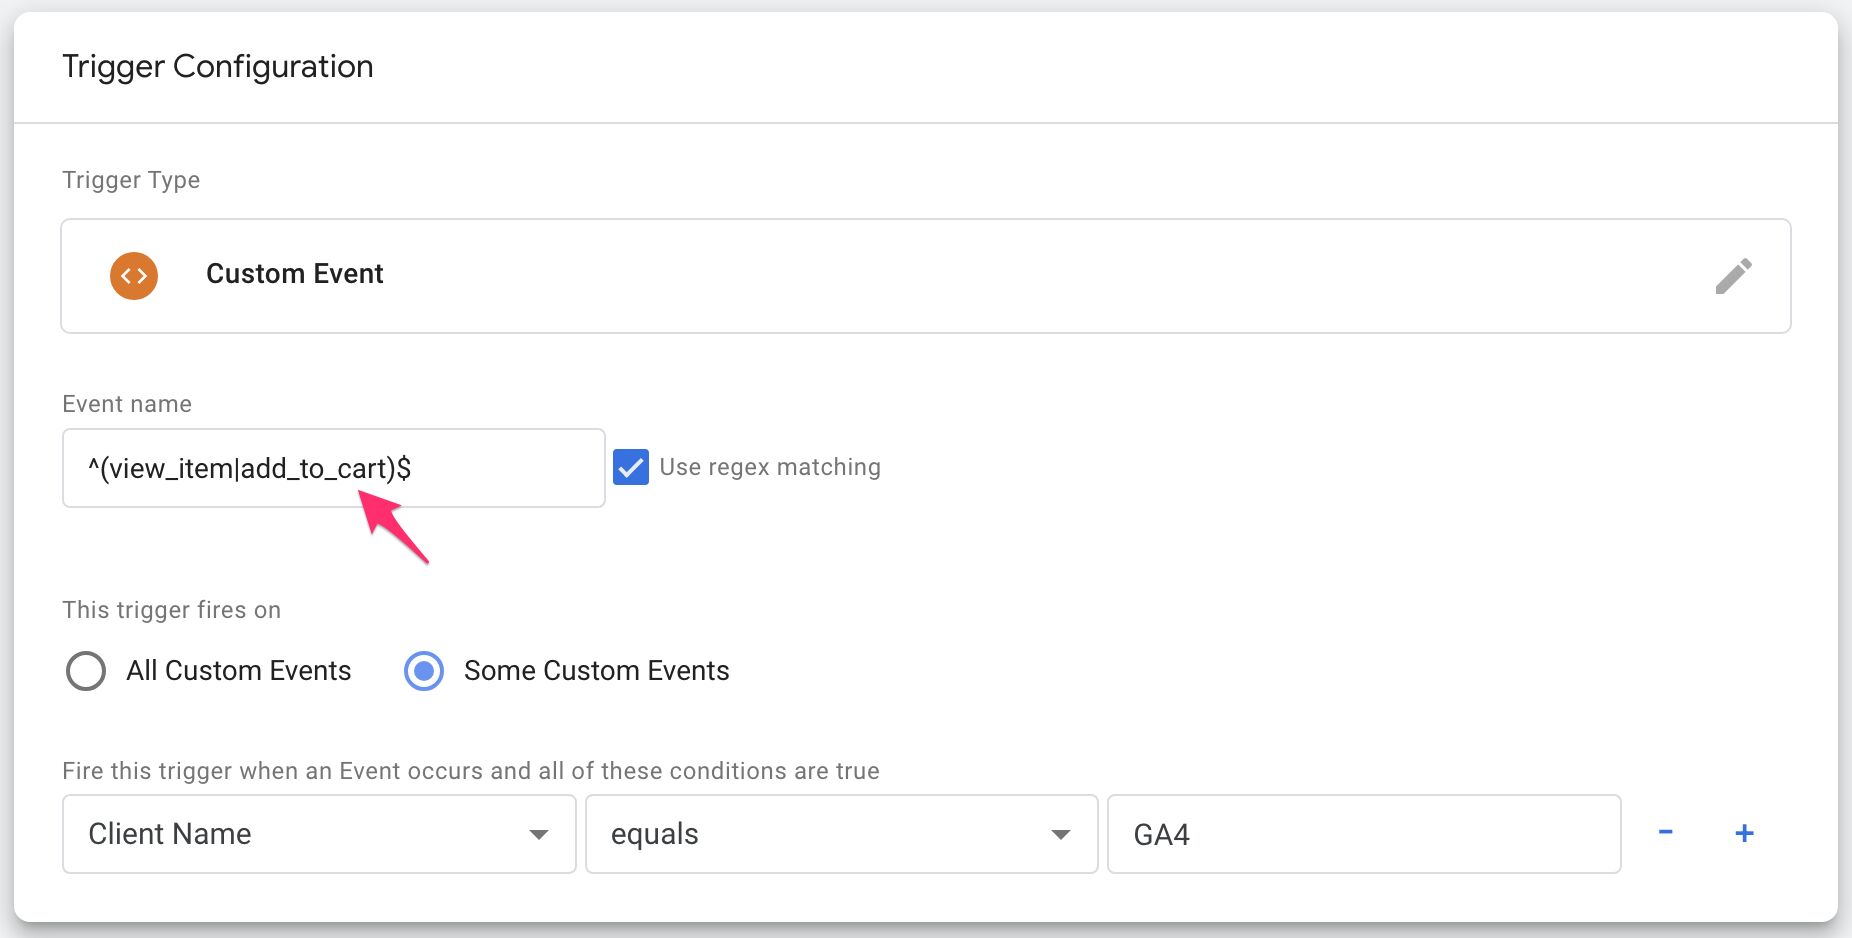
Again, make sure the trigger looks for the GA4
add_to_cartevent name and not the Piwik PROadd-to-cart.
Save everything.
Preview and test
This should be easy – go to Preview mode, send a GA4 add_to_cart event to your Server container, and check the Console tab with the add_to_cart event selected:
Wow, that looks good right away! The Tracker Debugger confirms our success:
Excellent, it’s all good!
Here’s what we did this time:
- Modify the Lookup Table to process the mapping of
add_to_cart(GA4) toadd-to-cart(Piwik PRO). - Update the trigger to also fire with the
add_to_cartevent.
The final event we’ll cover in this article is order.
The order event
The order event in Piwik PRO maps to the purchase event of GA4.
Let’s see if everything is as easy as in the previous section with add-to-cart.
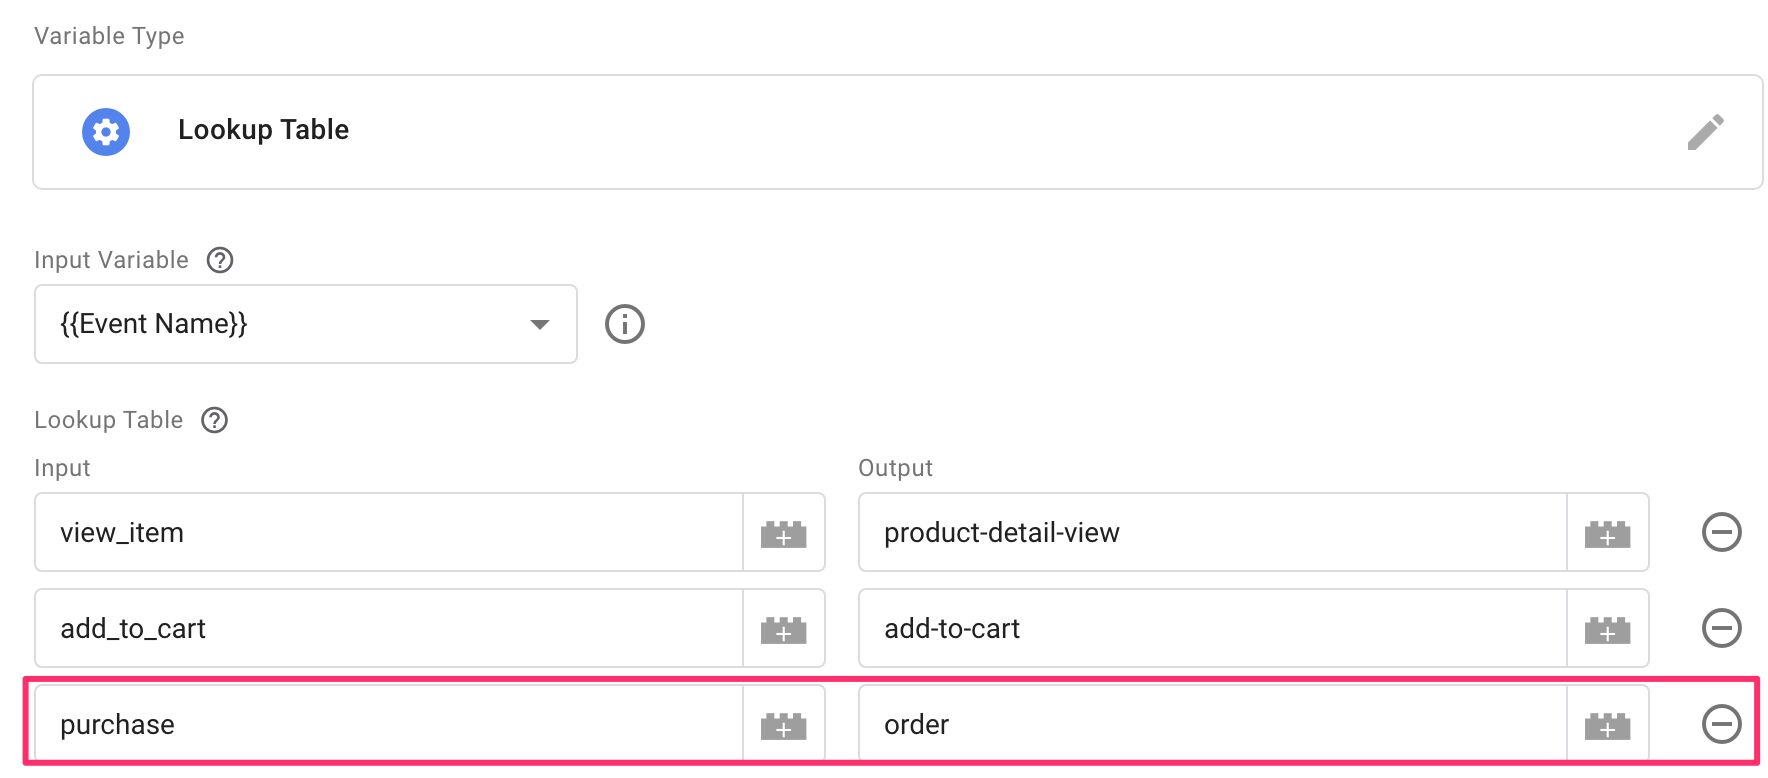
First, update the Lookup Table to account for the purchase > order mapping.
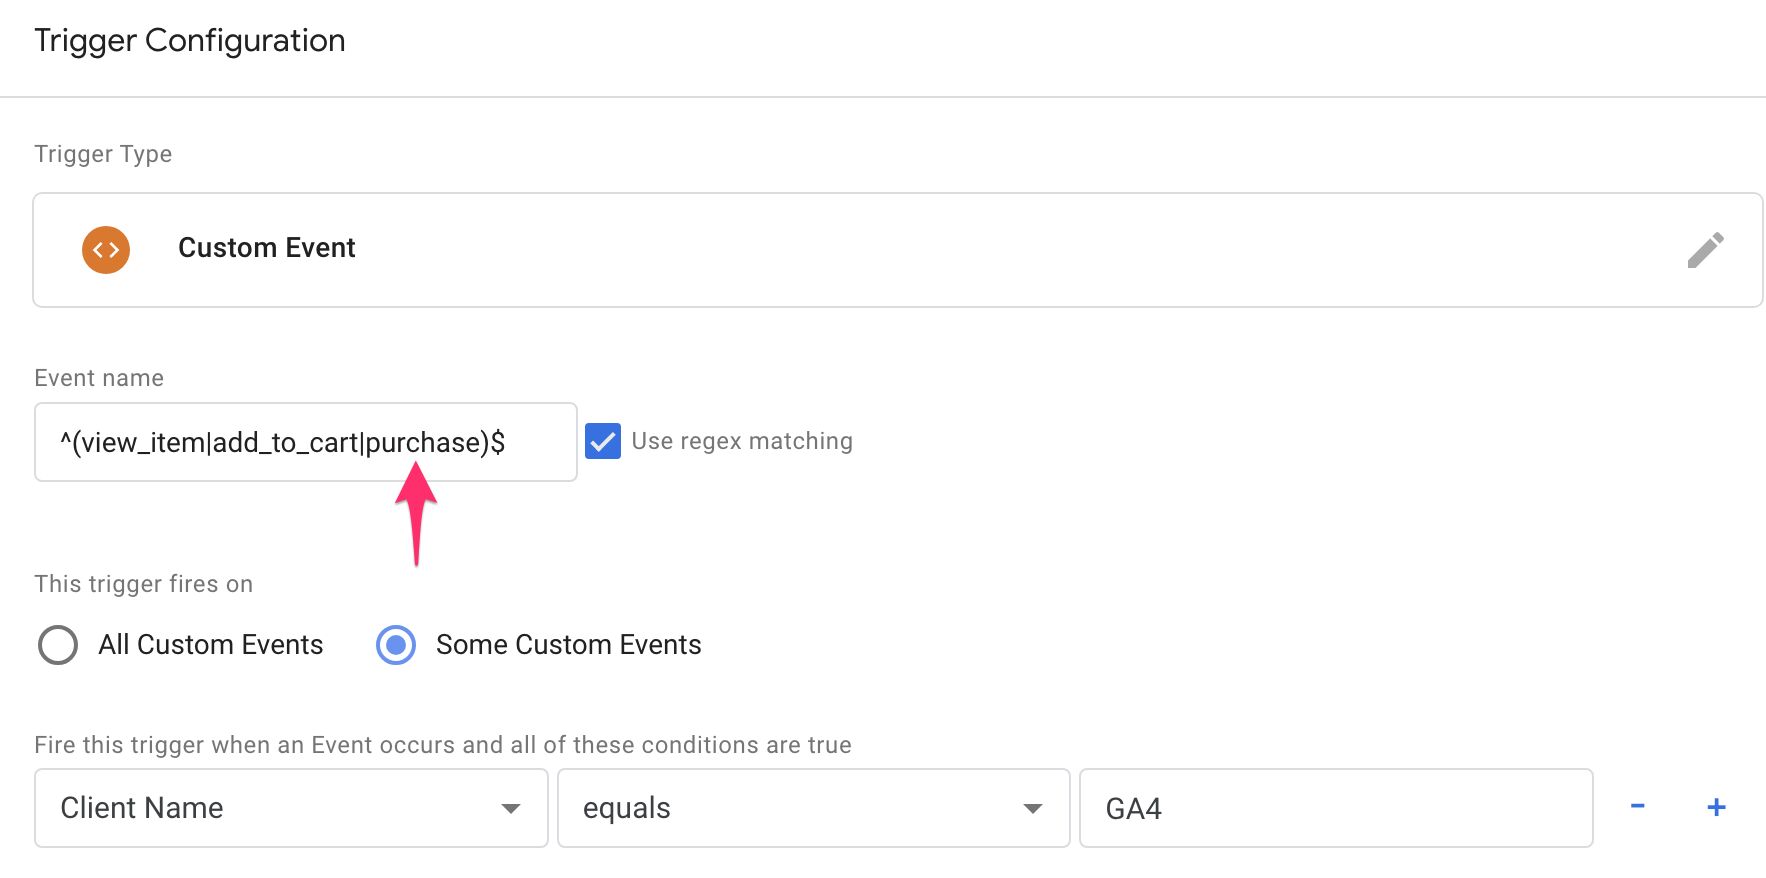
Then, update the trigger to listen for the purchase event, too, by changing the regular expression to ^(view_item|add_to_cart|purchase)$.
Finally, save everything.
Preview and test
Refresh Preview mode, and do something to generate a purchase event to your SGTM endpoint. This is what the Console tab should include:

OK, ok! It looks good. The Event Type (order) is there, we’ve got revenue (mapped from GA4’s value automatically), ec_id is there with the Order ID, and ec_products is populated as well. What about the Tracker Debugger?
It’s good!
Thanks to the automatic mapping of transaction_id to ec_id and value to revenue, we didn’t have to make any changes to the tag.
Summary
In this article, we started with a GA4 data stream collecting the following events:
page_viewview_itemadd_to_cartpurchase
To make things easier, we created a Transformation that generates some critical Piwik PRO-specific keys into the Event Data object:
We didn’t have to make any tag-specific changes. The template handles the most critical mappings automatically.
We did create a separate tag for ecommerce. I’m a huge fan of separating concerns, and this gives us room to maneuver in case we want to make ecommerce-specific adjustments to the data flow (which is very often the case!).
This is by no means an exhaustive setup. Remember that Piwik PRO and GA4 have vastly different data models. You can check the Piwik PRO HTTP API documentation to see the wide variety of signals that Piwik PRO can consume.
Ideas for further development could include:
- Parse the GA4 session cookie for the session counter and map that to the
_idvc(Visit Counter) parameter in the tag. - Parse the GA4 Client ID cookie for the first visit timestamp and map that to the
_idts(Time of First Visit) parameter in the tag. - Add page timing metrics to the Page View tag.
- Create Goal Conversion events from the ecommerce hits.
- Map the Piwik PRO
pingevent to GA4’suser_engagementhits.
I hope this guide was useful! Let me know in the comments if you have questions about mapping GA4 requests to Piwik PRO events using server-side Google Tag Manager.
