Android Quickstart With Google Analytics For Firebase And Google Tag Manager
With the release of Google Analytics: App + Web, Firebase is suddenly all the rage. The new App + Web property can combine data from your website and mobile apps, as long as the latter uses Google Analytics for Firebase, formerly known as Firebase Analytics.
In this guide, I’ll walk you through the steps of creating an extremely simple Android application, and we’ll then create a Firebase project, and for good measure add Google Tag Manager to the mix.
UPDATE 21 August 2019: I have now published a similar guide for iOS, too. Enjoy!
To follow along, all you need is a computer. You don’t need an Android device, even if debugging is nicer with an actual phone rather than an emulator.
I’ve also recorded a video if you prefer to see the guide rather than read it.
Table of Contents
The Simmer Newsletter
Subscribe to the Simmer newsletter to get the latest news and content from Simo Ahava into your email inbox!
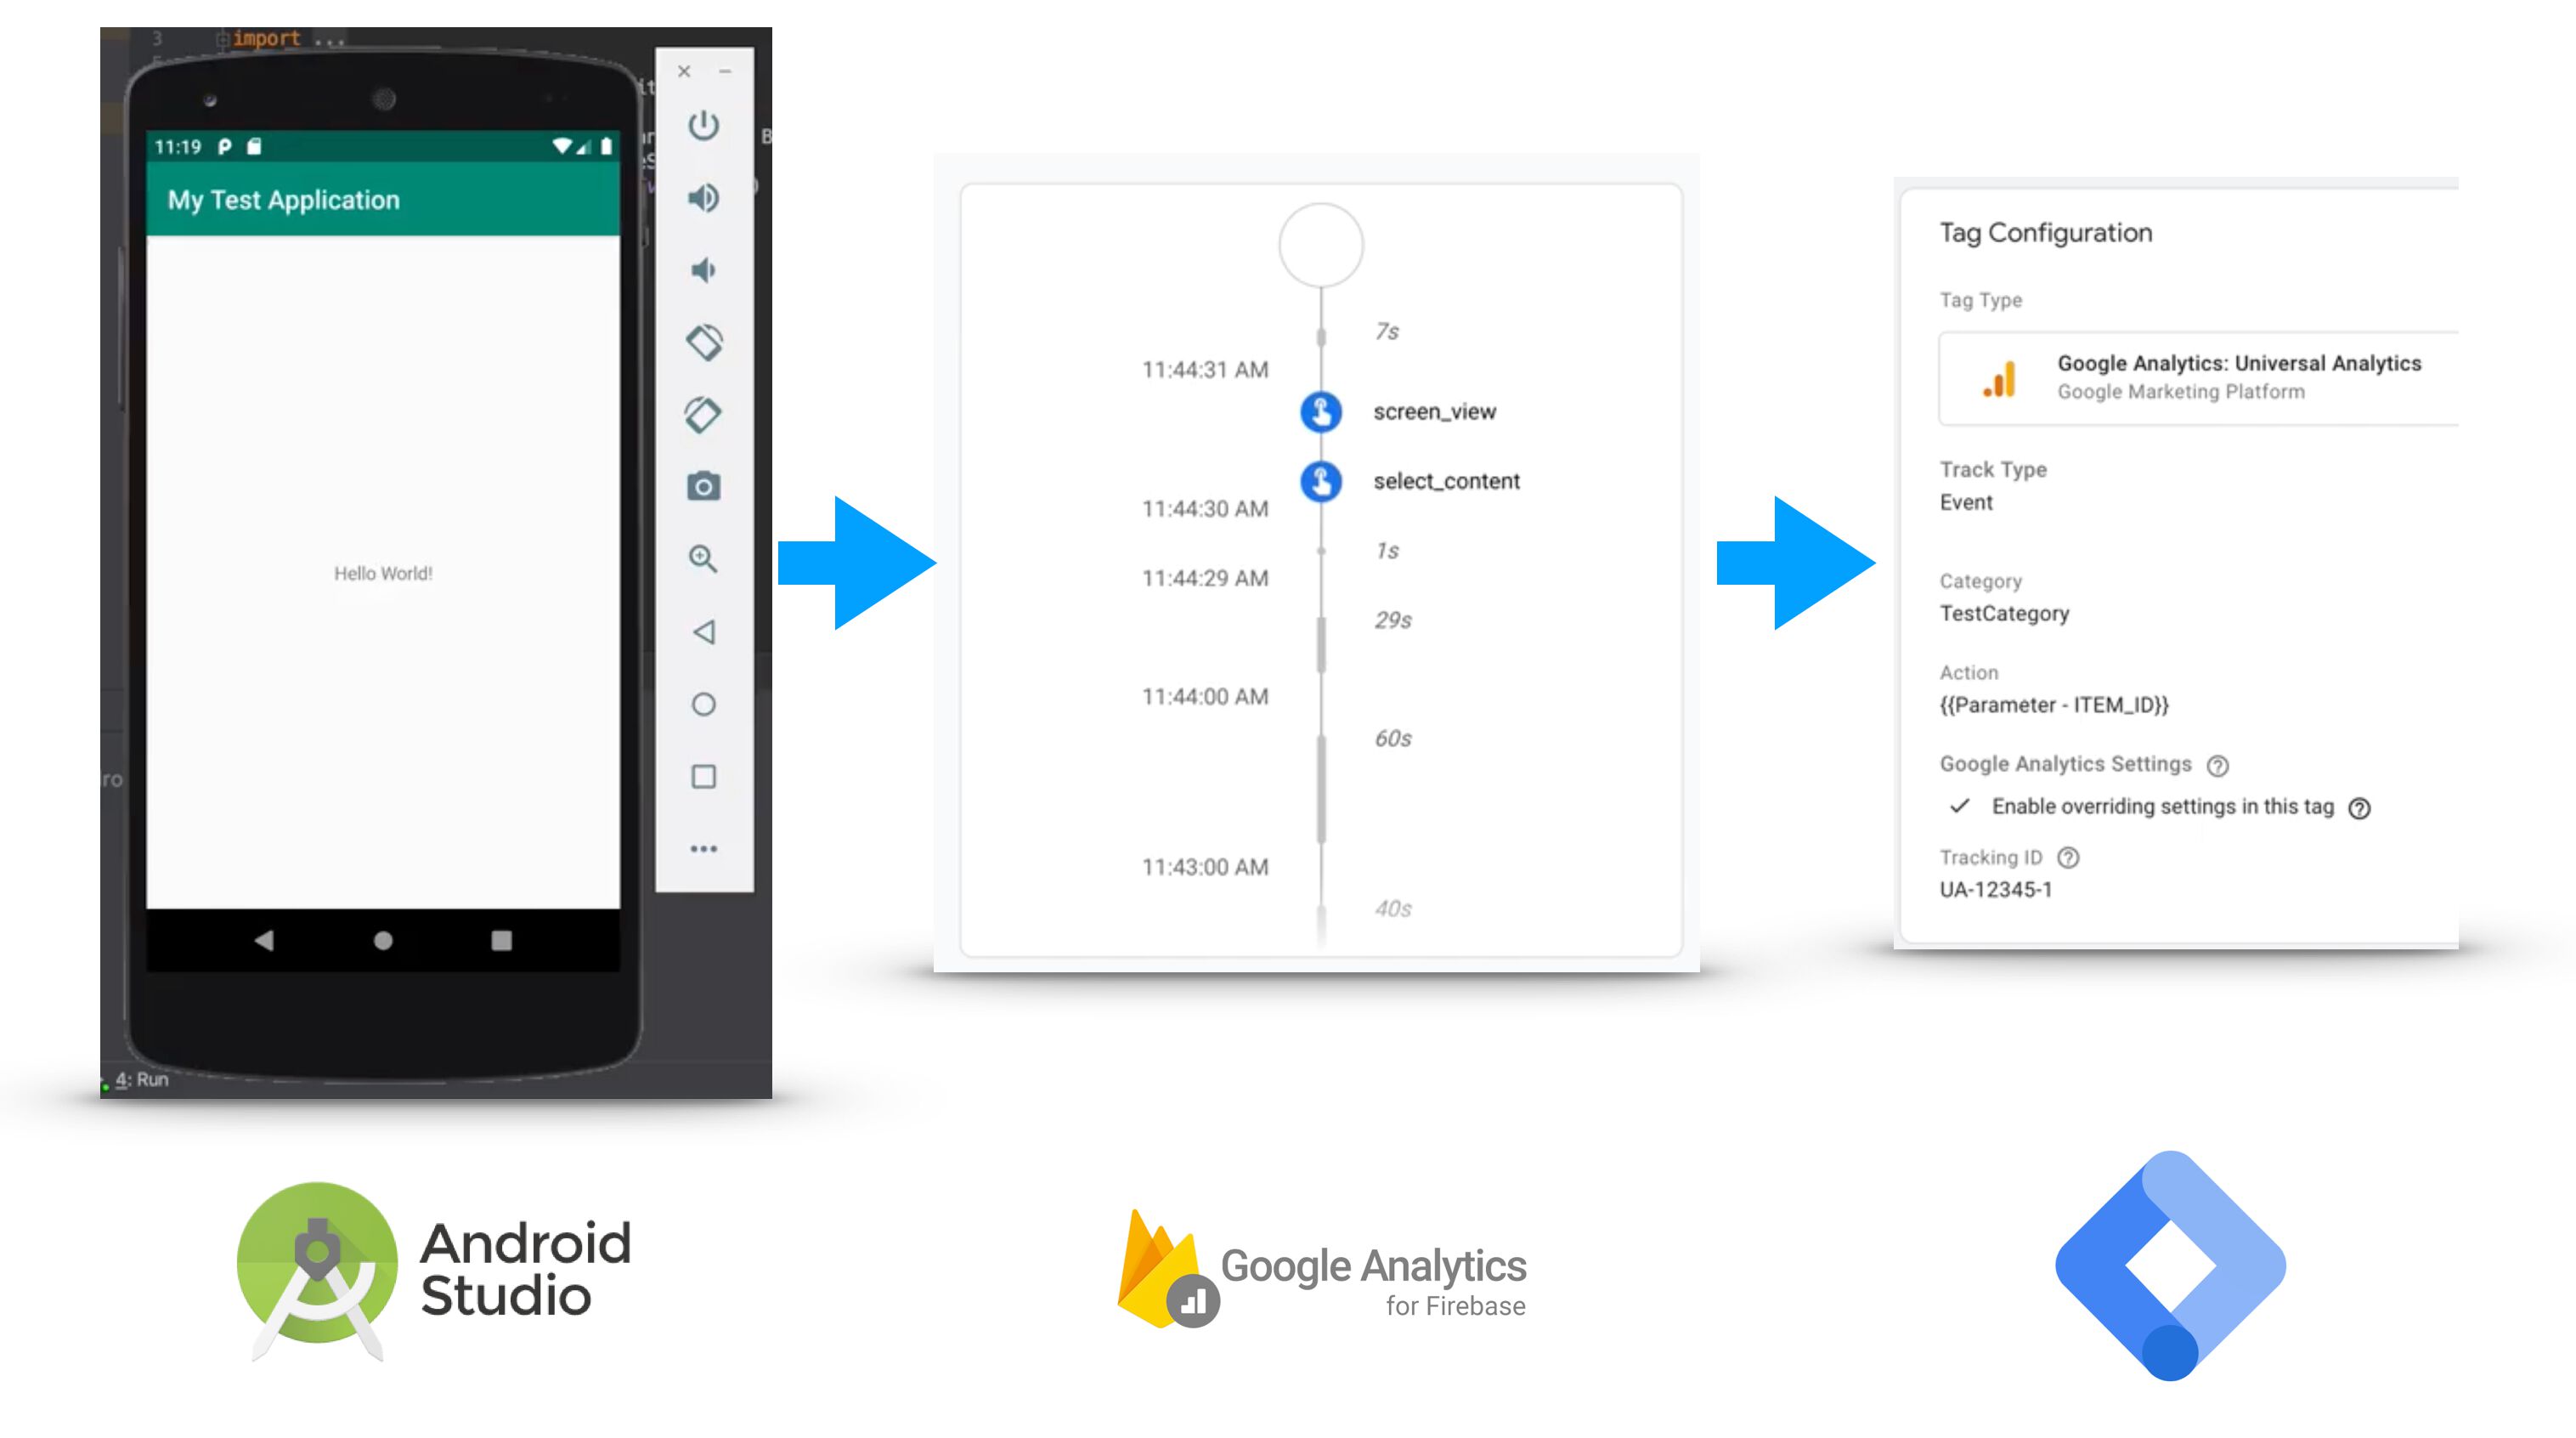
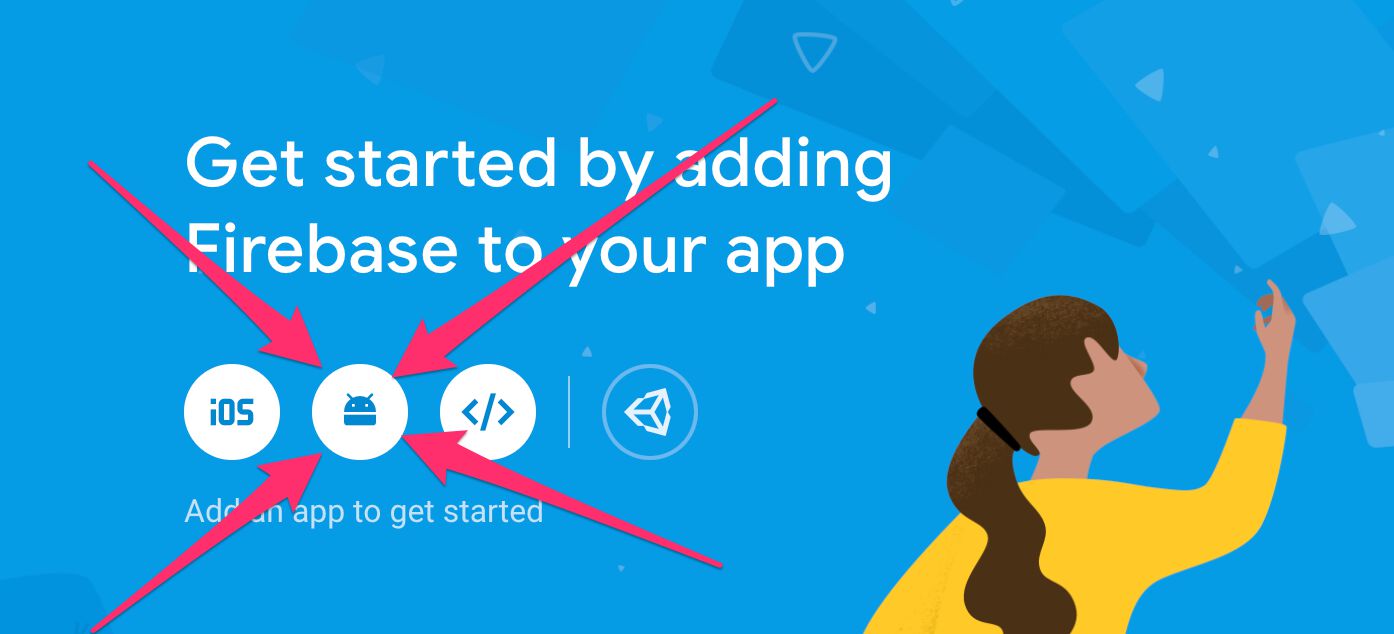
What you’ll build
We’ll create an Android application using Android Studio. This application can be run on your Android device or in an Android emulator (a virtual device).
We’ll create a Firebase project and deploy Firebase into the application. We’ll fire a basic event so we’ll know how to debug the hits sent from Firebase to Google Analytics.
We’ll create a Google Tag Manager container for Firebase, and we’ll install that in the application. We’ll use that container to take the event we configured for Firebase and send the data to a (non-Firebase) Google Analytics property as well.
The purpose of this guide is to show you how each of the components listed above works. It will do so in a very superficial manner, but you should be able to see how easy it is to create a mobile application and add some basic analytics to it.
Step 1: Create a project in Android Studio
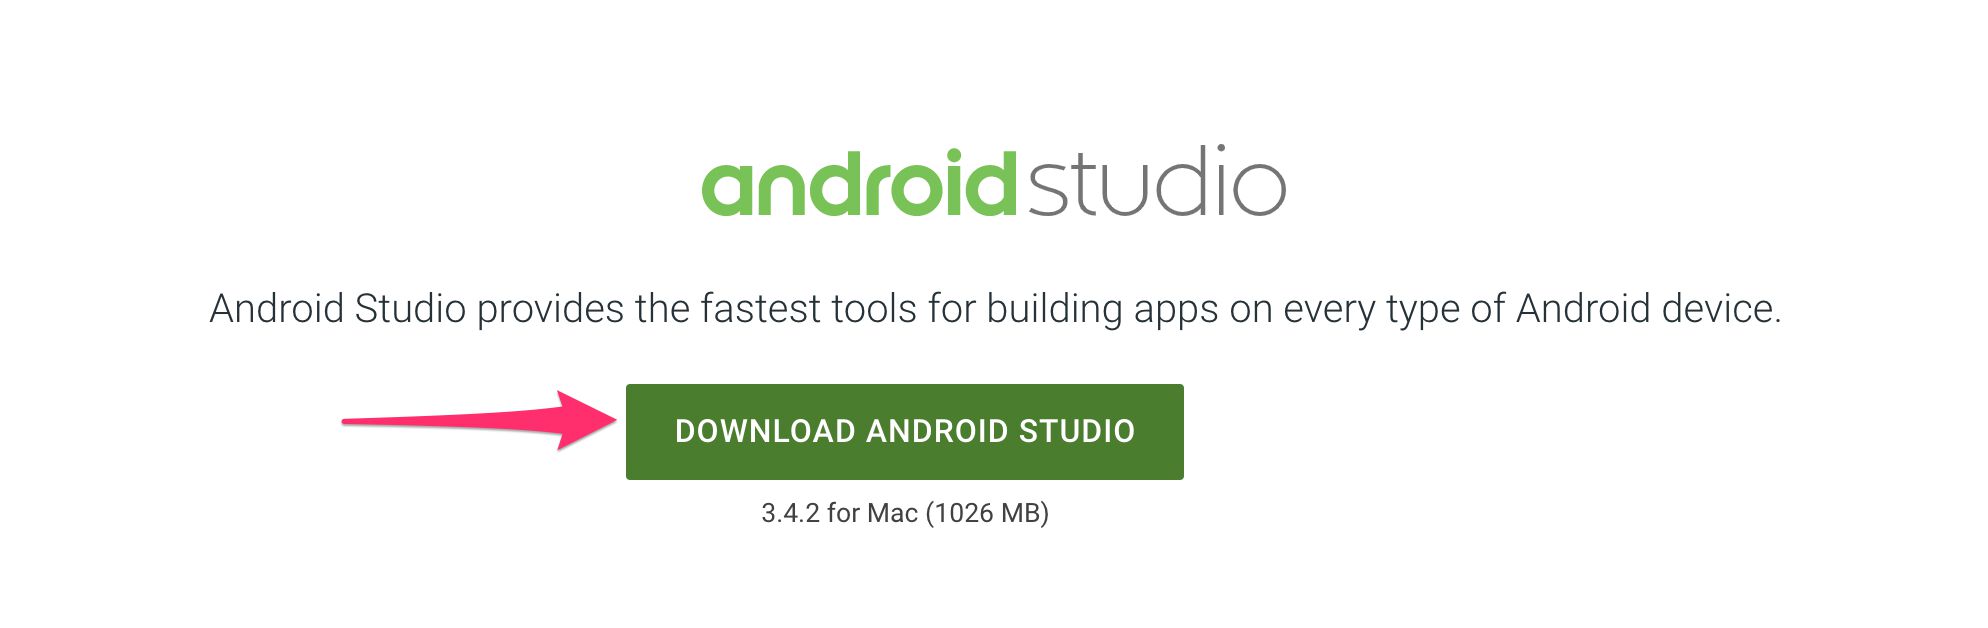
First of all, visit this link to download Android Studio. Android Studio is an IDE (integrated development environment) for building on top of the Android operating system.
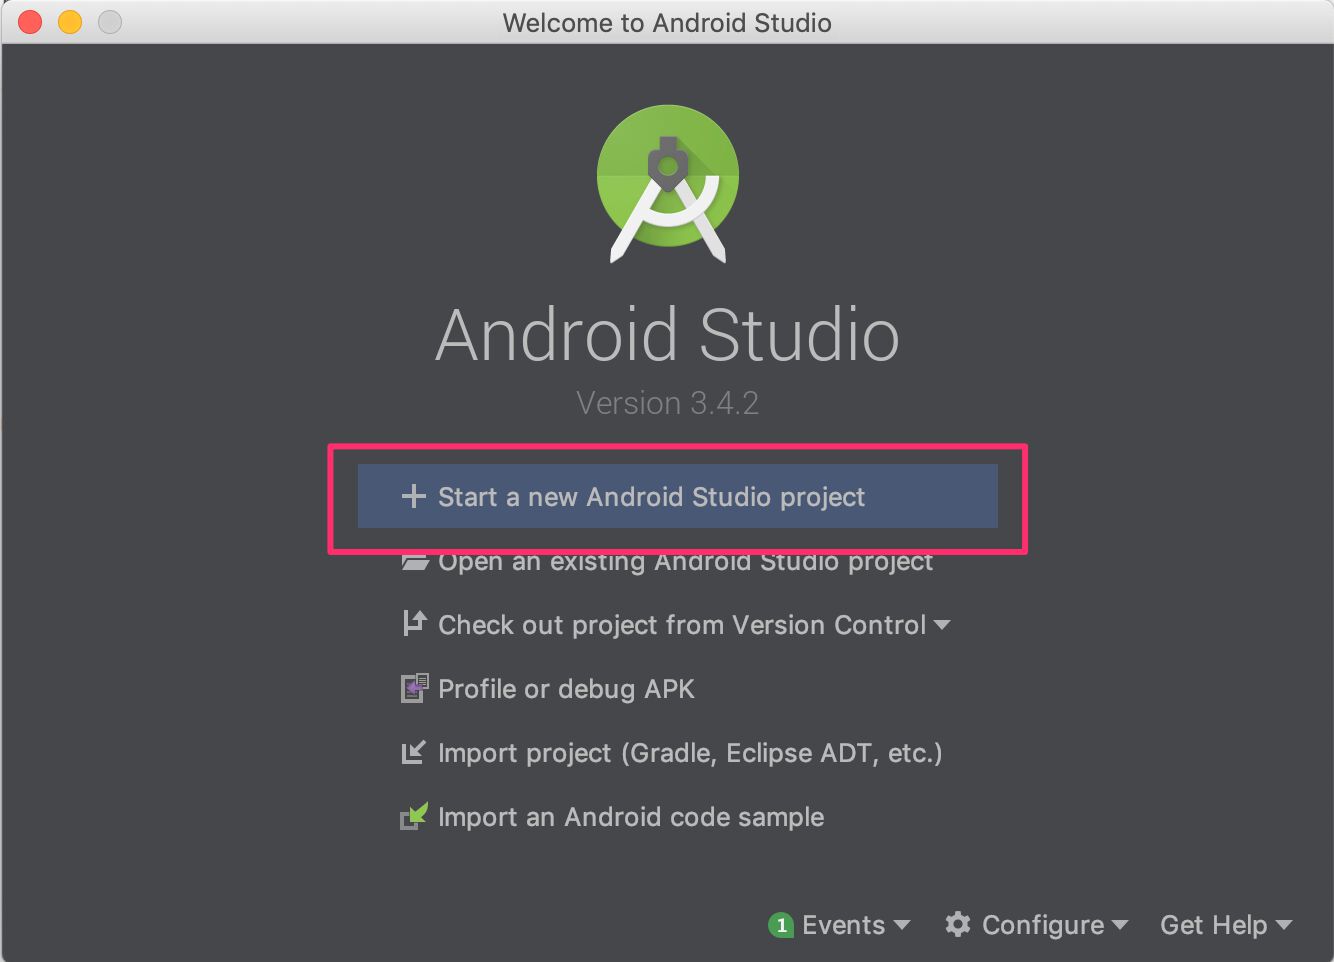
We’ll be using Android Studio to develop and debug our application. So, to get things started, fire up Android Studio, and choose Start a new Android Studio project from the splash screen.
Choose Empty Activity as the template and click Next.

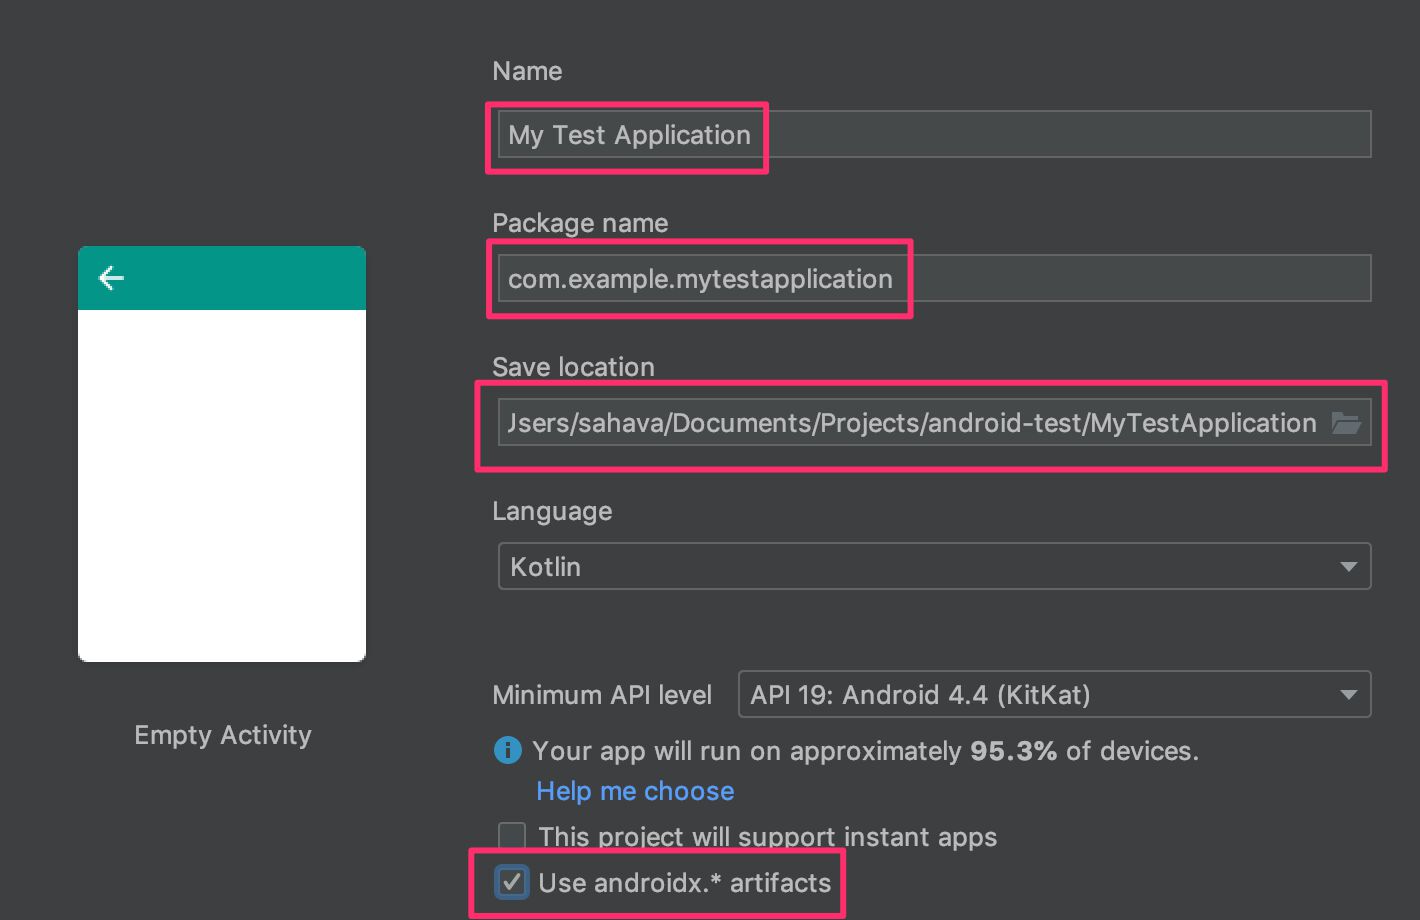
Give the project a Name - can be anything you like. Take note of the Package name generated for the project (you can edit this if you want), as we’ll need it when configuring Firebase. Make sure the Save location target exists - Android Studio will automatically create the directory for the project, but the location where the project directory is created must be a valid one.
Check the box next to Use androidx. artifacts*, as we’ll need them for the latest releases of Firebase.
Click Finish when ready.
Android Studio will build your application and load the basic dependencies while at it. Once the bottom bar says something like Gradle build finished in NNN ms, you can click the Play button in the header bar to run your application.

At this point, if you have an Android phone plugged into the USB port of your computer, you should see the phone in the list of connected devices. If the phone is running an Android OS version higher than the minimum set for the project (19 by default), you should be able to run the application on the phone by choosing it and clicking OK.
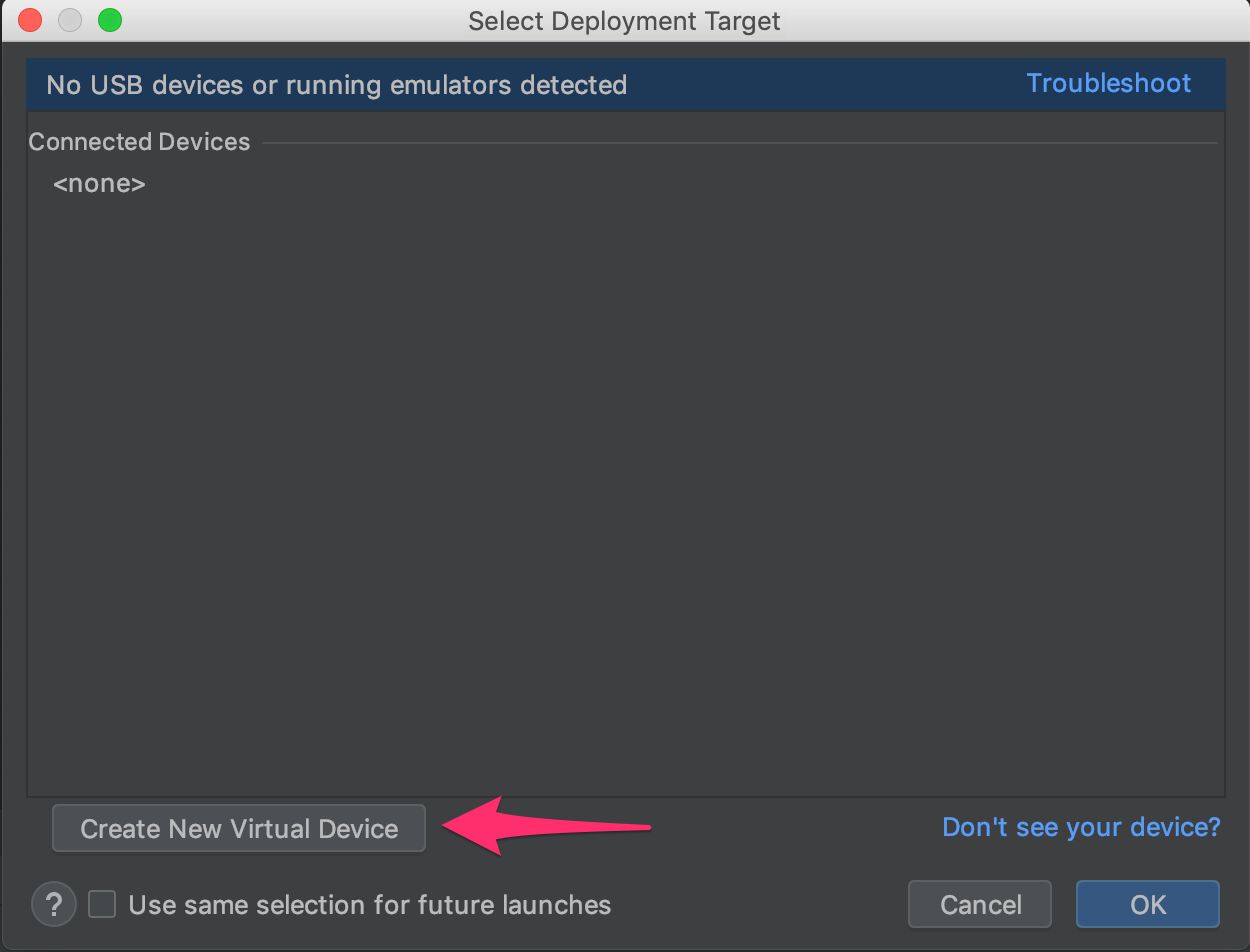
Otherwise, you’ll need to create a Virtual device, so click Create New Virtual Device to launch the Android Virtual Device (AVD) Manager.
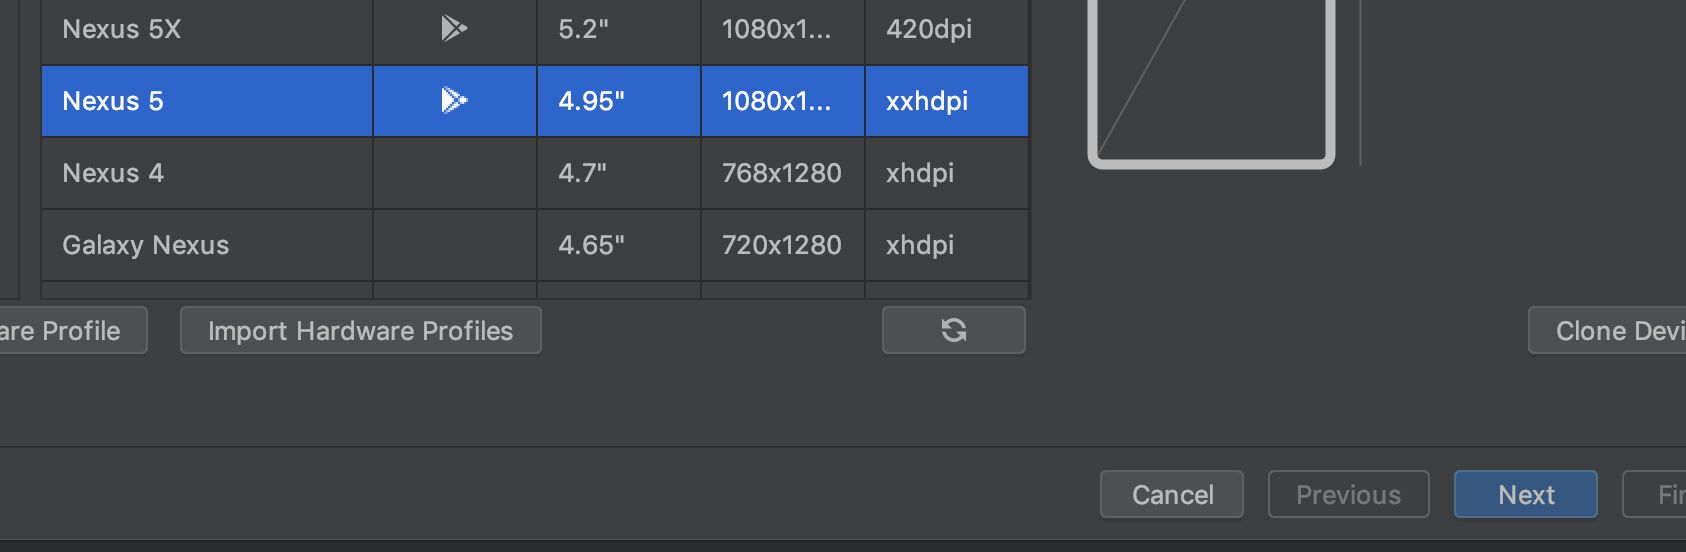
In the next screen, choose a phone model such as the Nexus 5 and click Next.
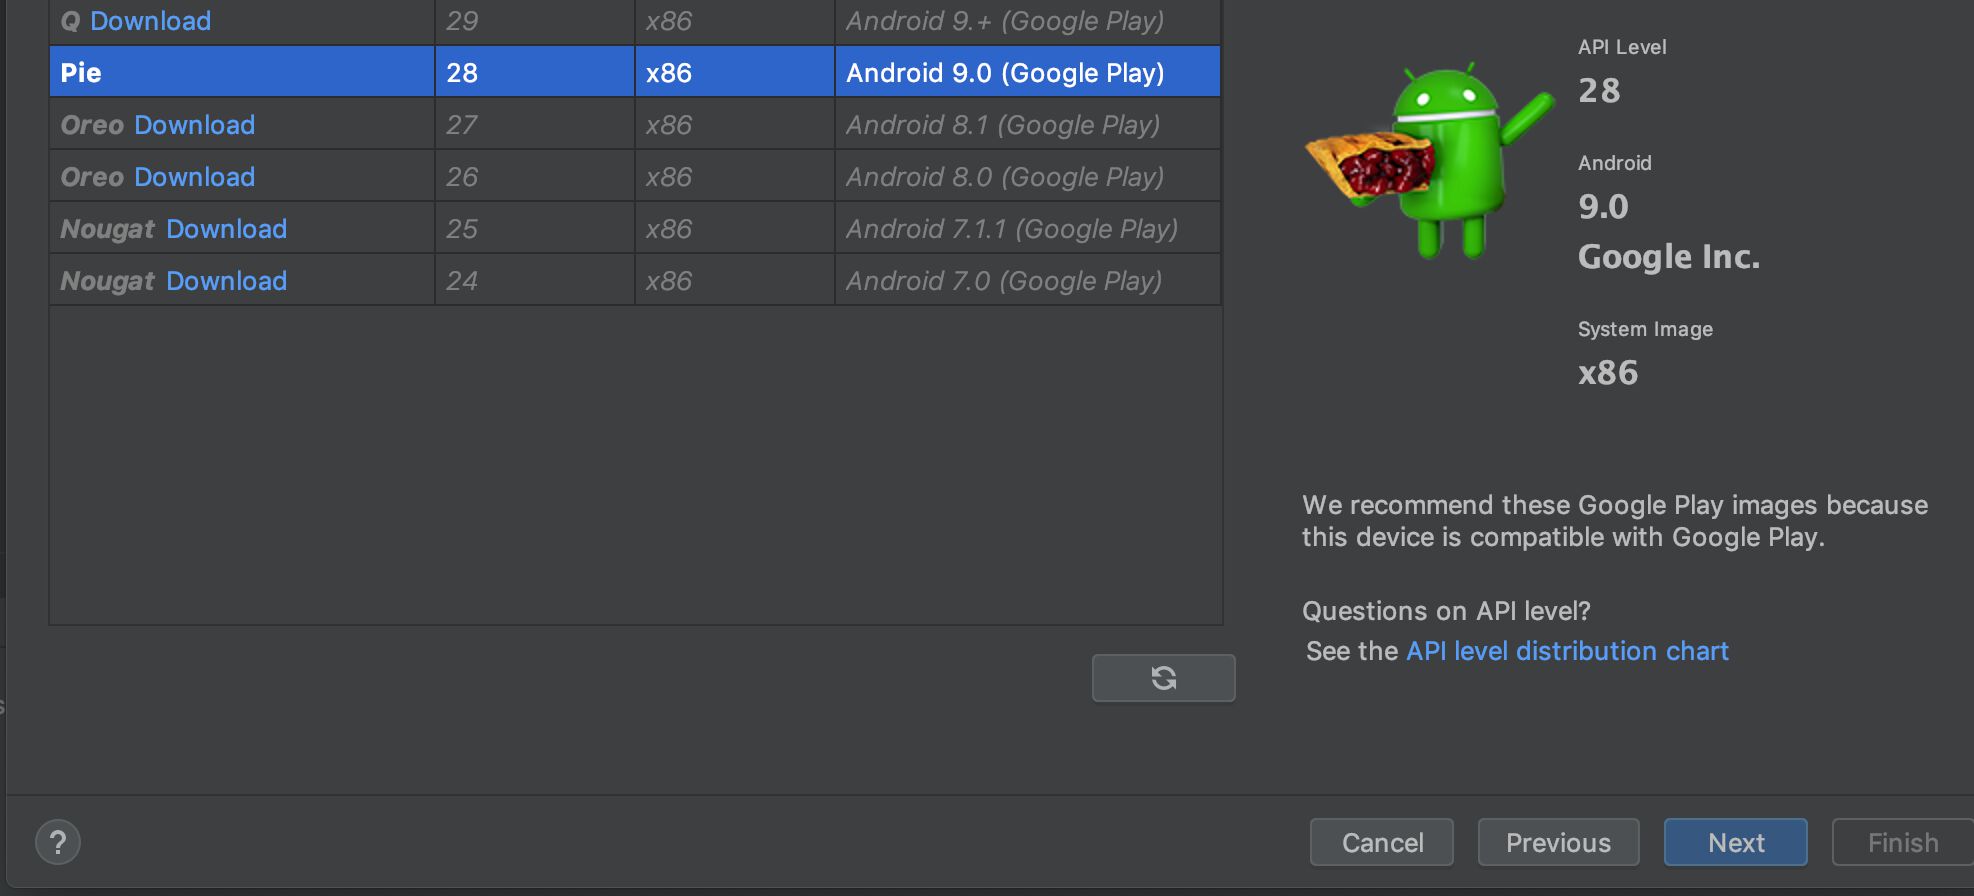
You need to choose a System image to format the device with. Download one of the recommended releases (I’m using Pie), as they should all have an API level higher than the one configured for the application. When the download is complete, finalize the configuration by clicking Next.
If you want, you can change the device name here, but you can leave all the other settings with their default values. Click Finish to create the device.
Now you should see the device in the Available Virtual Devices of the deployment target selection. Make sure the device is selected and click OK to fire it up and run the application.

It’s going to take a while to boot up the virtual device, install the application (APK) in it, and then fire it up. But once it’s done, you should see this:
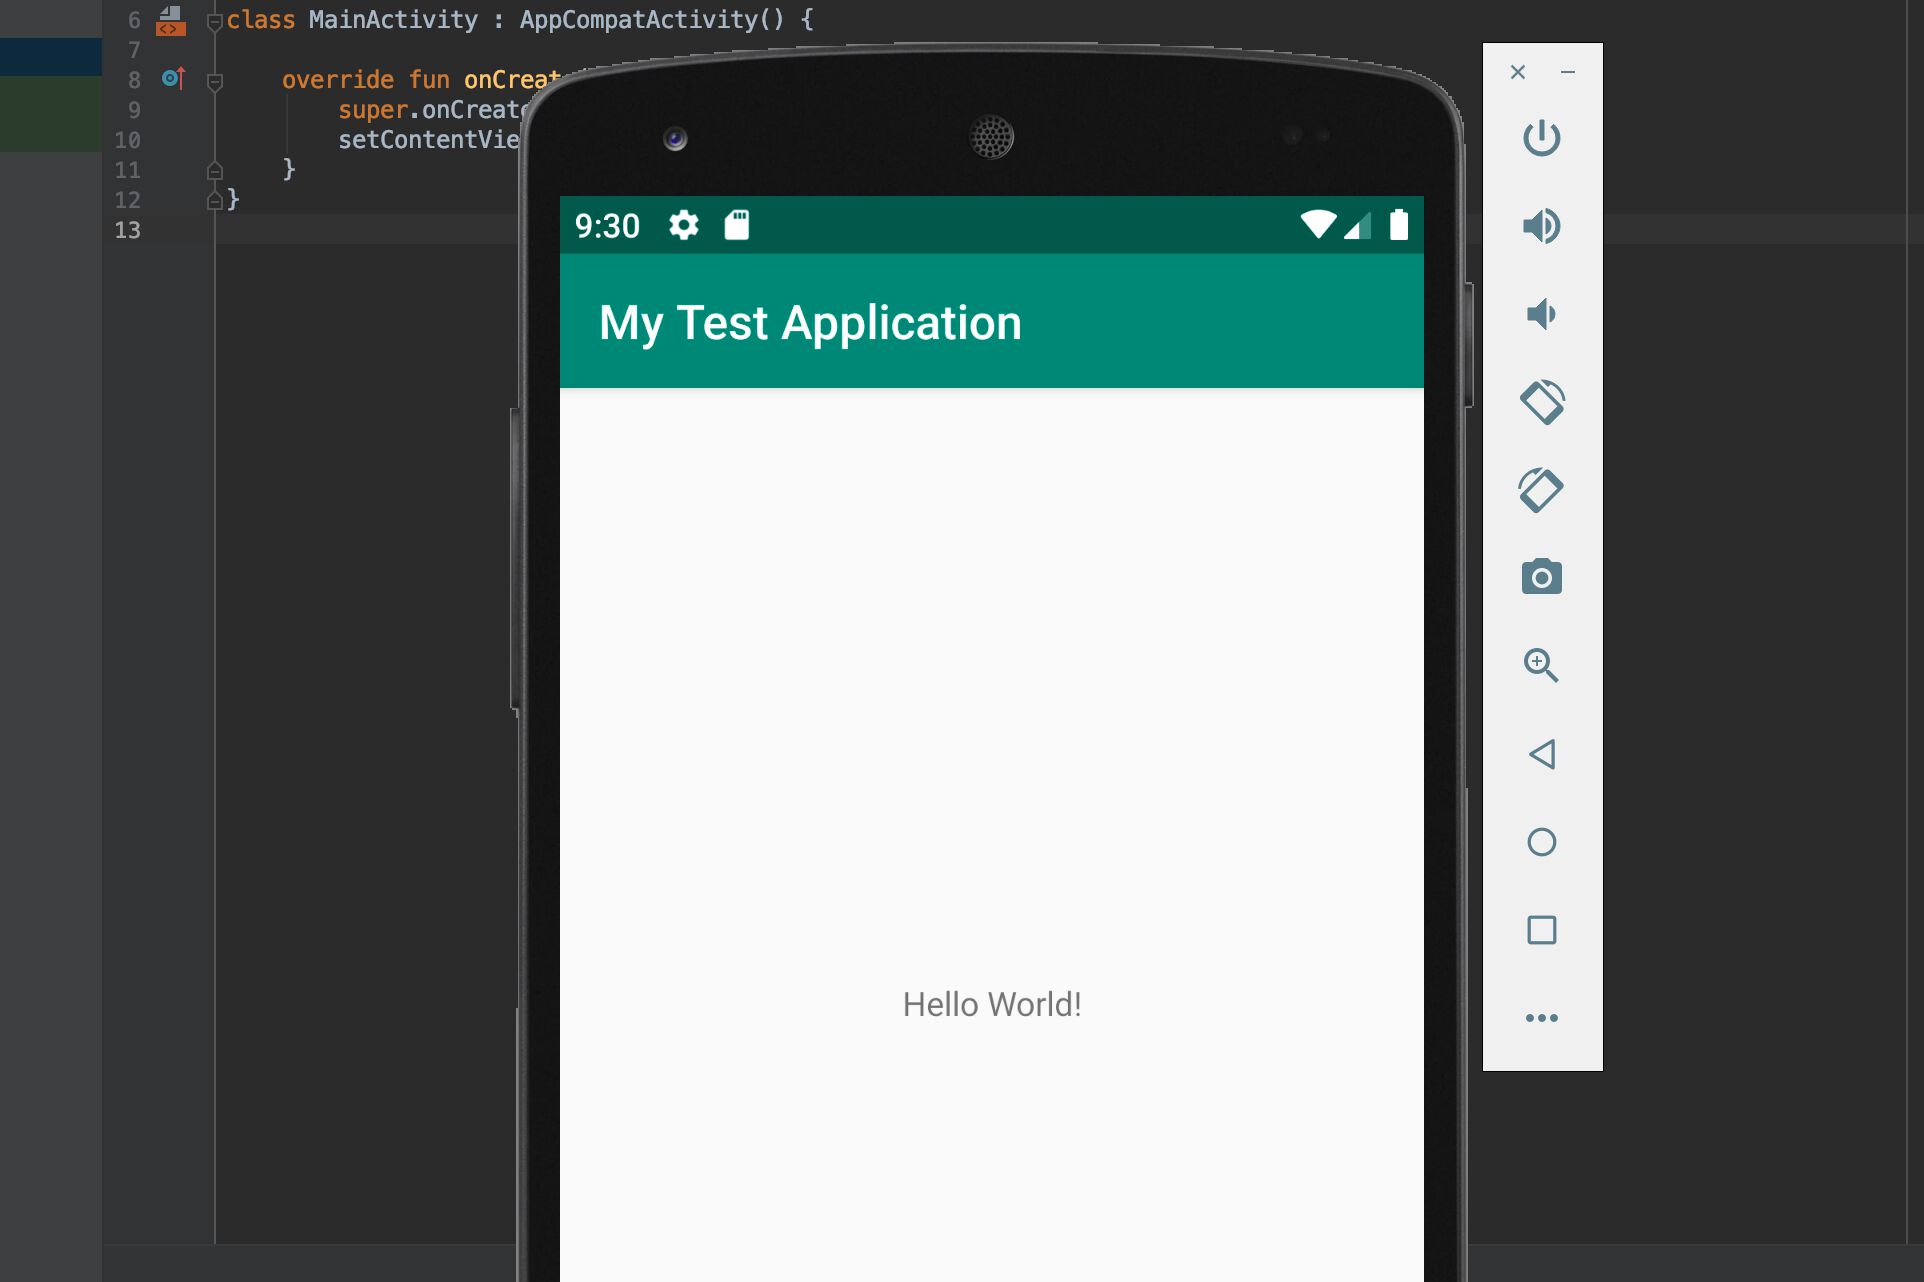
Congratulations, you’ve built an Android application! The virtual device functions just like a real device, and you can use the device controls to move around the settings and applications menus just as you would with a real device.
Next, we’ll need to add Firebase to the application.
Step 2: Create a Firebase project
To be able to leverage Google Analytics for Firebase and to implement Google Tag Manager in the application, we need to create a Firebase project and configure its SDK in our application. Fortunately, this is very easy to do.
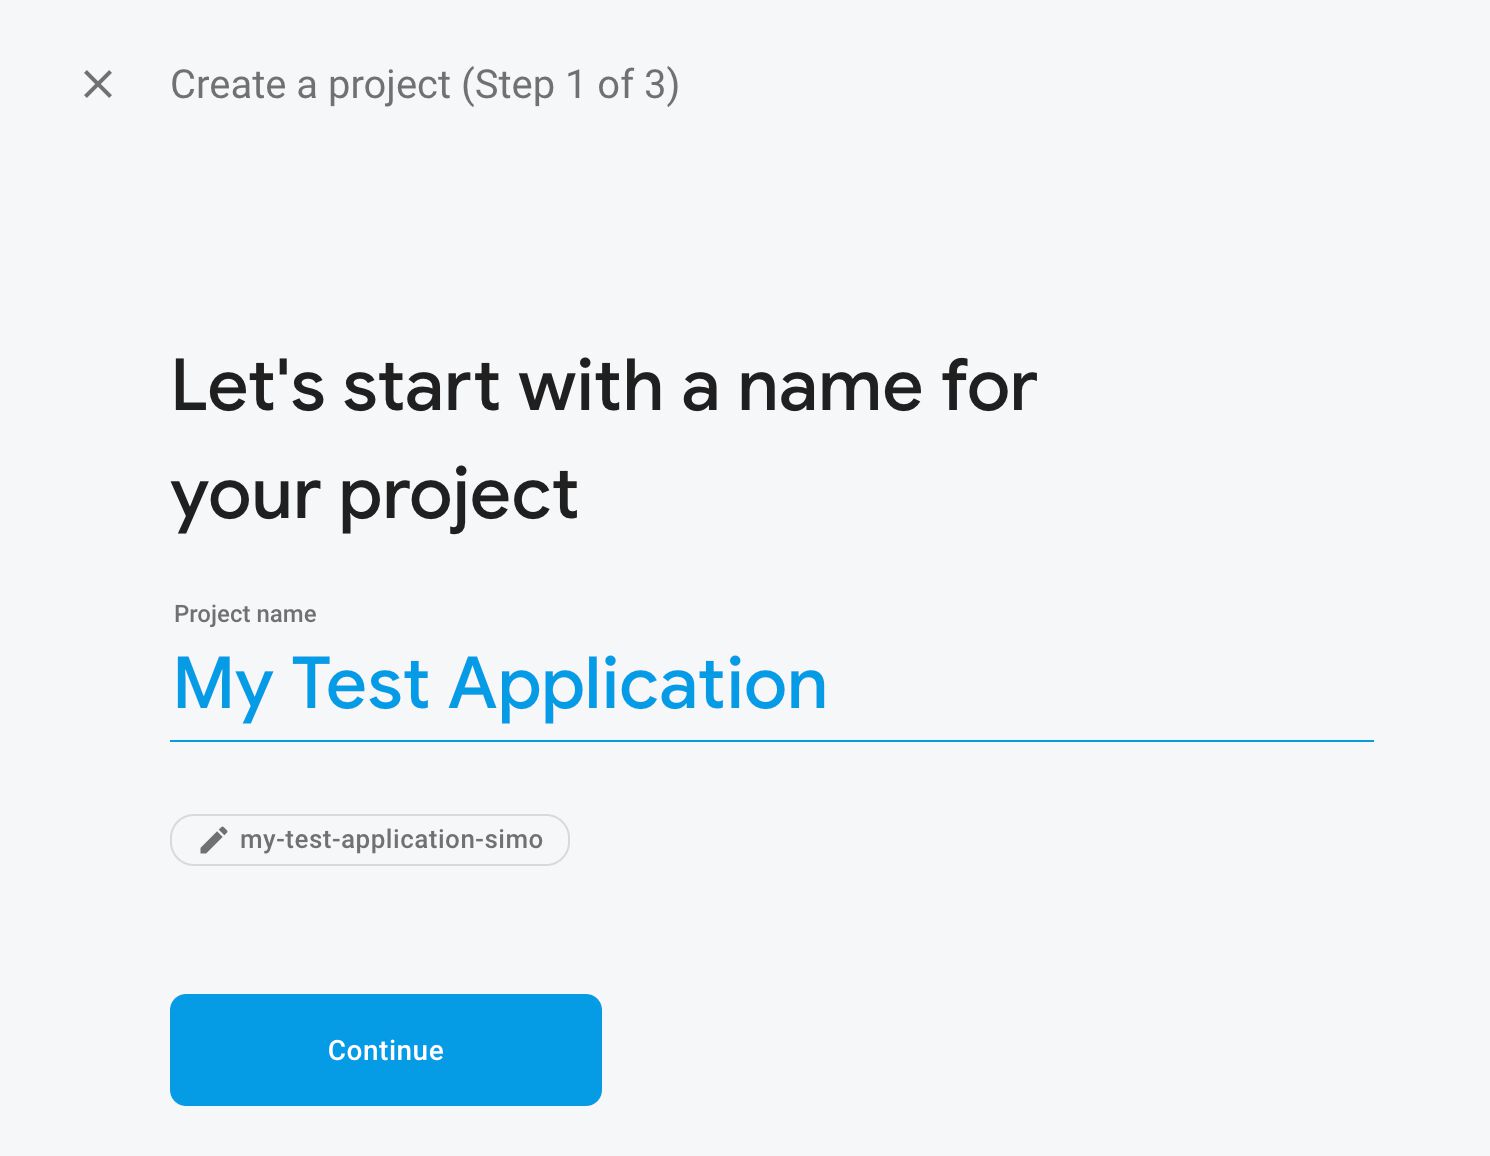
Browse to https://console.firebase.google.com/, login to Google services if necessary, and click to Create a project.
Give the project a name. Make note of the project ID given to the project (you can edit this if you wish, but it must be unique). It’s the name of the project that will be created in the Google Cloud Platform automatically for you.
In the next screen, make sure Set up Google Analytics for my project is selected and click Continue.
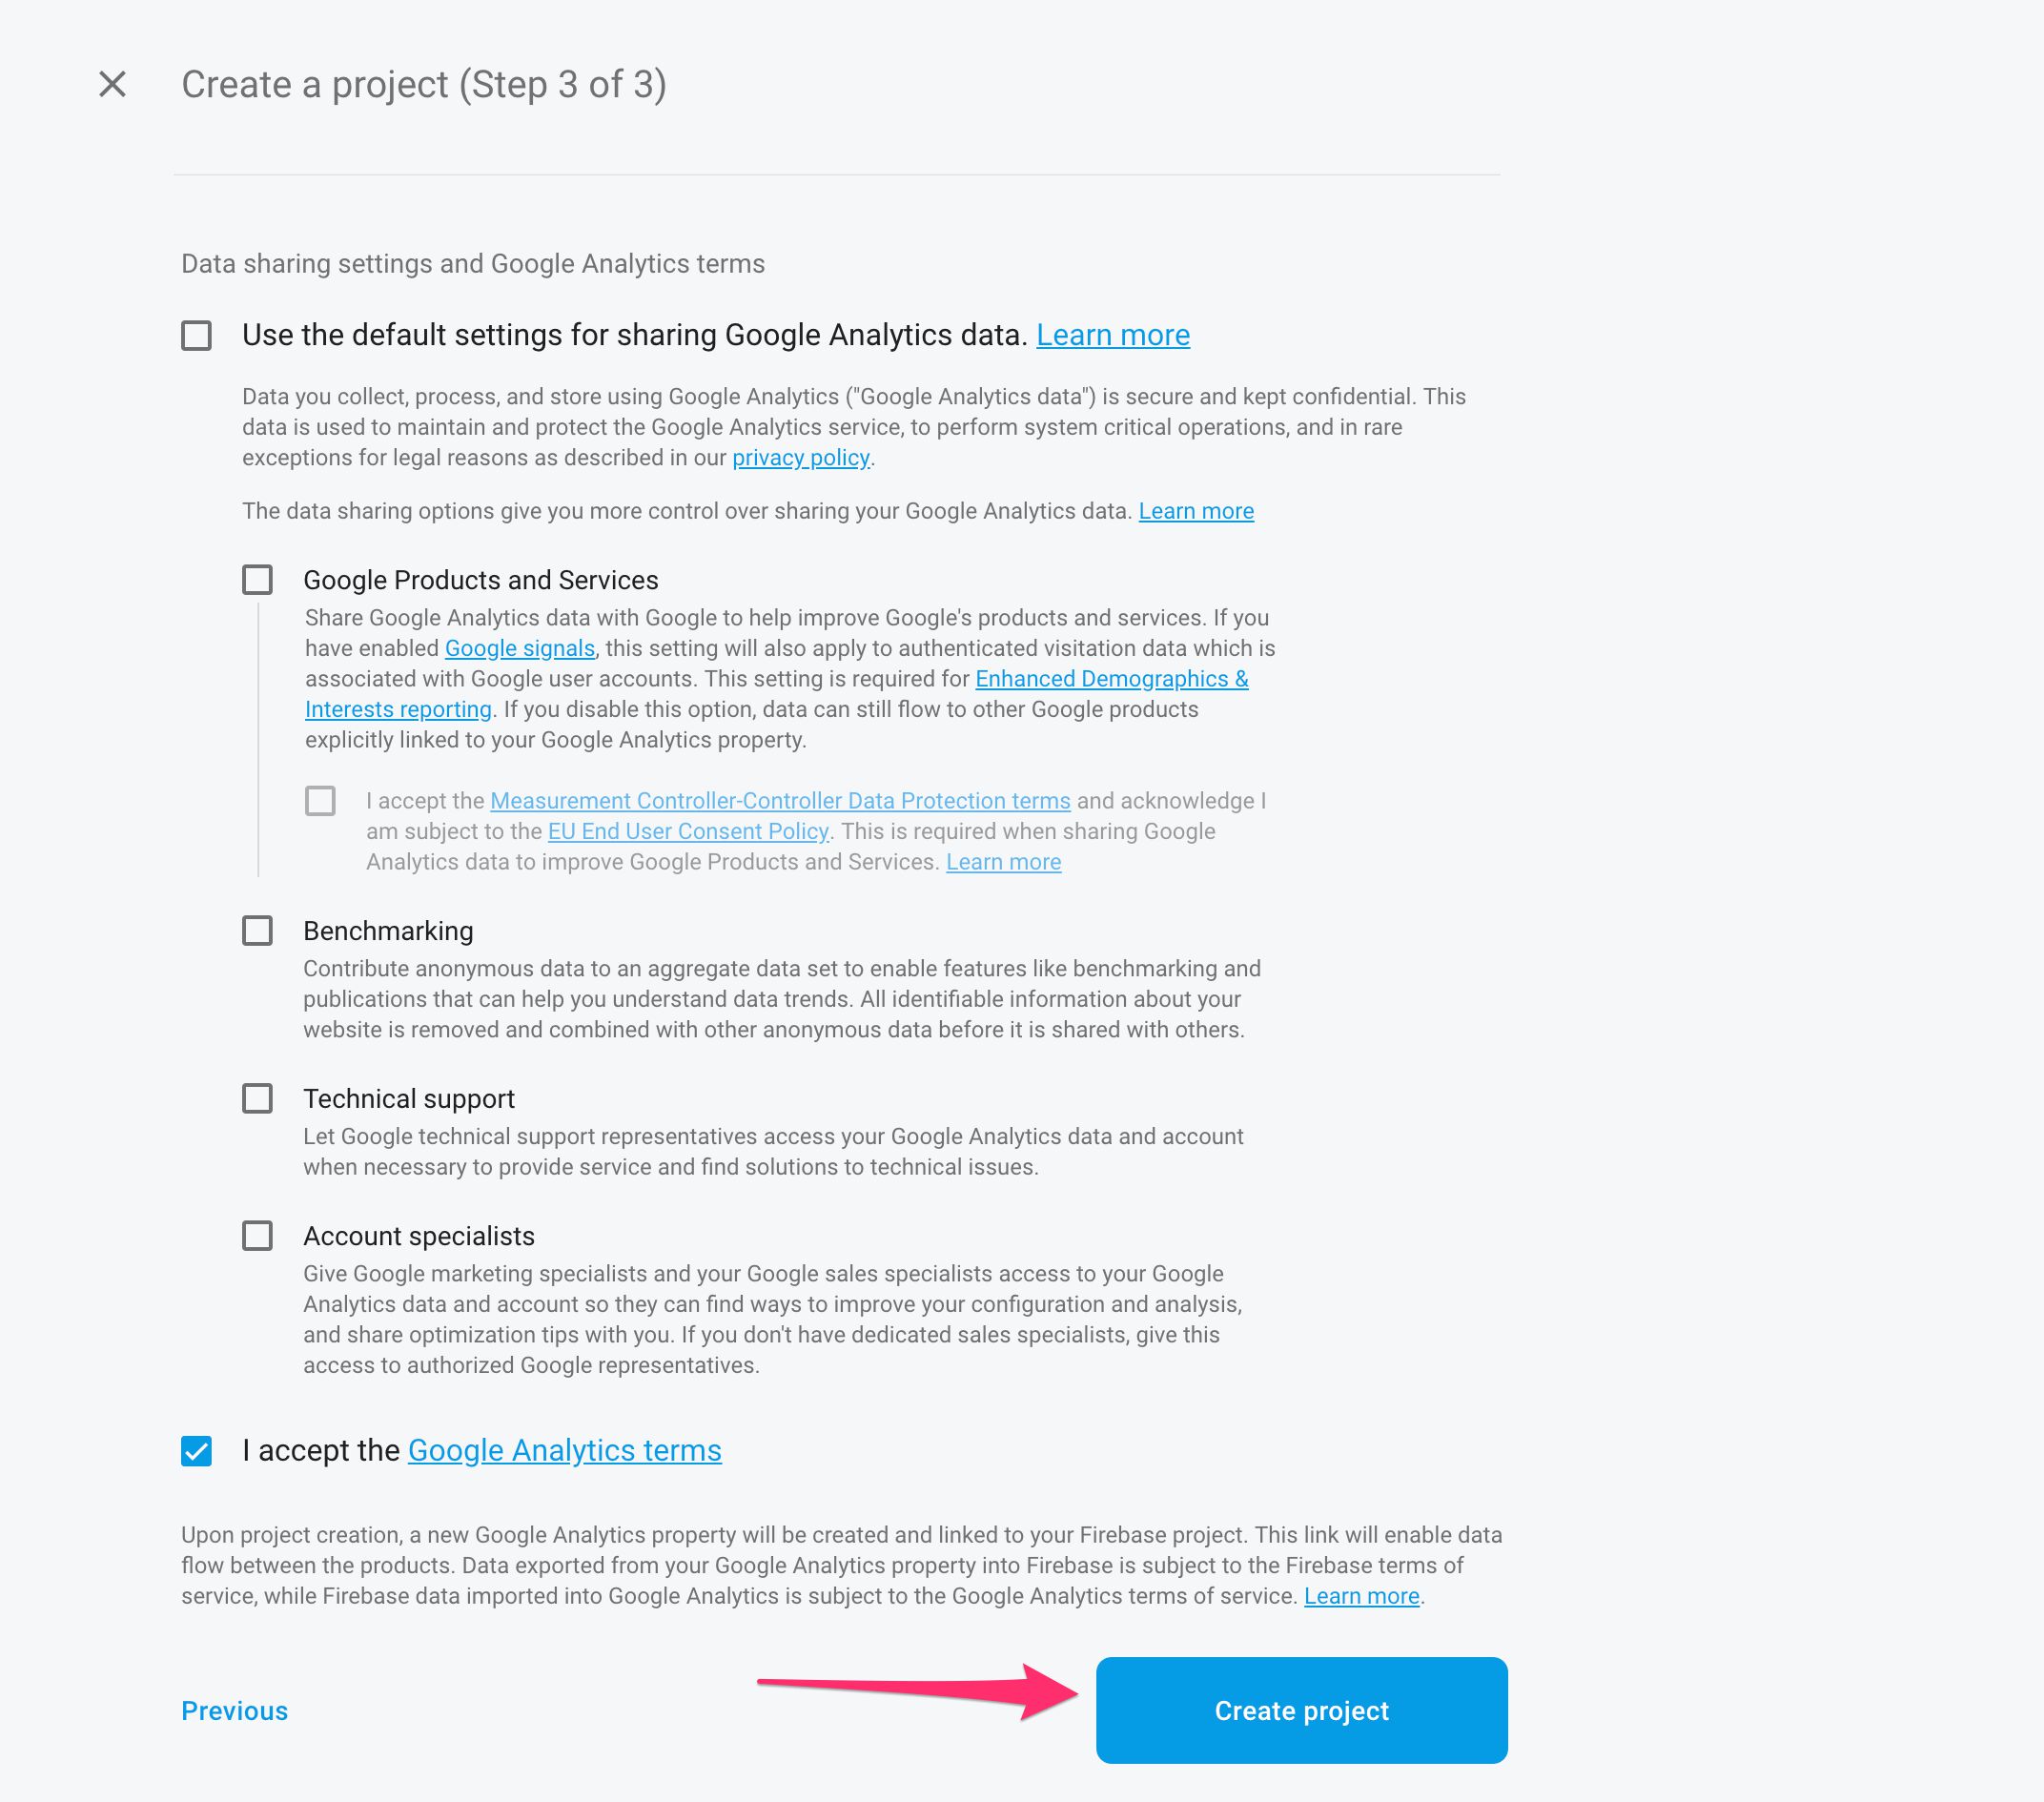
Now you can select a Google Analytics account you have access to, or you can create a new account. The latter option is mandatory if you don’t have access to any Google Analytics accounts.
If you need to create a new account, configure its data sharing settings first.
Then, click Create project to link the Firebase project to the Google Analytics account you selected (or created). Note, this will create a new [App + Web property]({< relref “getting-started-with-google-analytics-app-web.md” >}) with an App Stream in the target Google Analytics account.
You’ll see a spinner while the service creates your project. Wait patiently.
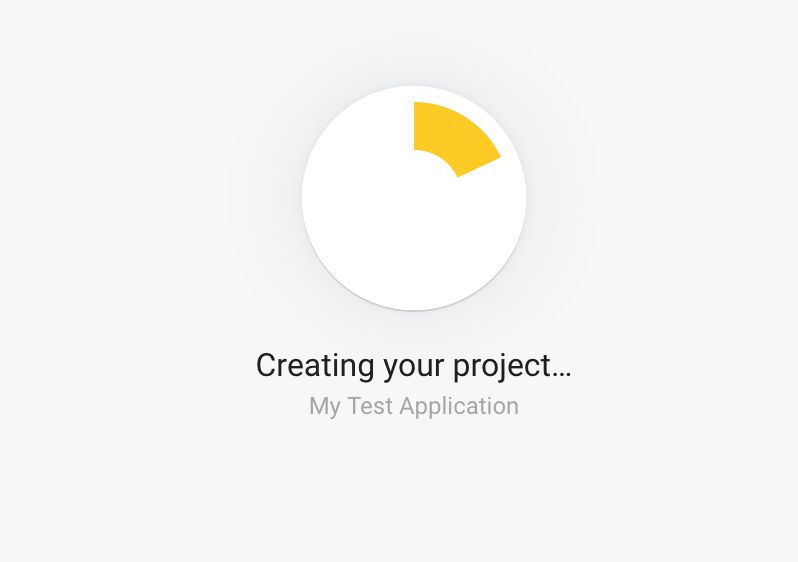
Once done, it will tell you that your new project is ready, so click Continue to configure the SDK.
Step 3: Deploy Firebase project in application
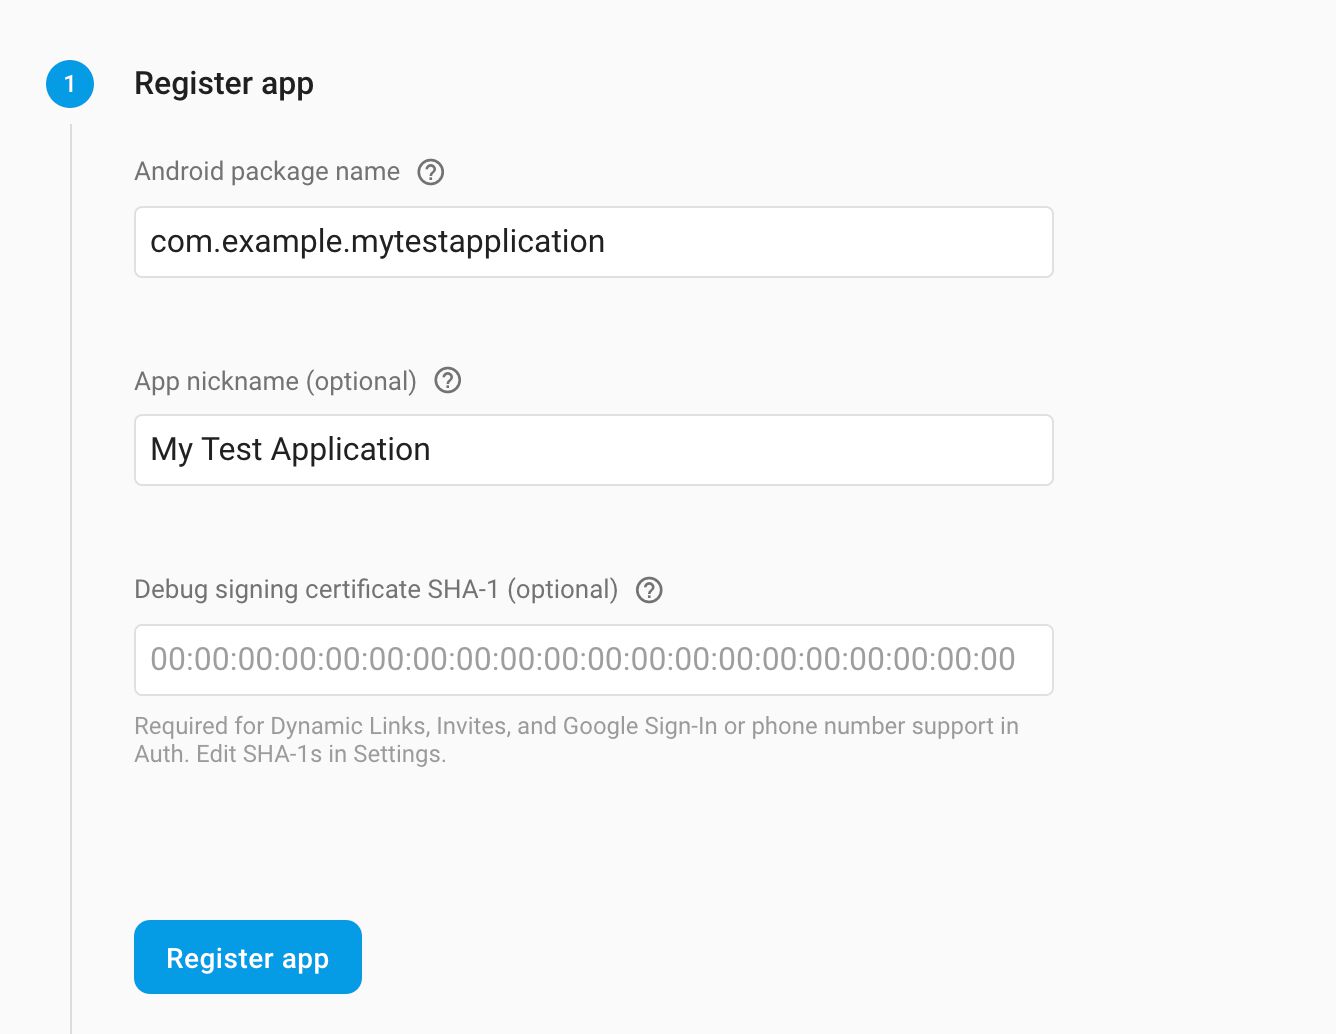
In the dashboard, click the little Android mascot head to configure the Firebase project to work in your application.
The first thing you need to do is Register the app, so type the package name configured for your application in the respective field.
If you can’t remember the package name, you can open the AndroidManifest.xml in the /app/manifests/ directory, and check the value of the package attribute in the <manifest> tag.

Once you’ve filled the fields, click Register app.
In the next screen, you are prompted to download the google-service.json file. Click the button to do so, and then switch to Android Studio.
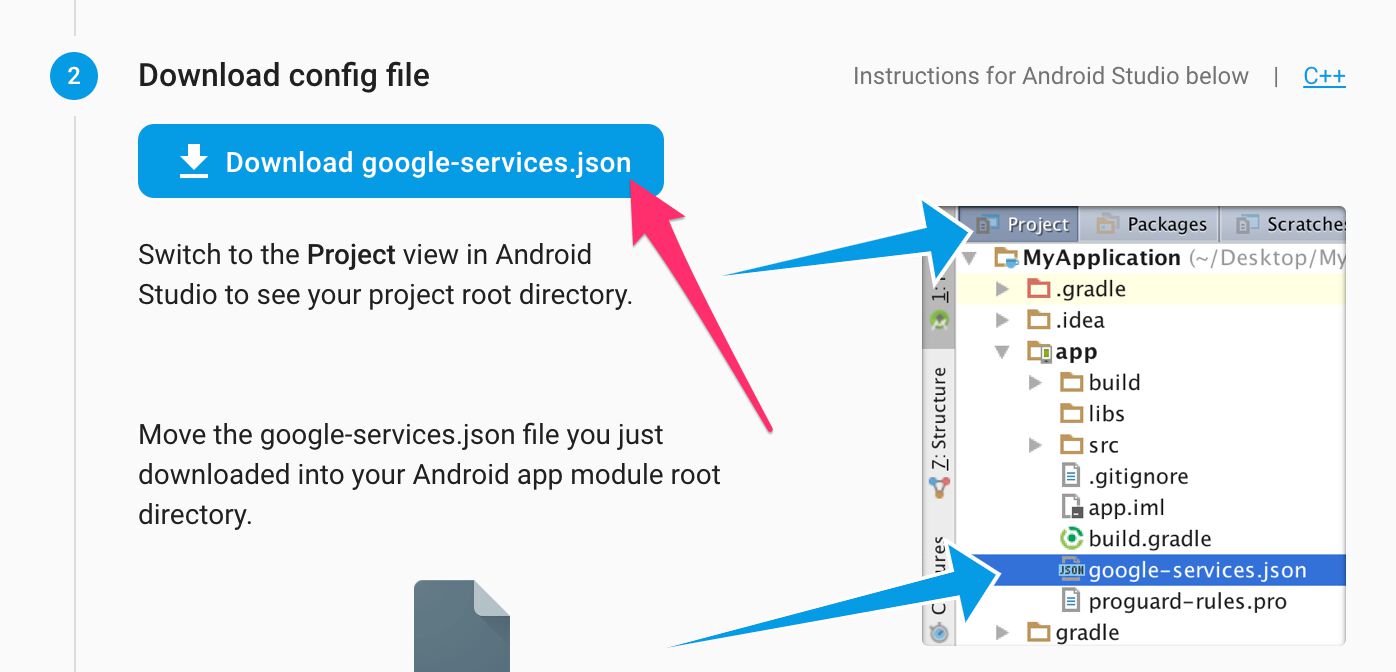
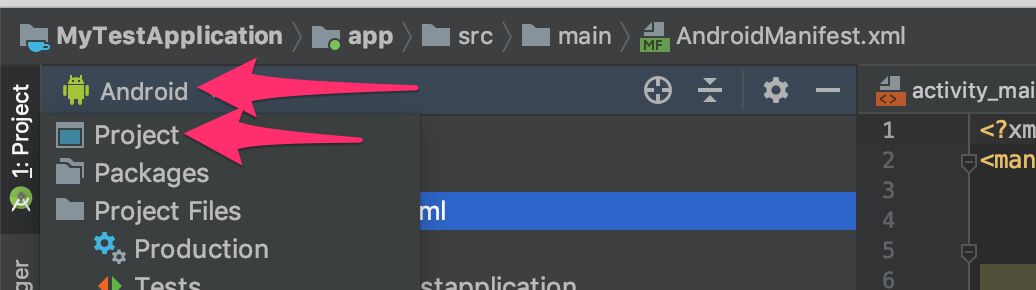
In Android Studio, first click the “Android” label to open the drop-down menu for the project navigator view, and choose Project to see the full directory structure of the project.
Next, expand the project directory and the /app/ folder within, and drag-and-drop the google-services.json from your downloads into the /app/ directory. Click OK if you see a dialog asking if it’s ok to move the file. It should end up looking like this:

Once you’ve done this, go back to the web browser and click Next to proceed to the next step in your Firebase project creation.
In this step, you are asked to add the Firebase dependencies to your project- and app-level Gradle files. Gradle is the build tool used by Android Studio applications, and it governs, among other things, the dependencies that the app needs to load in order to compile and run. Firebase is one such dependency.
The first file you need to edit is the project-level build.gradle file. You can find this in the root of your project folder, so double-click it in Android studio to open it for editing.
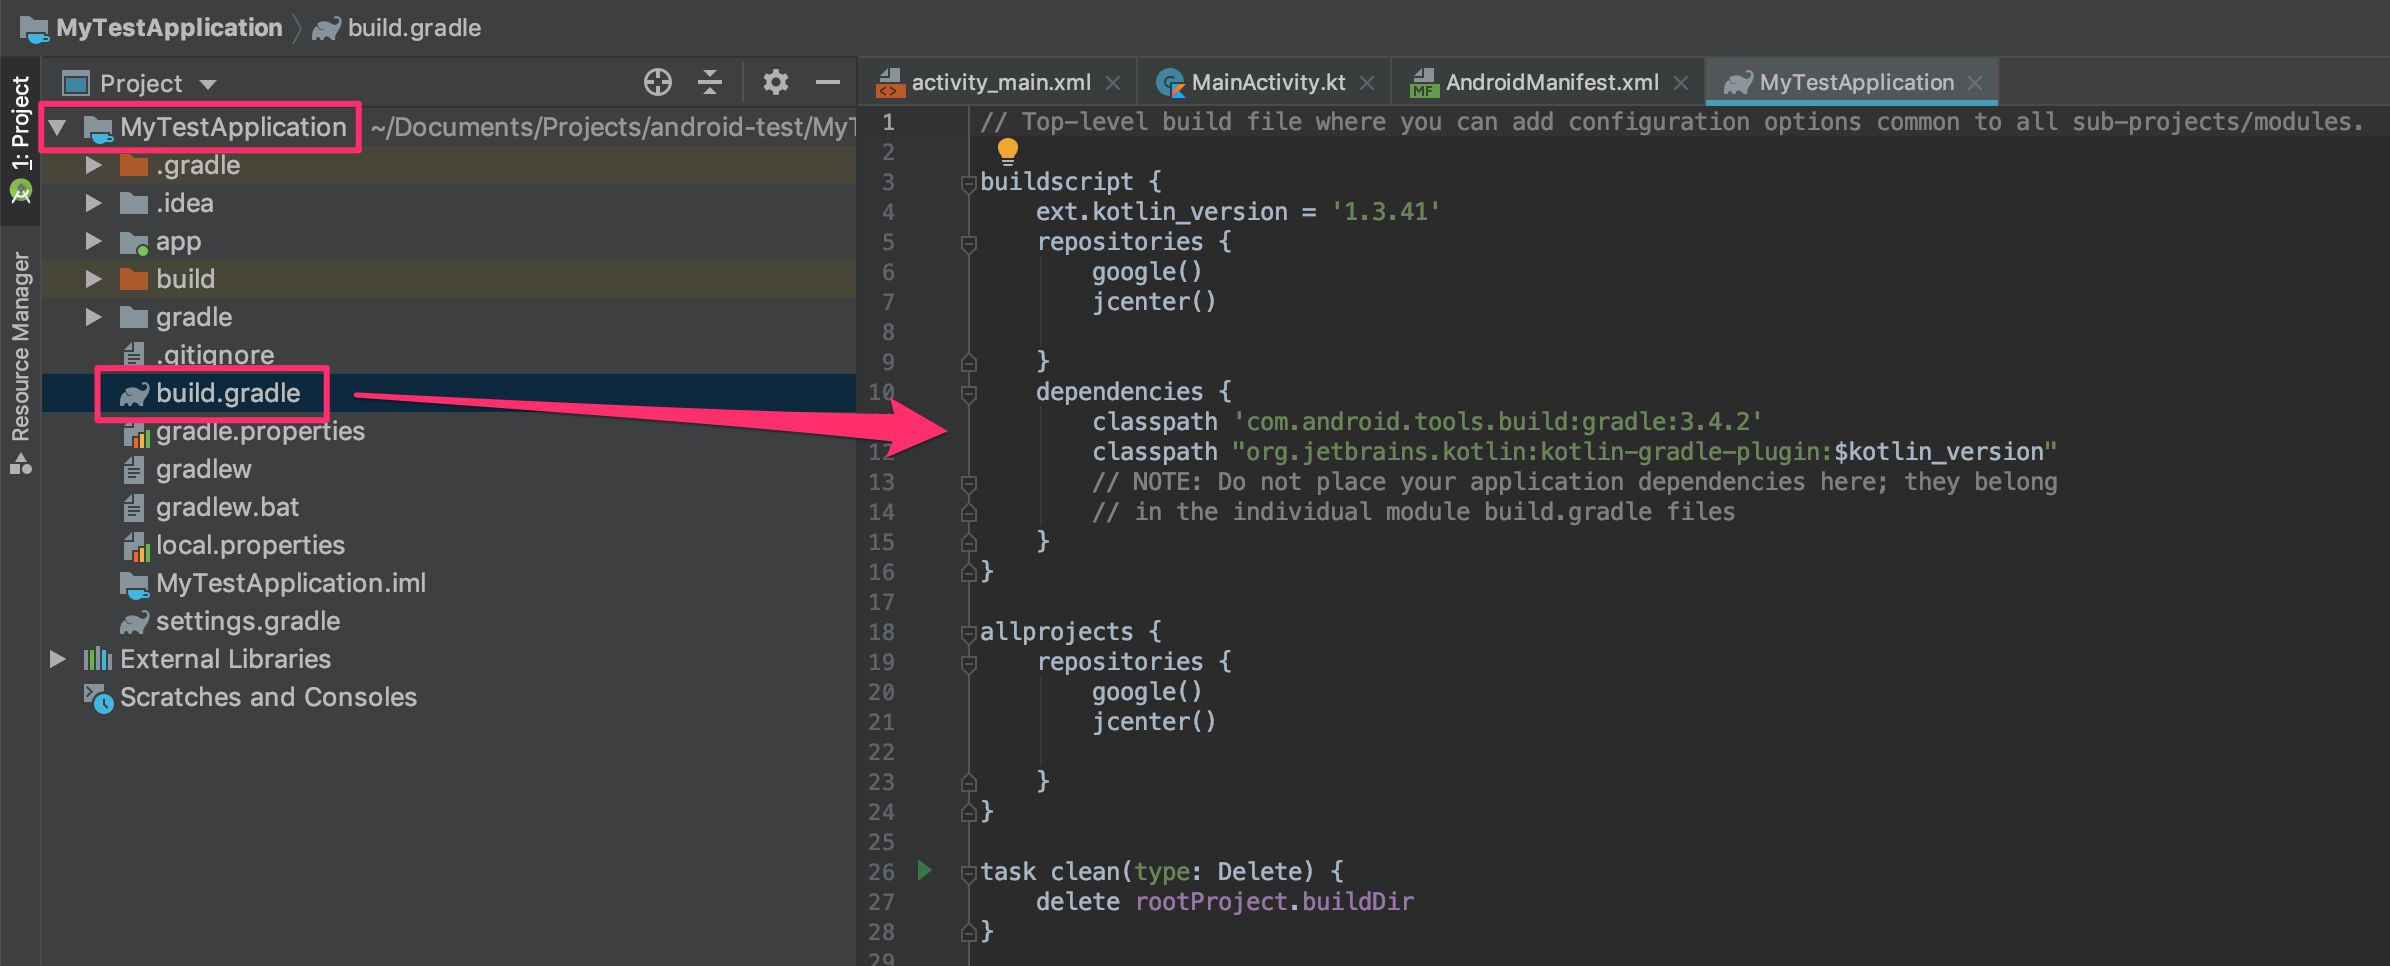
Find the dependencies block, and add this line to the end:
dependencies {
  ...
  classpath 'com.google.gms:google-services:4.3.0'
}
Note! At the time of writing, the Firebase console recommends
google-services:4.2.0, but you can upgrade this to4.3.0as in the code example above. If a newer version is available, this will be indicated by a yellow highlight around theclasspathcode.
Save the file, and then open the /app/build.gradle file.
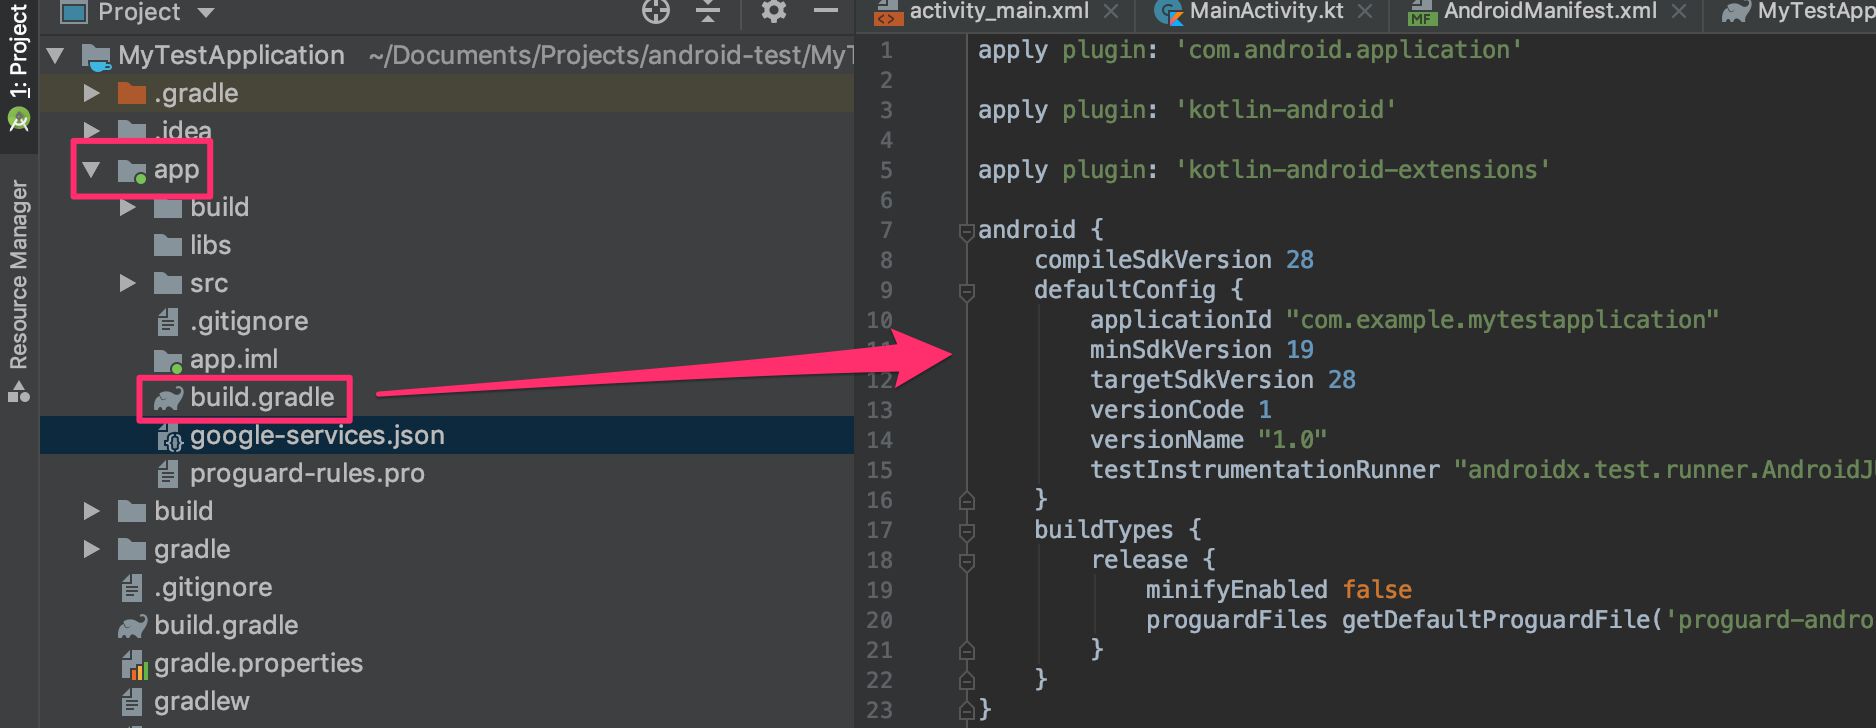
Here, edit the dependencies block again to add two new lines to the end:
dependencies {
  ...
  implementation 'com.google.firebase:firebase-core:17.0.1'
  implementation 'com.google.android.gms:play-services-tagmanager:17.0.0'
}
Note! Again, if there are newer versions of the Firebase core and Google Tag Manager dependencies available, this will be indicated with a yellow highlight around the
implementationstatements.
As you can see, we are already adding GTM as a dependency. It won’t do anything until we configure the container, though.
Finally, add the following line to the end of the build.gradle file:
apply plugin: 'com.google.gms.google-services'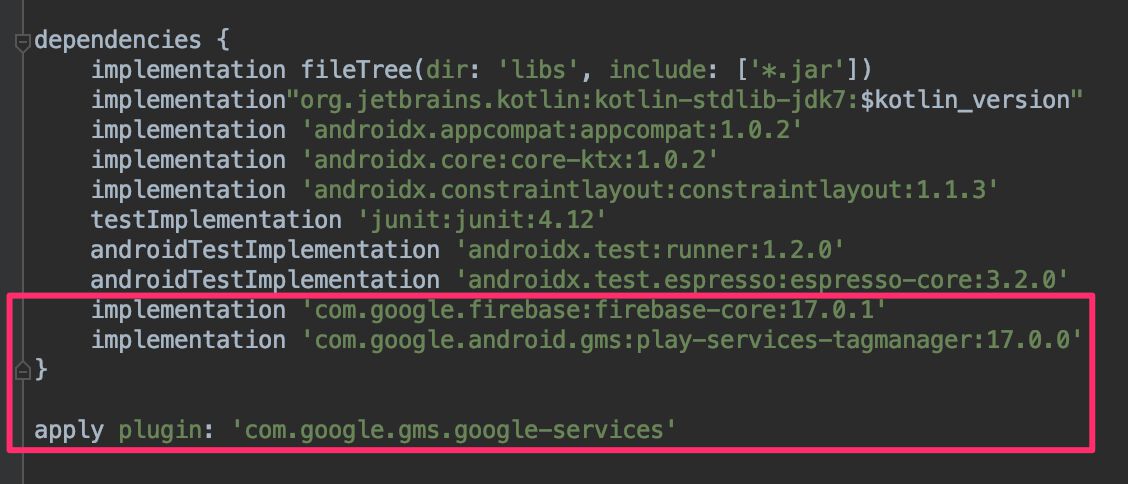
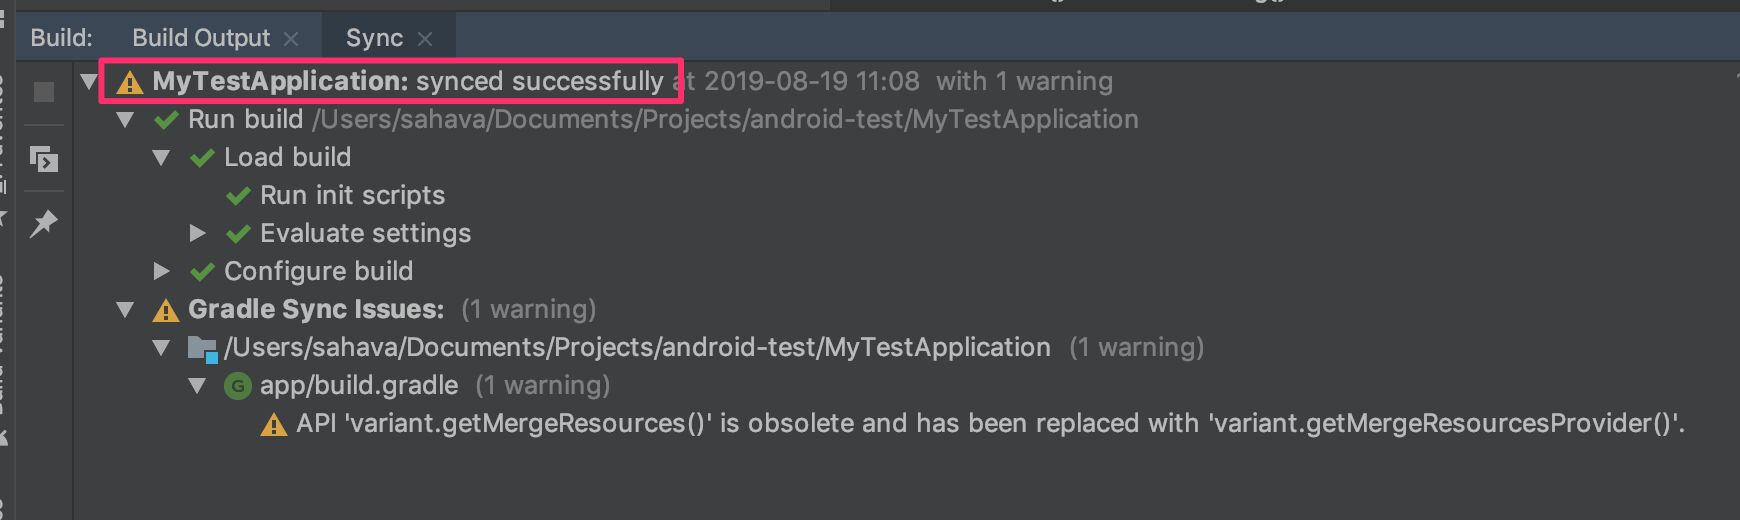
Save the file. Now you can click the Sync now button in the blue header on top of the code editor to have the application download and build the dependencies you just added.

You might see a warning about deprecated methods or features in the sync log, but the sync should still complete successfully.
Now, in the web browser where you are creating the Firebase application, you need to click Next to enter the final stage. Here, Firebase waits for your application to send a request to Firebase servers. To do so, make sure you are connected to the internet, and run your app (by clicking the Play button in the Android Studio interface). If all goes well, the application will run, send a request to Firebase servers, and you’ll see the project creation view change to this:
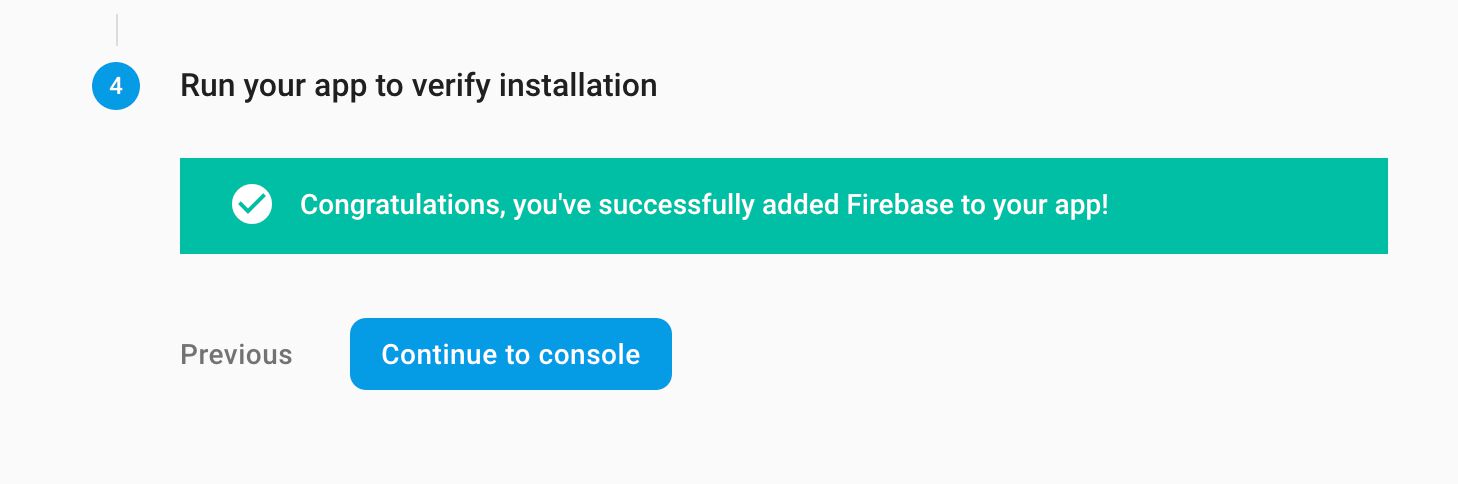
Click Continue to console to go back to the Firebase dashboard.
Congratulations! Firebase is now running in your app. You can scroll through the different screens in the Firebase console, but you won’t find anything useful, yet. You still need to make Firebase do something. And that something, in this guide, will be to collect data.
Step 4: Implement basic analytics
To implement some analytics logging, we need to load the Firebase Analytics dependency, and then initialize it in our application.
So, open the build.gradle file under /app/ again, and add the following new dependency:
dependency {
  ...
  implementation 'com.google.firebase:firebase-analytics:17.0.1'
}
Click the Sync now button in the editor to synchronize your application with this latest change to its dependencies.
Then, open the MainActivity.kt file for editing. You can find it in /app/src/main/java/_project_/. You can also hit CMD + Shift + O and type MainActivity.kt in the selector to find and open the file. In any case, you should end up with the file open in the editor.

Activities correspond to views and screens in the application. They are so much more than that (read here), but as an analogy this will suffice for now. The MainActivity.kt file contains code that is run when the application is opened. This is because the application comprises just one activity.
If the application had different screens or views, we would create additional activities for them.
In the MainActivity.kt file, add the following code right after the class MainActivity heading.
Before hitting enter after typing FirebaseAnalytics, you’ll see a little tooltip appear that identifies the class you are trying to create an instance of. Hit enter to automatically add the import command for the FirebaseAnalytics class.
class MainActivity : AppCompatActivity() {

  // ADD THIS:
  private lateinit var firebaseAnalytics: FirebaseAnalytics

  // DON'T TOUCH
  override fun onCreate(savedInstanceState: Bundle?) {
    ...
  }
}
If you can’t get the tooltip to appear, or if the automatic import doesn’t work, you can expand the import statements in the top of the MainActivity.kt file, and manually add the FirebaseAnalytics module.
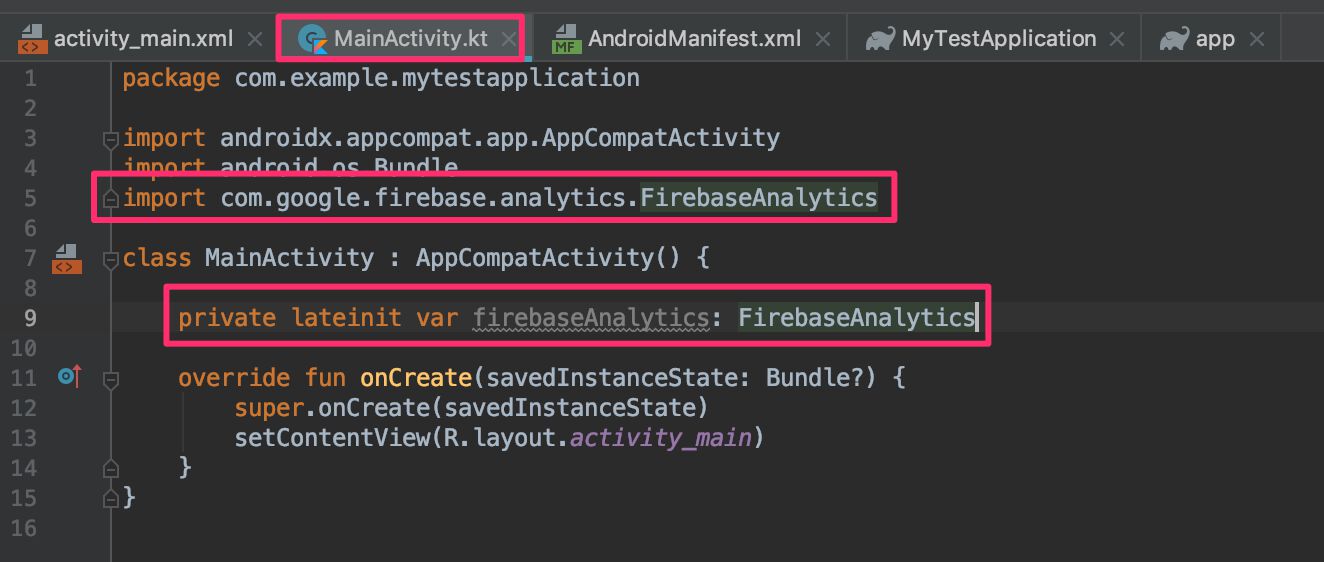
With this code, we are initializing a variable named firebaseAnalytics of the type FirebaseAnalytics. We are using the lateinit keyword to avoid having to initialize it with a value (as we’ll only have the value once the activity has loaded).
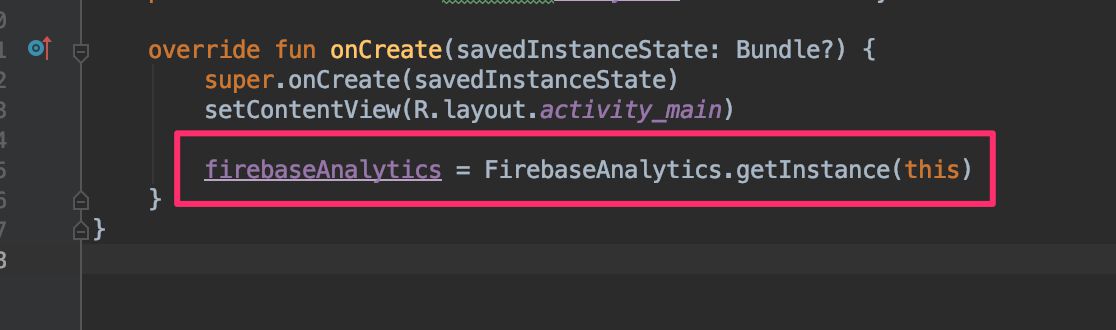
Next, in the onCreate method we can actually initialize the variable. Add this line to the end of the onCreate method block:
firebaseAnalytics = FirebaseAnalytics.getInstance(this)This initializes the firebaseAnalytics local variable as an instance of the FirebaseAnalytics class. We can now use the firebaseAnalytics variable within this MainActivity class to send data to Firebase Analytics.
To send an event to Firebase Analytics, you need to call the logEvent() method of the firebaseAnalytics instance. The call takes two parameters: an event name, and a bundle of parameters (key-value pairs).
To keep things simple, we’ll send the event to Firebase from the same onCreate method, which means it will be sent as soon as the application has loaded (and Firebase with it).
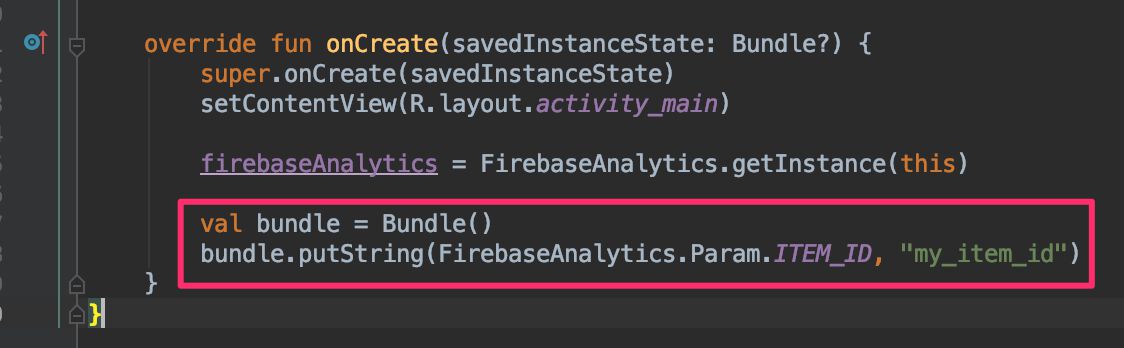
Let’s add a simple key-value pair using the recommended parameter Item ID. These prescribed parameters can be found as properties of the FirebaseAnalytics.Param enum.
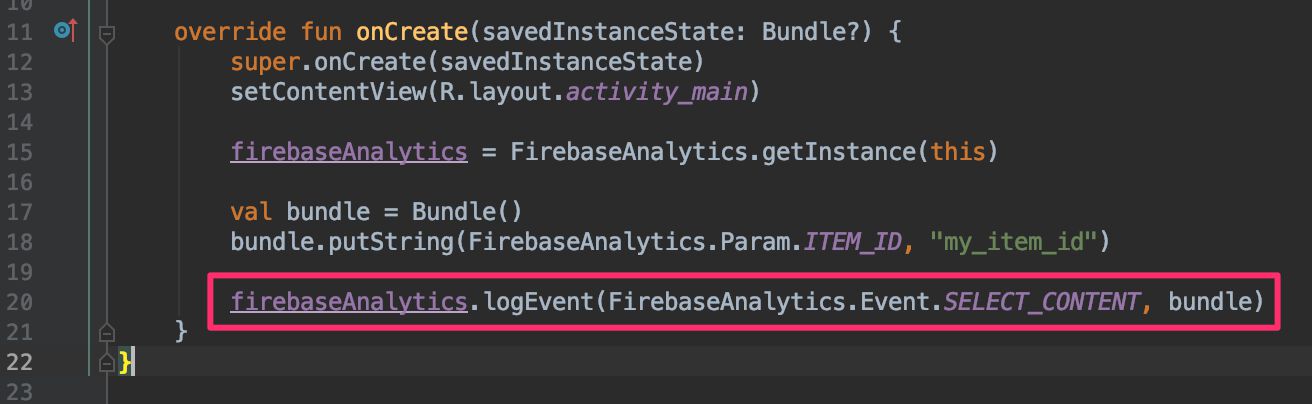
Edit the onCreate method to look like this:
override fun onCreate(savedInstanceState: Bundle?) {
  ...

  firebaseAnalytics = FirebaseAnalytics.getInstance(this)

  val bundle = Bundle()
  bundle.putString(FirebaseAnalytics.Param.ITEM_ID, "my_item_id")
}
We create a new Bundle instance, to which we add a single parameter with the name item_id (stored in the enum FirebaseAnalytics.Param.ITEM_ID) and value "my_item_id".
Next, we need to send the bundle to Firebase Analytics together with an event name. Prescribed event names can be found within FirebaseAnalytics.Event. We’ll use the SELECT_CONTENT event name for this exercise.
Add the following line to the end of the onCreate method:
override fun onCreate(savedInstanceState: Bundle?) {
  ...

  firebaseAnalytics.logEvent(FirebaseAnalytics.Event.SELECT_CONTENT, bundle)
}
Once you’ve made the changes, you can run the application to have it log events to Firebase. Once the app is running, you can enter the StreamView report in your Firebase Analytics console, and you should see the console collecting data from your application.
Note that Firebase processes dispatched events in batches, and it’s possible your select_content event doesn’t make it to the first batch. So at this point just make sure that StreamView is showing some data so that you can verify your Firebase Analytics setup works. Firebase collects certain events by default (e.g. user_engagement, first_open, screen_view), so you should see these in the StreamView.
Luckily we have the DebugView for getting more Real Time data from our debugging devices. Read on!
Step 5: Debug
To have data appear in DebugView, you need to first register your virtual device as a valid Debug Device. To do that, click to open the Terminal tab in Android Studio with the virtual device running.
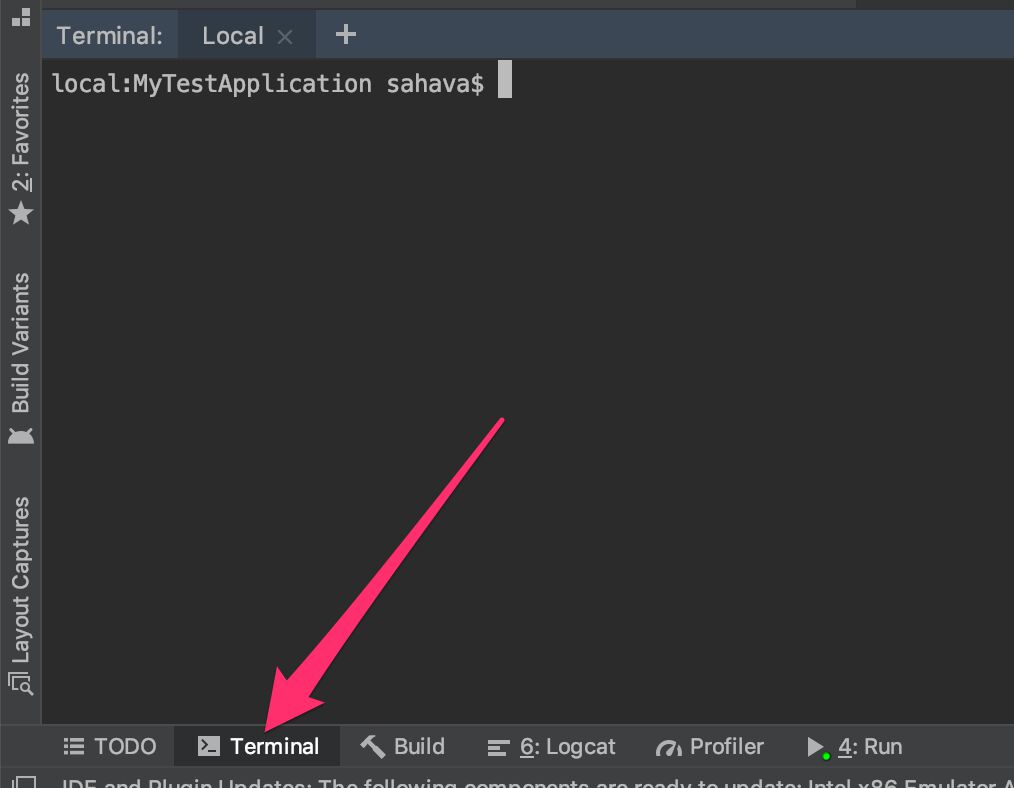
In the terminal console, type this and press Enter. Substitute com.example.mytestapplication with your application’s package name.
adb shell setprop debug.firebase.analytics.app com.example.mytestapplicationYou might see a warning about mismatched server-client versions, but if you see the text * daemon started successfully, you’ll know it worked.

Now, run the application again and open the DebugView report in Firebase. Your device should appear in the Debug Device list (it might take a moment to appear), and your debug events should start appearing in the stream. You can click the select_content event to see the custom parameter being sent.
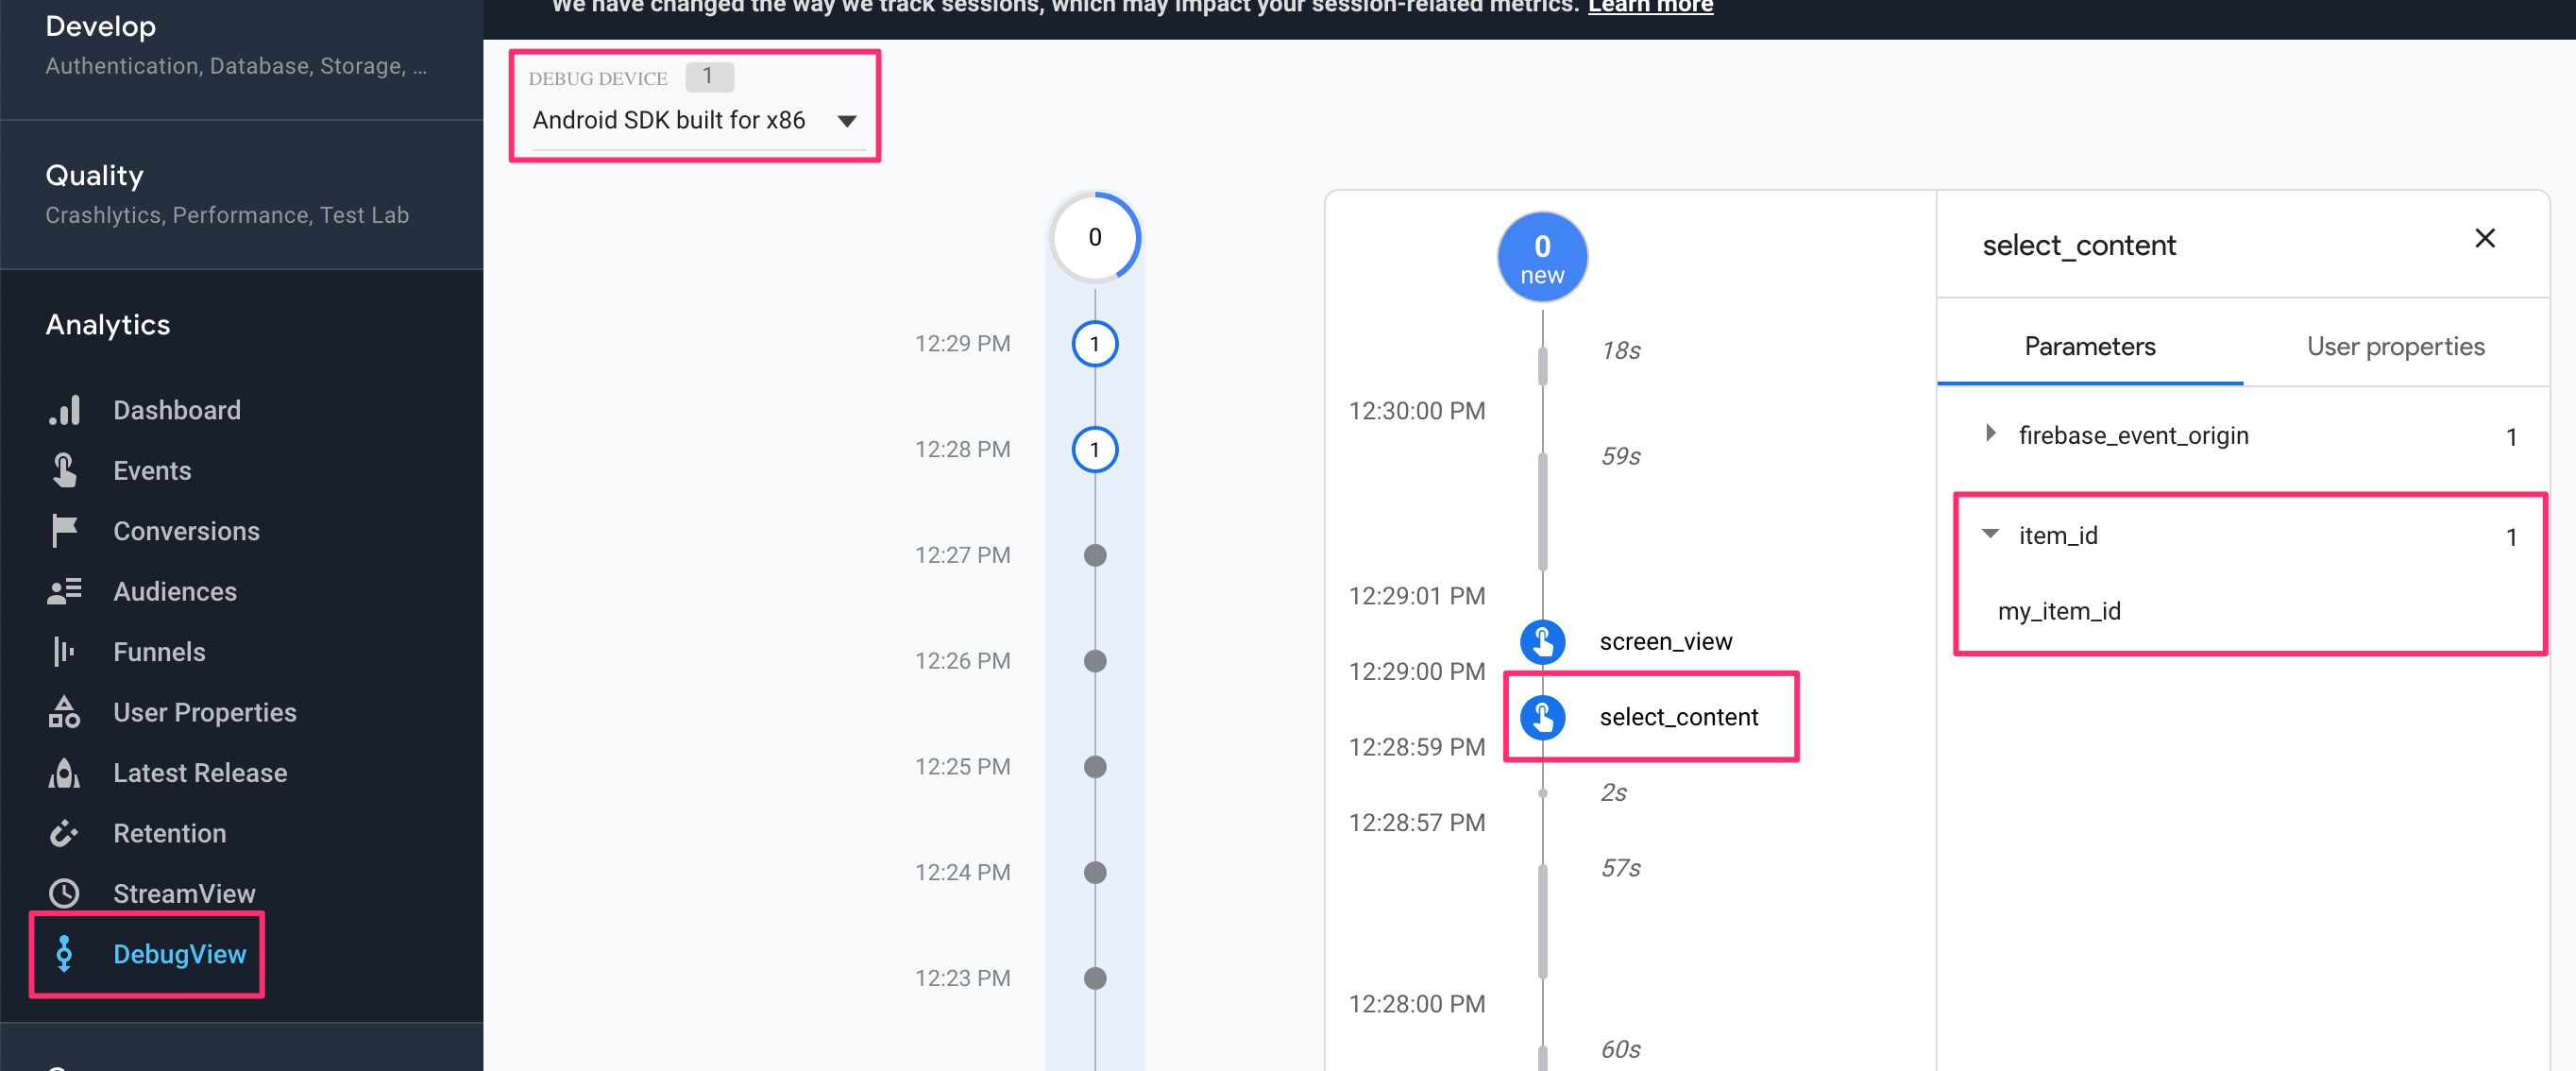
Nice! You’re collecting analytics data from your application to Firebase.
The last thing we’ll do is use that select_content hit to send a request to Universal Analytics, and we’ll use Google Tag Manager to do so.
Step 6: Download Google Tag Manager container
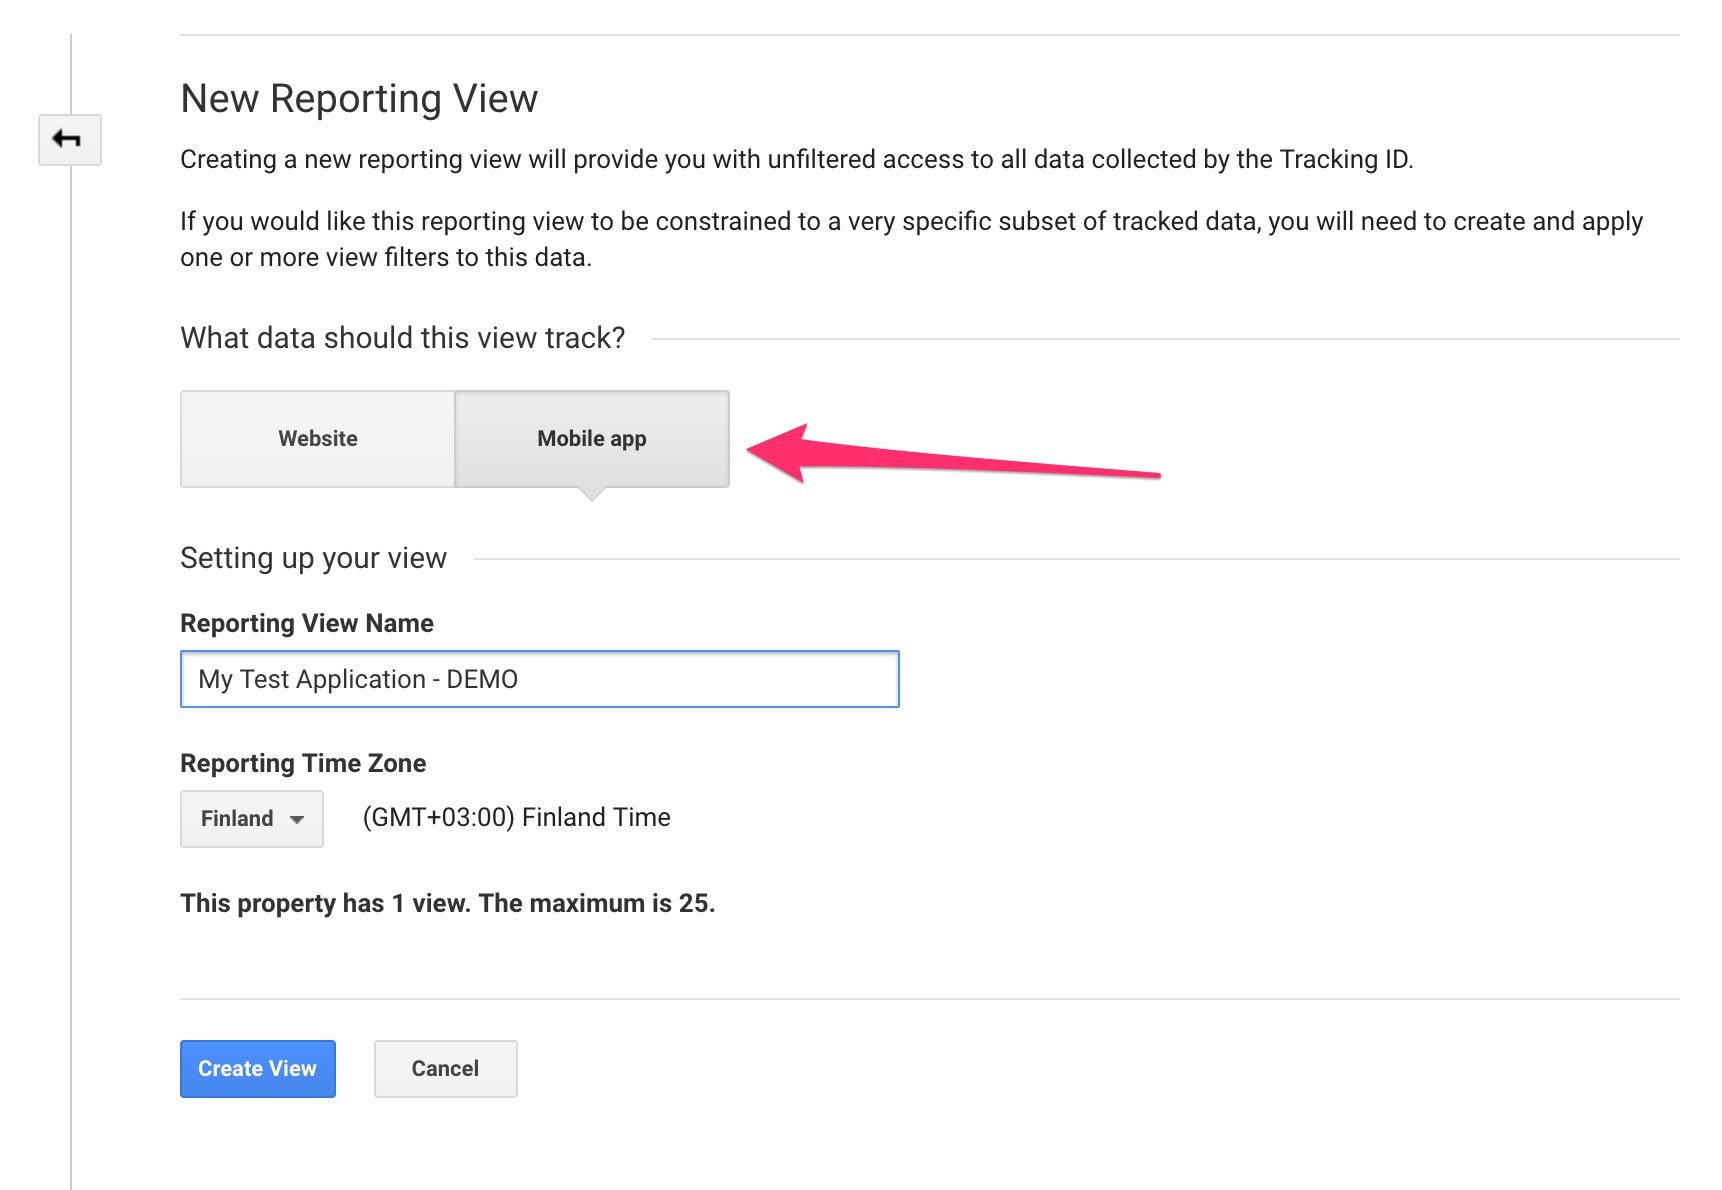
First, if you want to see the data in an actual Google Analytics report, you’ll need to create a Mobile View in Google Analytics. It’s not very intuitive, but you need to create a new Web Property, and then a new Mobile App View under that Property.
NOTE! This is not necessary to test the integration. We can inspect the requests sent by the application to verify they are being sent to Google Analytics, even if the target property hasn’t been configured to accept mobile app data.
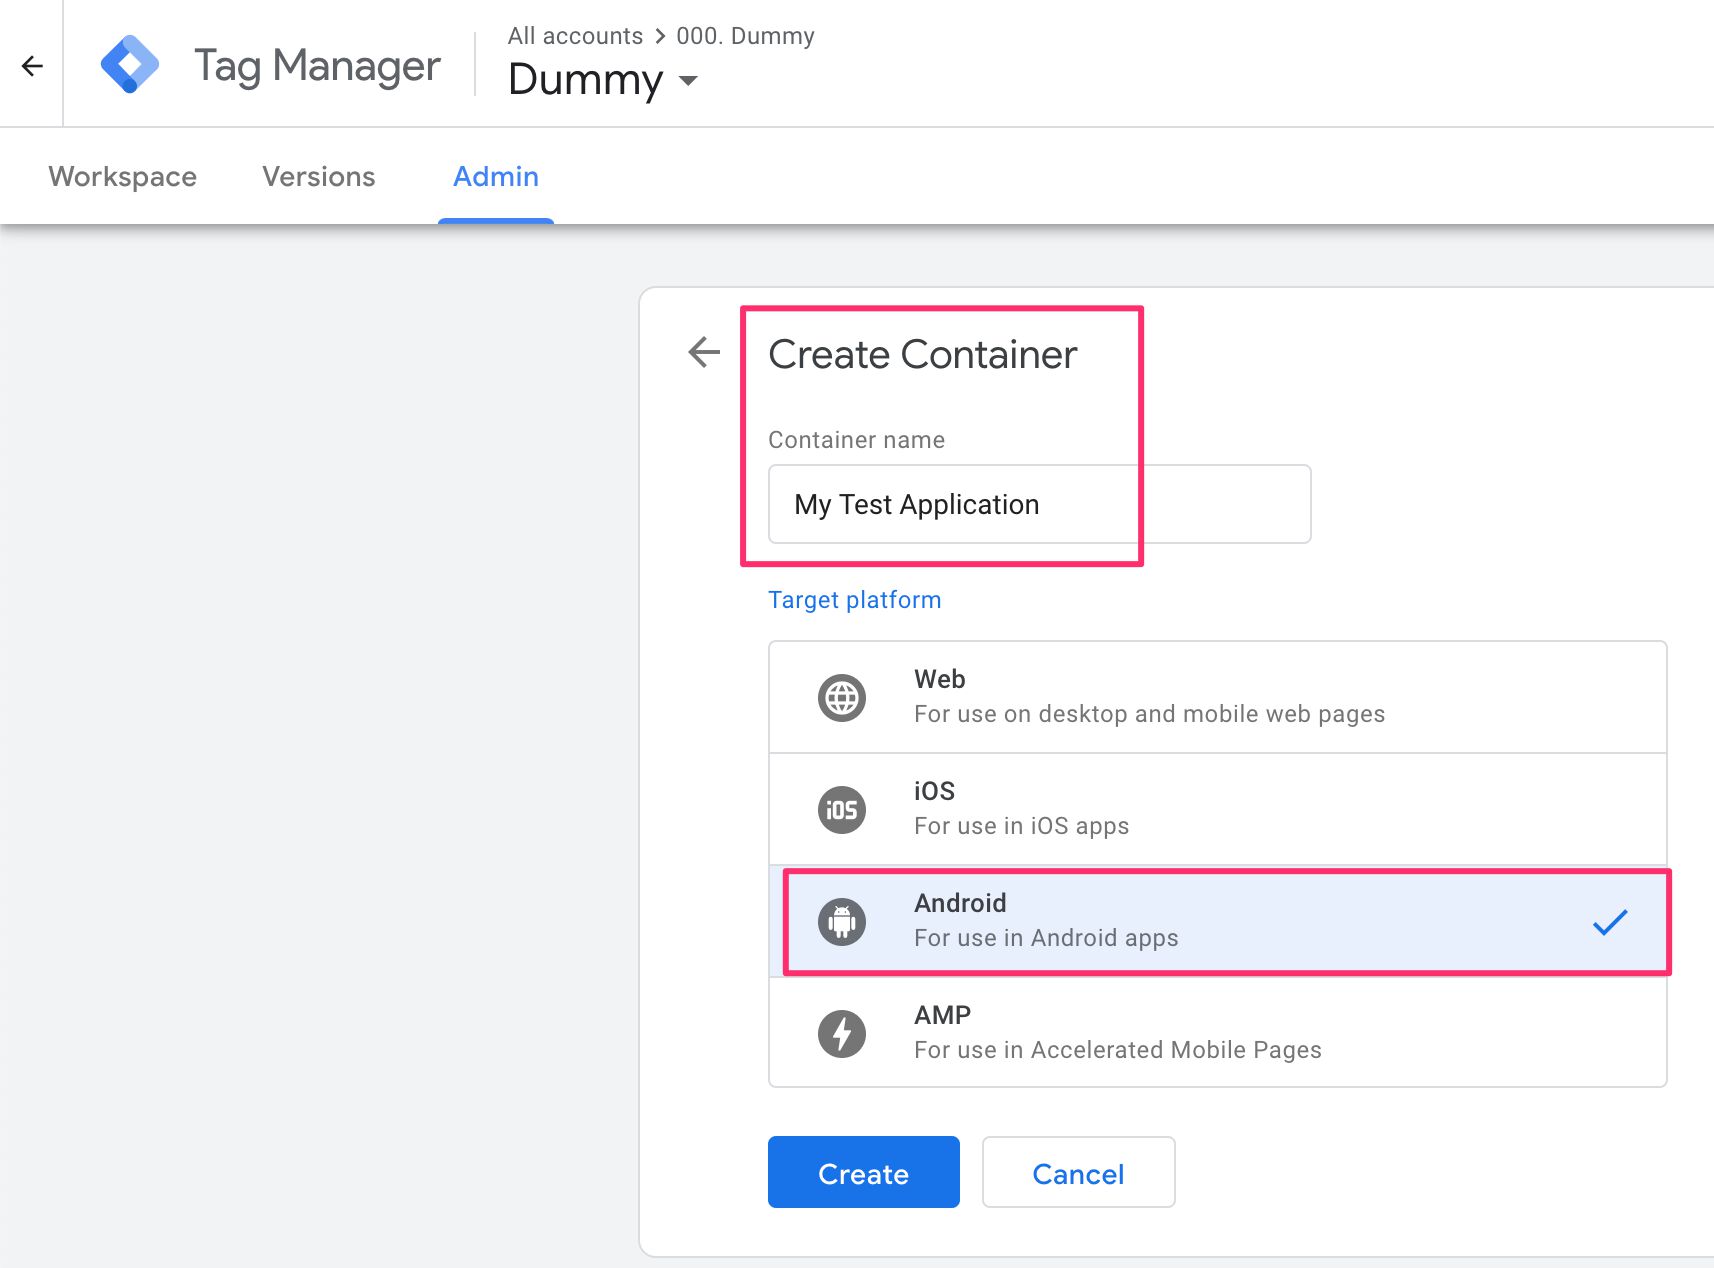
Go to https://tagmanager.google.com/ and create a new Container under an account of your choosing (if necessary, create the GTM account first).
Choose Android as the container type, give the container a name, and then click to Create it.
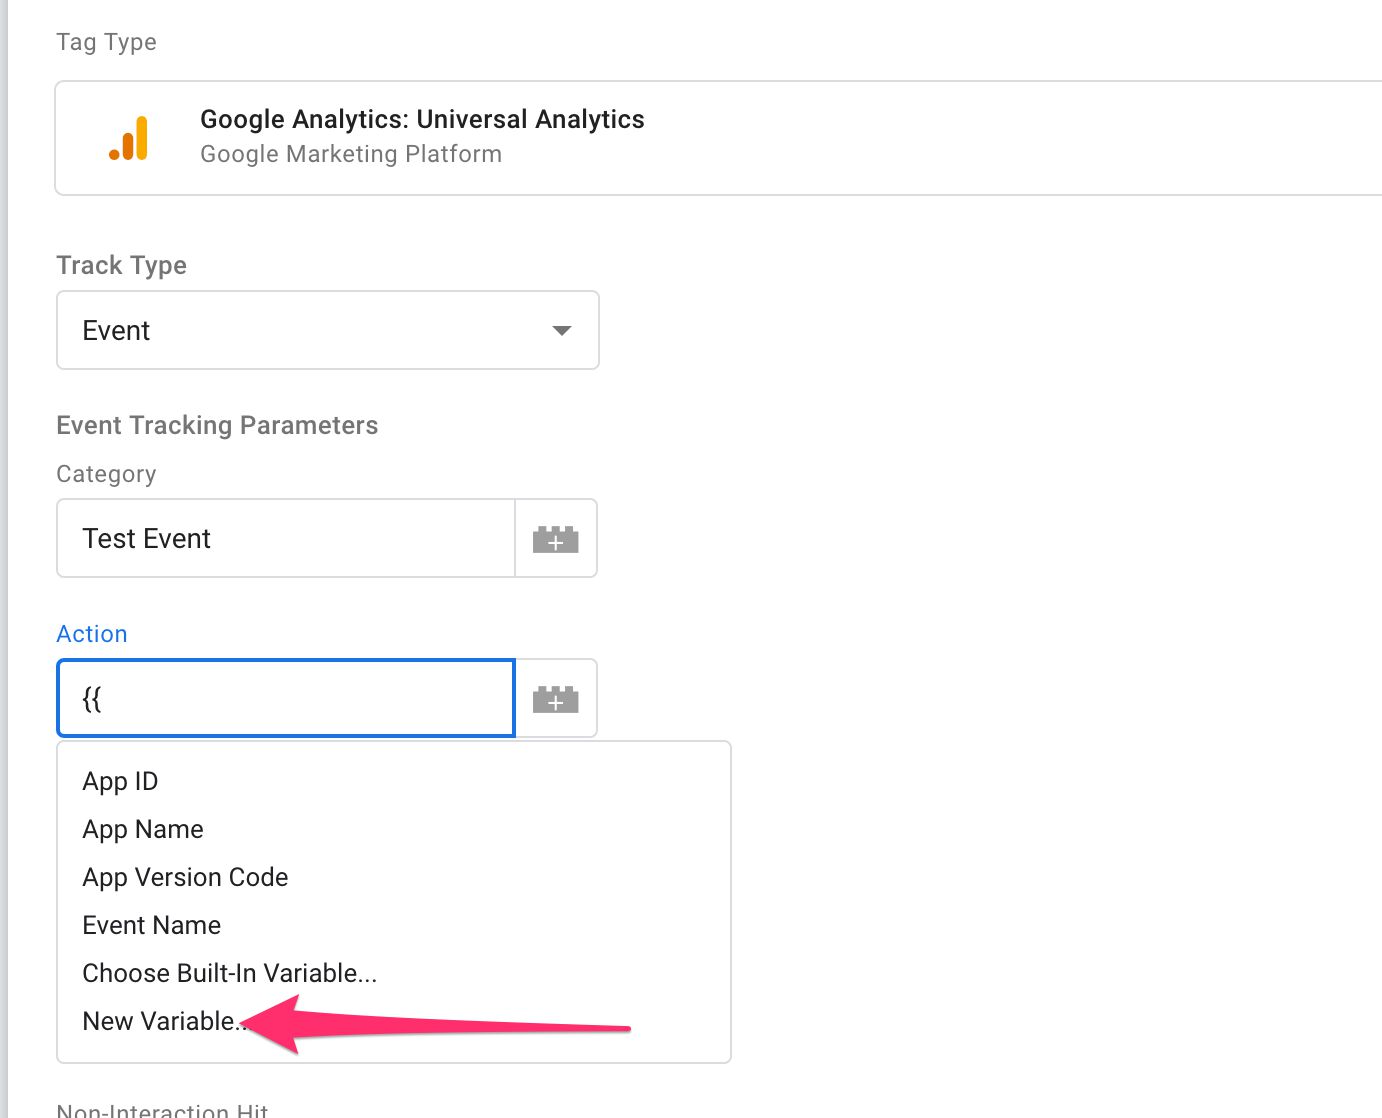
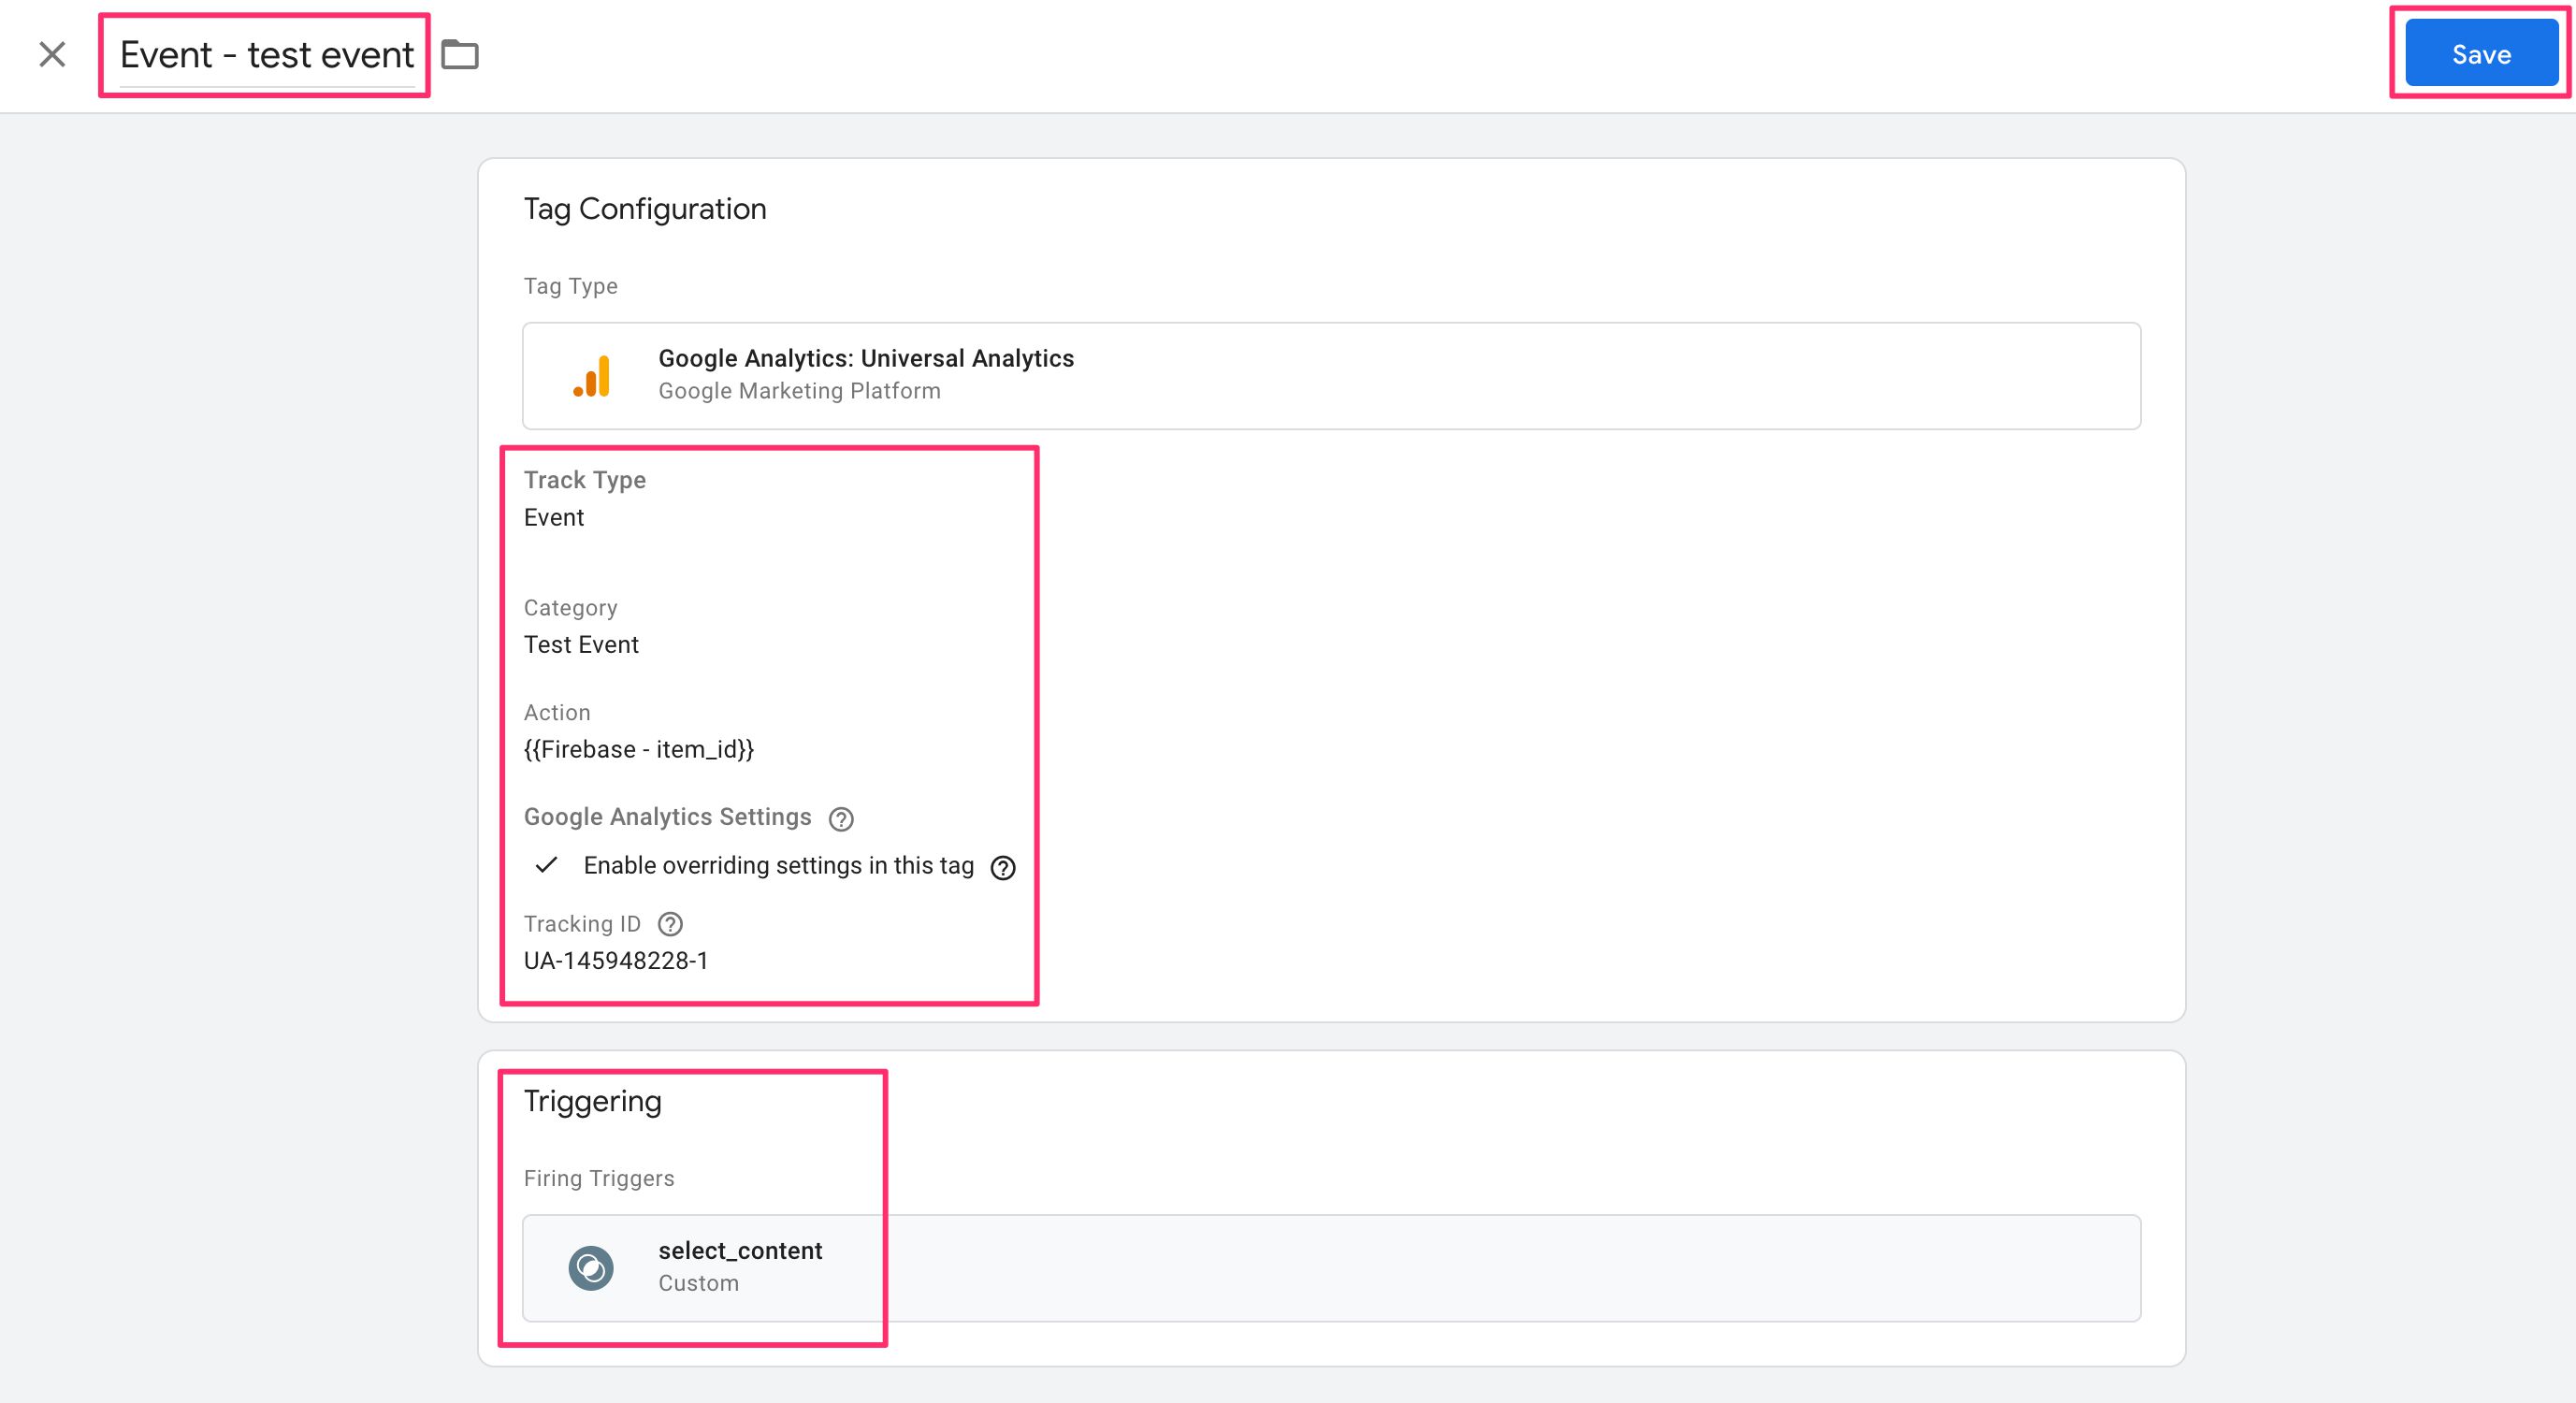
Next, create a new Tag and choose Google Analytics: Universal Analytics as the type. Select Event as the Track Type, and add something like Test Event as the Event Category.
In Event Action, type {{ in the field and click New Variable… from the drop-down menu.
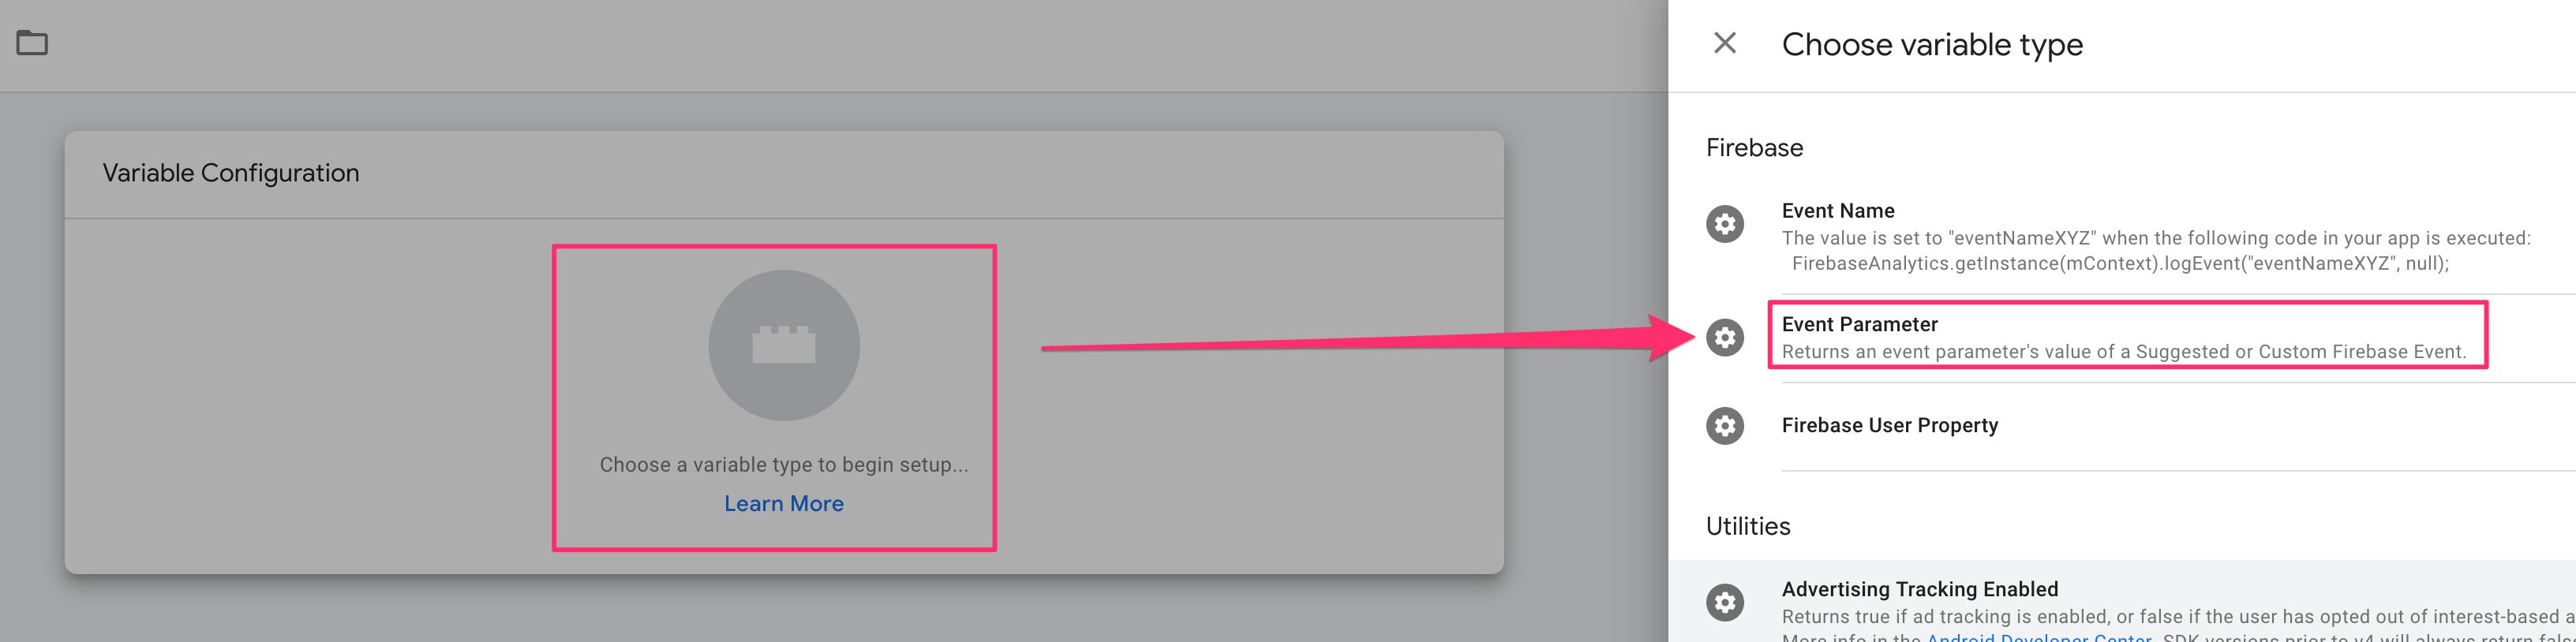
Choose Event Parameter as the variable type.
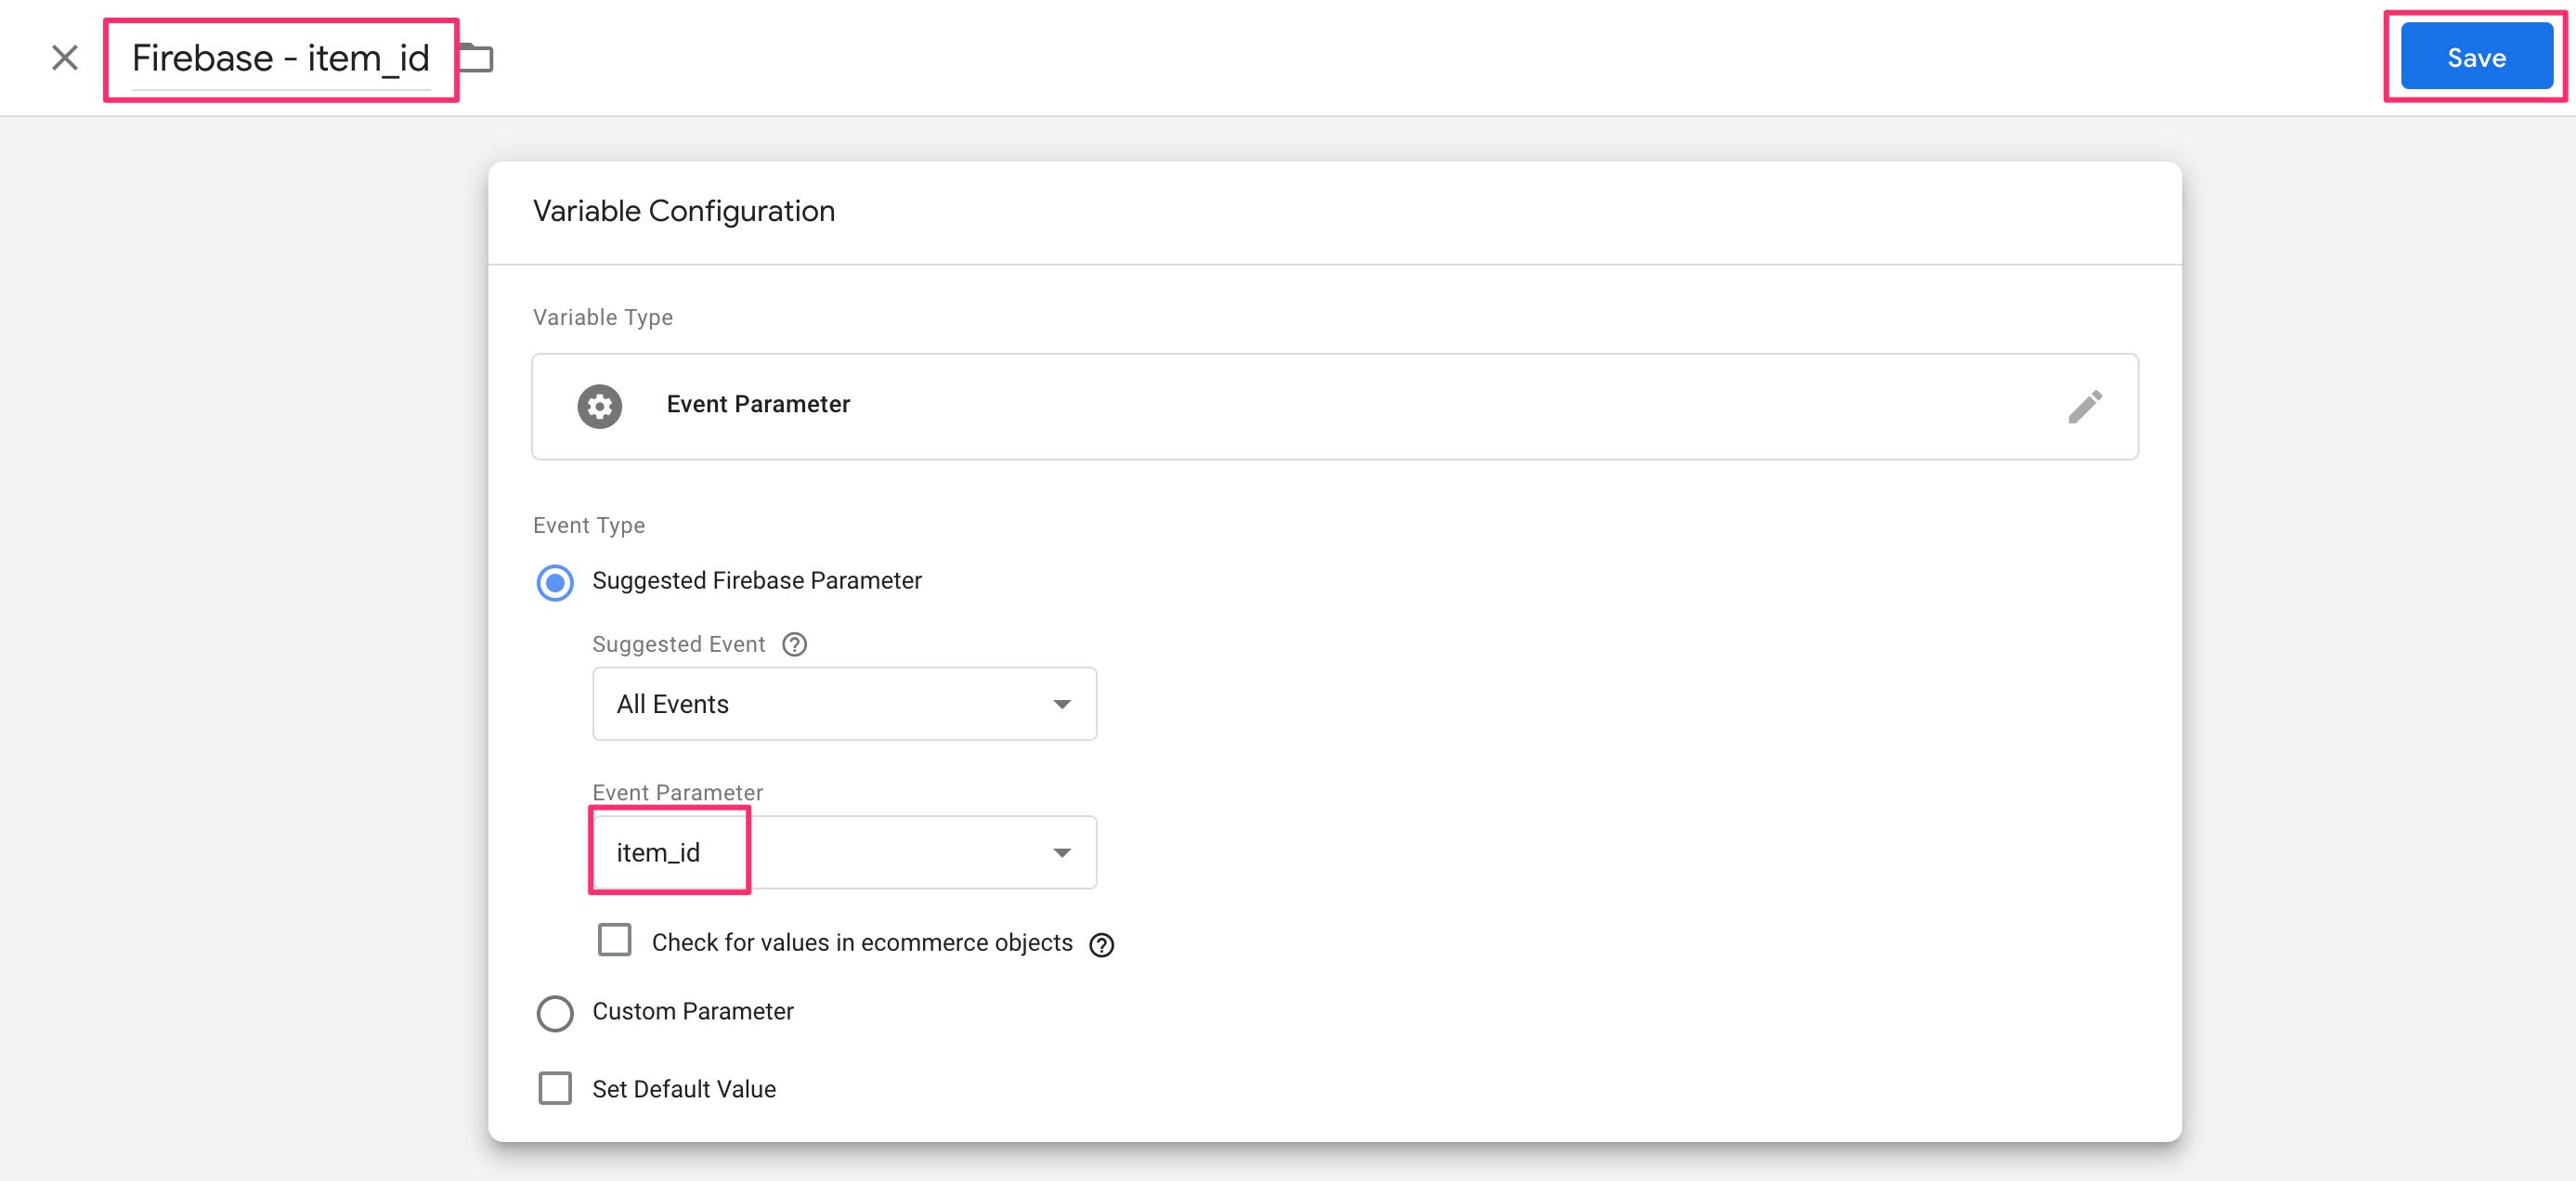
From the Event Parameter drop-down, find item_id. Name the variable e.g. Firebase - item_id, and click to Save it.
Back in the tag, check Enable overriding settings in this tag, and type the UA-XXXXXX-Y number for your GA property in the Tracking ID field. If you only care about testing, you can type a dummy ID like UA-12345-1 here.
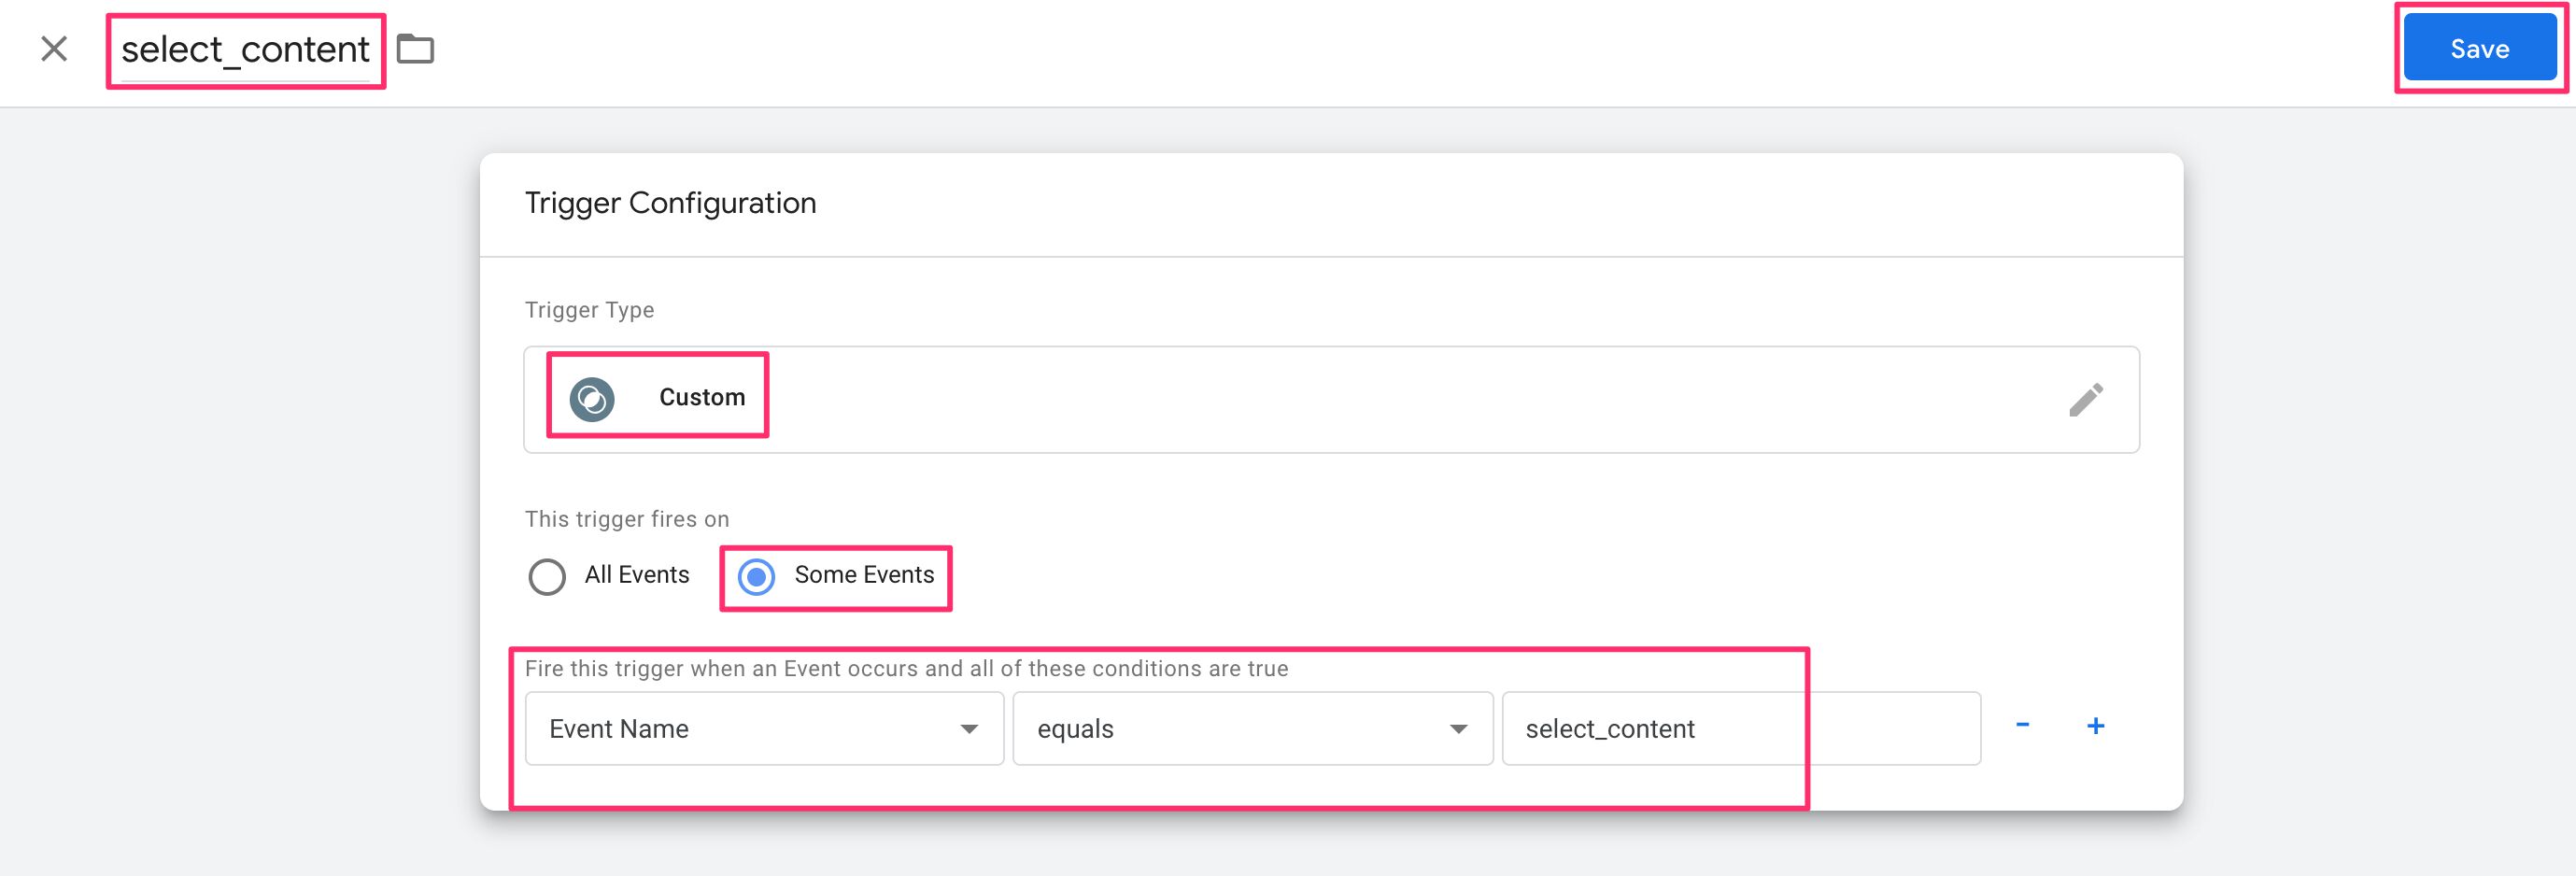
Now, click the Triggering box to add a new trigger to the tag. In the flyout, click the blue plus icon to create a new trigger.

Choose Custom as the trigger type, check Some Events and modify the trigger to check if Event Name equals select_content. Give the trigger a name and save it.
Once back in the tag editor, give your tag a name. It should now look like this:
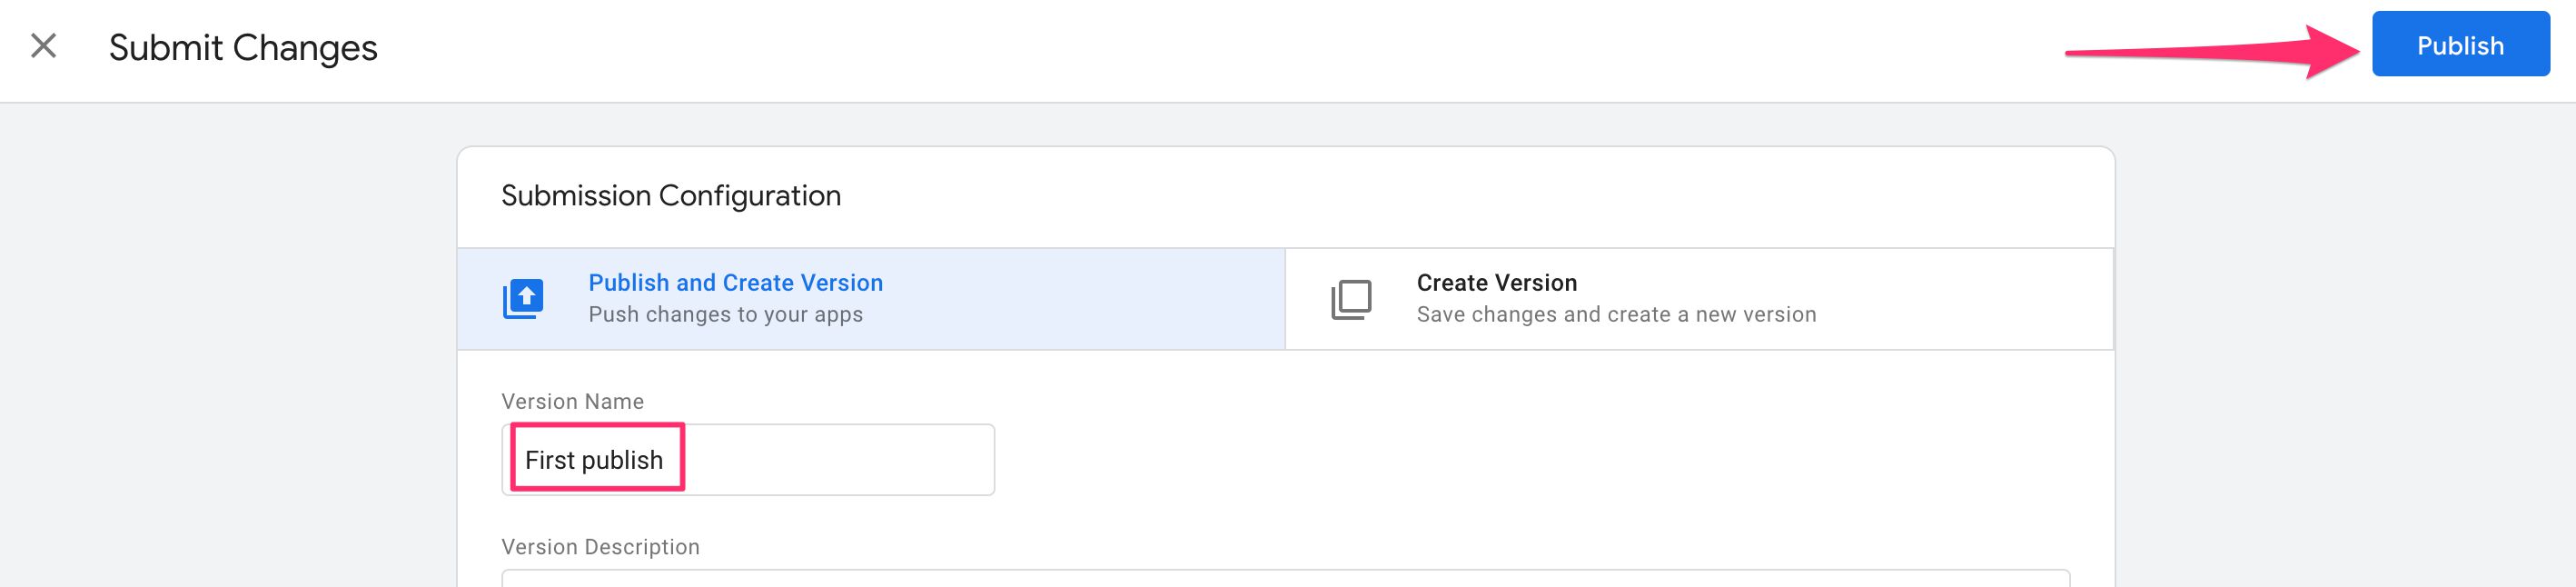
If happy, save the tag. Next thing to do is to Publish the container, so click the big blue SUBMIT button in the top right corner of the Google Tag Manager user interface.
Give the version a name and click Publish.
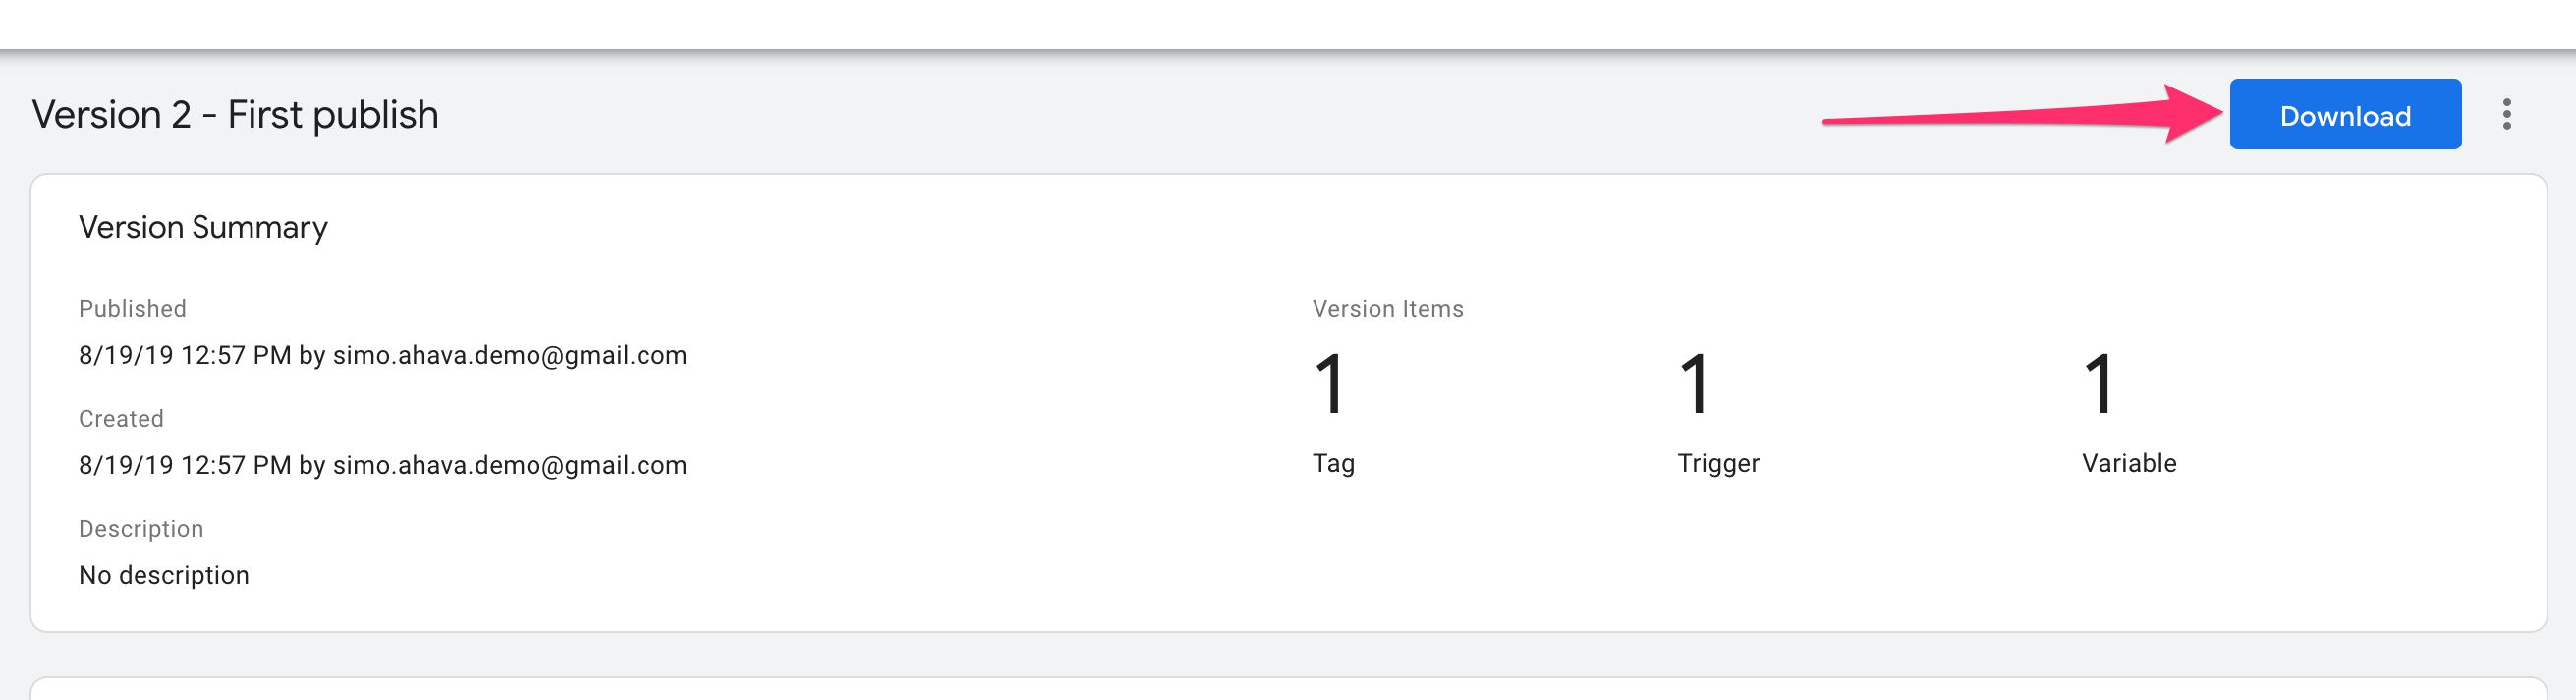
Once done, a summary screen should open, and you’ll see a big blue Download button in the top right corner. Click that to download the container JSON.
Note! Even though the GTM container is loaded over the network (as with web containers), the application loads with this downloaded container first, to account for scenarios where the user fails to download a fresh container e.g. due to network lag. Thus it’s a good idea to always have the latest Google Tag Manager container version also included in the app assets.
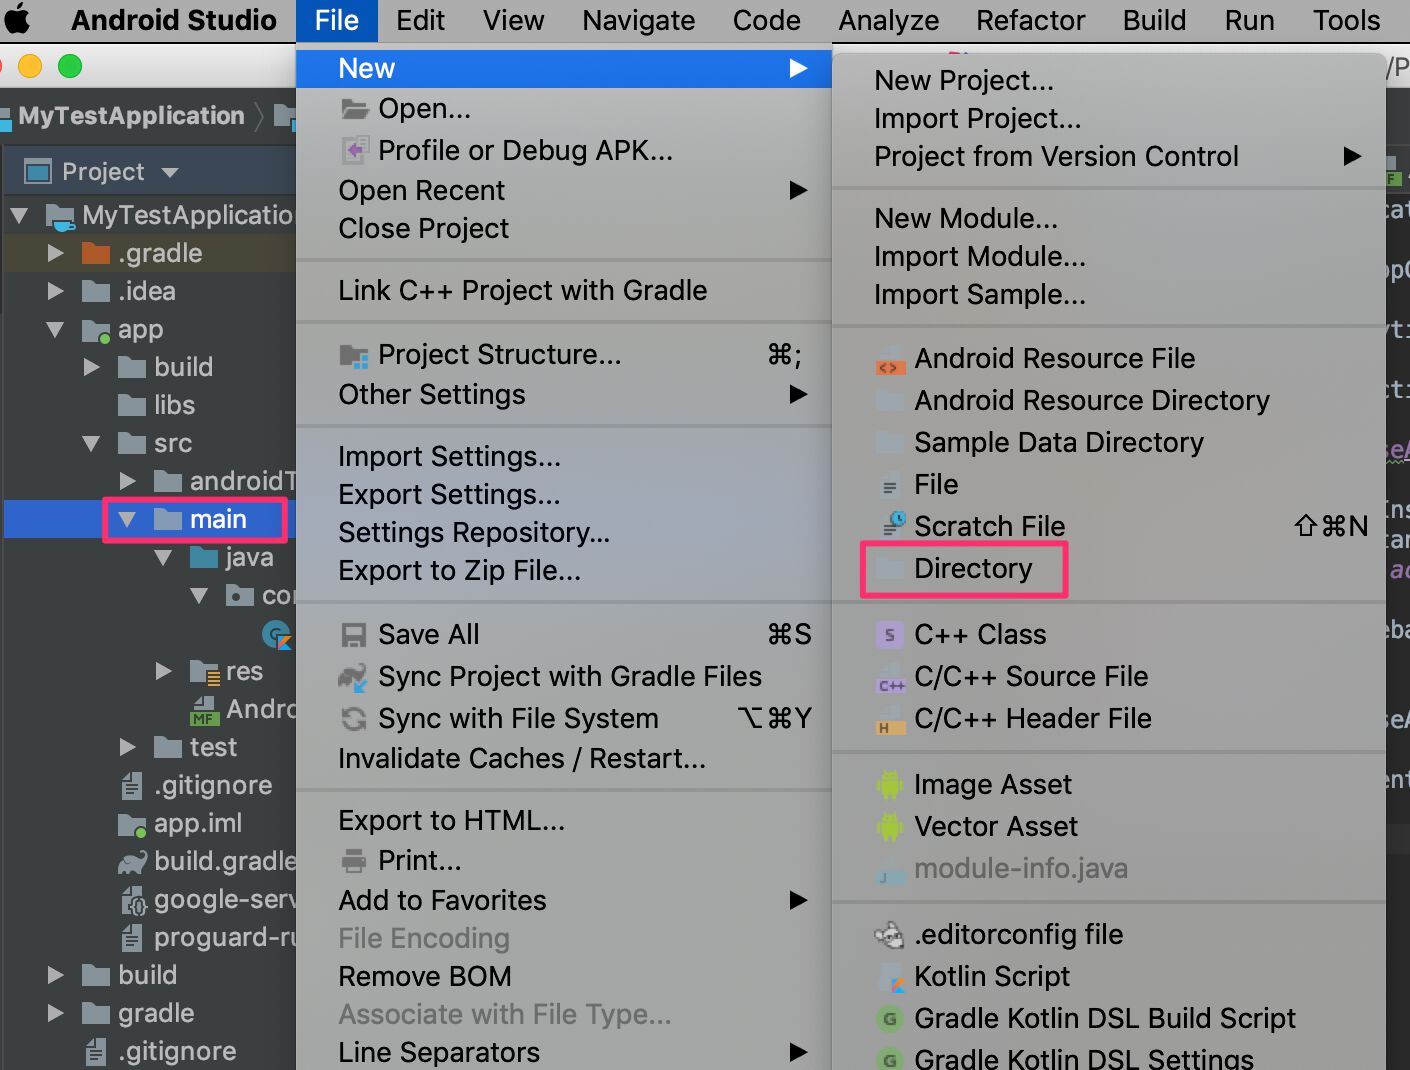
With the container JSON downloaded, you’ll now need to create the directory in Android Studio. Expand the /app/src/main/ directory in the Project view, and with main selected, click File -> New -> Directory from the Android Studio menu bar.
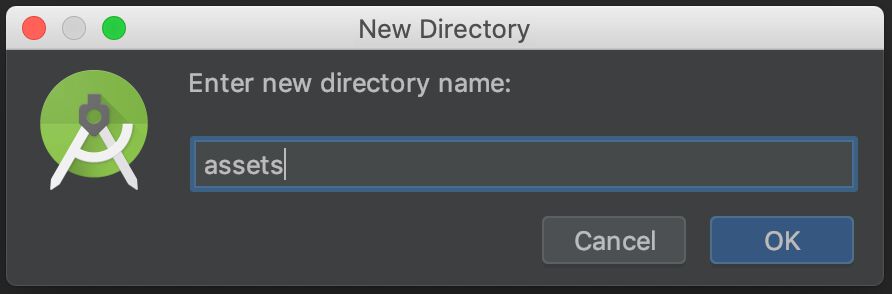
Name the directory assets and click OK.
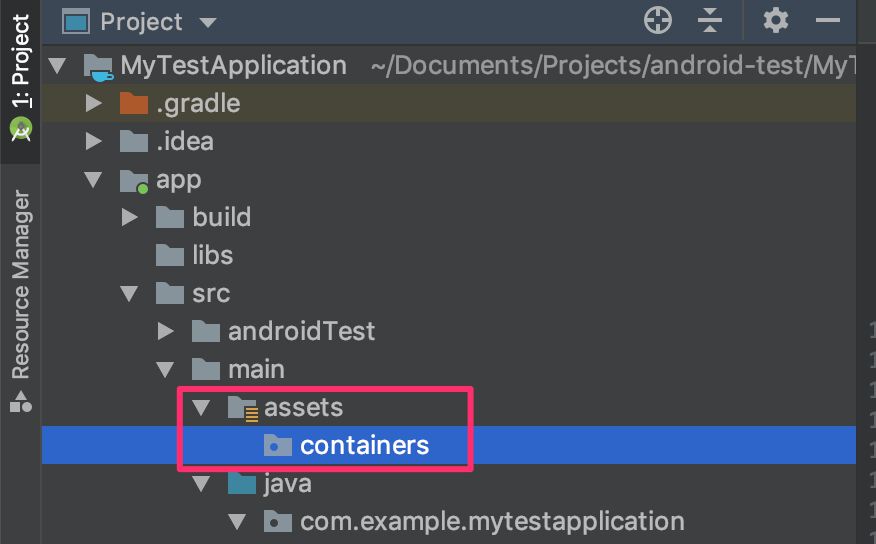
Next, select this new assets directory, and repeat the process of creating a new directory. This time, name the directory containers. You should end up with a tree structure that looks like this.
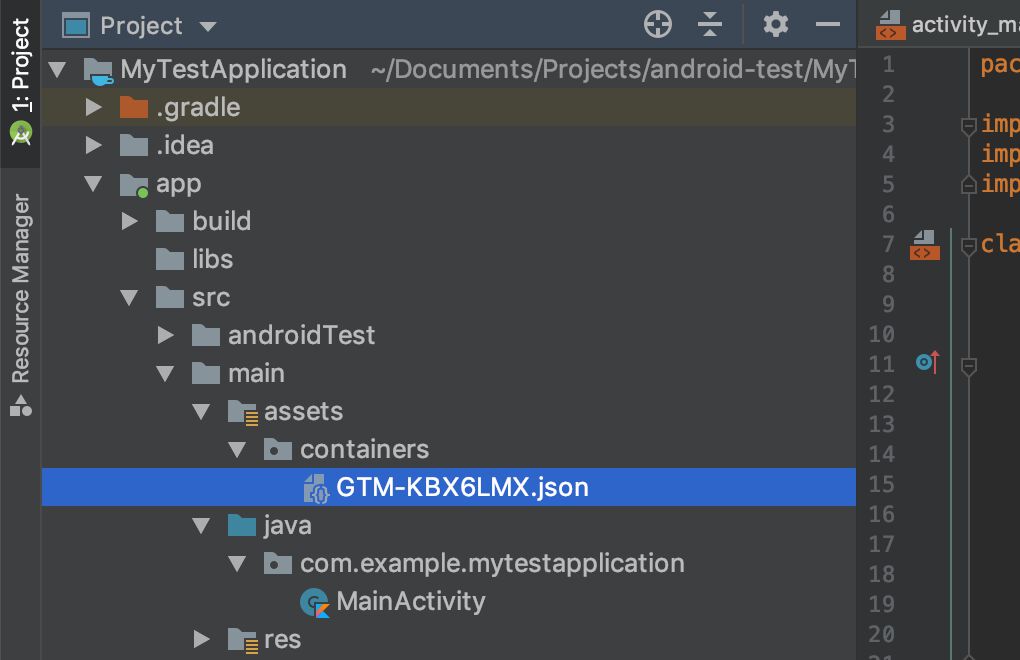
Finally, drag the container JSON file from your downloads into this new containers directory, and click OK to approve the move. You should see the file in its correct place.
Note! It’s important that the container JSON be located in this exact directory!
Now, let’s test it works!
Step 7: Debug Google Tag Manager and Google Analytics
First thing you’ll need to do is enable some extra logging in Android Studio. With the Terminal tab open once more, type the following commands pressing Enter after each one. Note that you need to have your (virtual) device running.
adb shell setprop log.tag.GoogleTagManager VERBOSE
adb shell setprop log.tag.GAv4 DEBUG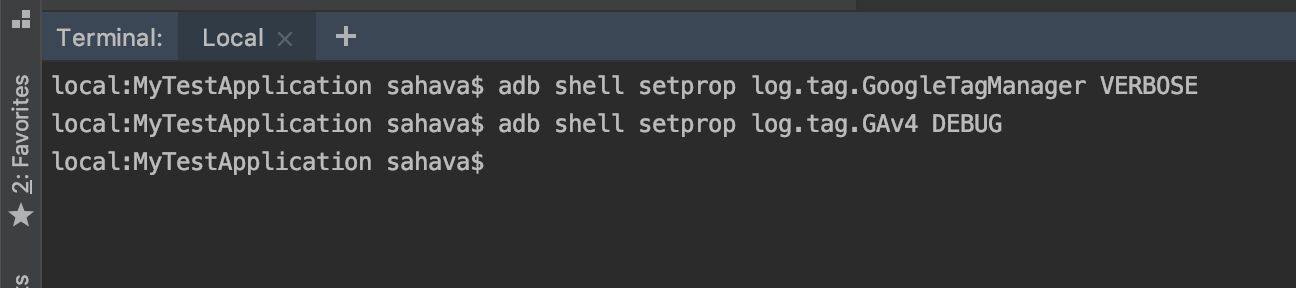
Next, click to open the LogCat tab, and re-run your application. Once the app is running, filter the LogCat view for the string GoogleTagManager. You should see logging that your container was loaded, and then a bunch of logging about processing Firebase events and such.
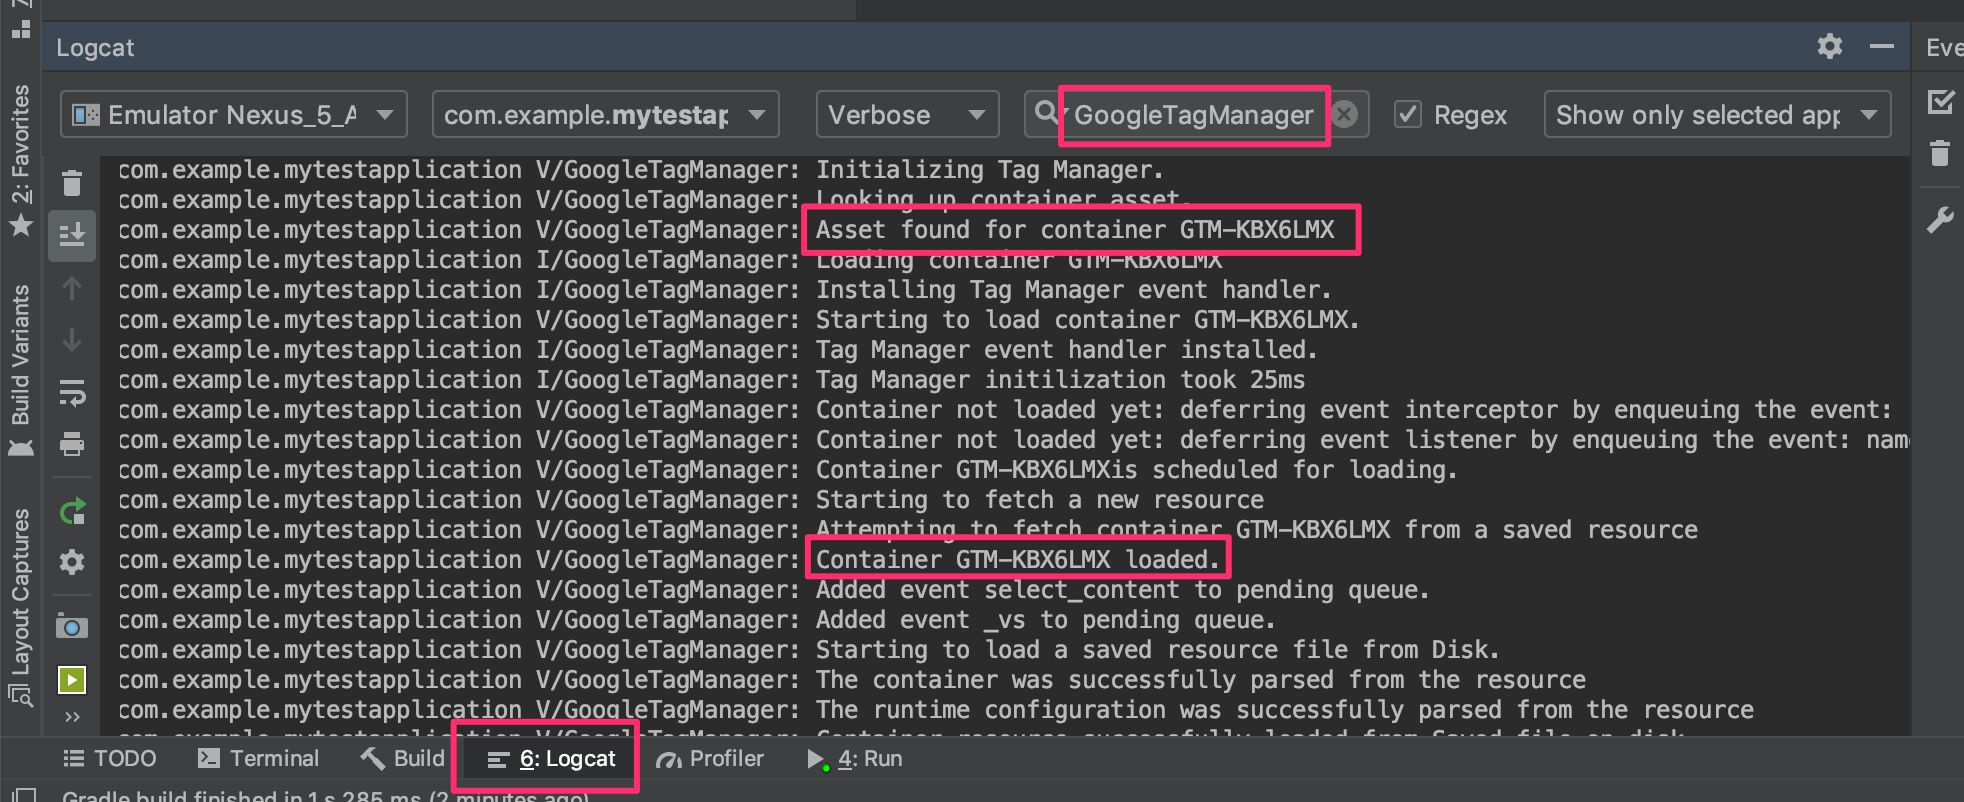
Then, filter the LogCat for the string D/GAv4. You should see a line with Hit delivery requested with a bunch of parameters matching those you configured in the Universal Analytics tag of Google Tag Manager, and then another line with Hit sent to the AnalyticsService for delivery.

If you see all that, then everything works, woohoo! If you’re sending the data to an actual Google Analytics property where you have a Mobile App view running, you should see your event in the Real Time report.

There you have it! You’ve built an Android application, which collects data to Google Analytics for Firebase, runs a Google Tag Manager container, and duplicates the Firebase event into a Universal Analytics endpoint.
Summary
This guide should serve as a very basic introduction to Android development. I wrote it because I think everyone even remotely interested in application analytics should understand the mechanisms of how Android application development works.
When you integrate Google Analytics into your Firebase Project, a Google Analytics: App + Web is automatically created in the Google Analytics user interface. Thus you can leverage the new reports immediately, and if you end up having a website to complement the app, you could add website data to the property as a Web stream, too.
Google Tag Manager for apps is quite far removed from its web counterpart. You have far less to work with due to how application’s restrict the type of ad hoc code that can be run within.
Firebase is also still a work-in-progress, and it still has many limitations that need to be sorted out before it’s feasible to even think about replacing Universal Analytics with it.
However, I hope you were bitten by the Android bug. It’s a really fun platform to develop against, and Kotlin is a relatively simple language to learn, especially if you come from a JavaScript background. Here are some resources for further education:
I hope you enjoyed the guide! Let me know in the comments if something was left unclear.
